This activity sends an e-mail to one or more people.
- Drag it from the Toolbox Pane and drop it in the Designer Pane.
To configure this activity
Select the activity in the Designer Pane to configure the following property boxes.
-
Activity Name
Once added to a workflow definition, the default name of an activity can be changed. Providing a custom name for an activity helps you remember the role it plays.
To name an activity
- Add an activity to your workflow by dragging it from the Toolbox Pane and dropping it in the Designer Pane.
- Select the activity in the Designer Pane.
- Under Activity Name in the Properties Pane, replace the default name.

Note: Activity names cannot be the same as any other activity name in the workflow, they cannot be the same as the workflow's name, they must be less than 100 characters, they must contain at least one alphanumeric character, they cannot be "Name," and they cannot be the same as the activity's runtime type (which is usually only an issue with custom activities).
-
Activity Description
Use the Activity Description to provide descriptive text to help you remember the role that the activity plays in the workflow. All activities contain a default description that you can modify while constructing your workflow.
To modify an activity description
- Add an activity to your workflow by dragging it from the Toolbox Pane and dropping it in the Designer Pane.
- Select the activity in the Designer Pane.
- Under
 Activity Description in the Properties Pane, replace the default description.
-
Configure Email
The Email property box configures an e-mail for the Email activity.
Note: You must have a connection profile specified for your workflow if you want to add an attachment to your e-mail. More information.
To configure the Email property box
- Add the Email activity to your workflow definition by dragging it from the Toolbox Pane and dropping it in the Designer Pane.
- Select the activity in the Designer Pane.
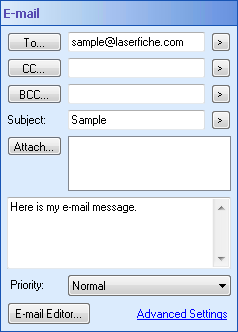
- Under Email in the Properties Pane, you can define recipients, a subject, a message, and a priority level.
- Optional: For additional e-mail options, click Email Editor to open the Email Configuration dialog box. Or, click Advanced Settings to open the Advanced Email Settings dialog box.
- Specify the e-mail's recipients by manually entering e-mail addresses, by clicking the token button (right arrow)
 to use tokens, or by selecting To, CC, and/or BCC. Selecting any of these buttons opens the Find User dialog box which allows you to search for a user.
 - Click the high priority
 or low priority buttons
  to give your e-mail a priority level.
 - Type your message in the main text box. You can use HTML code to create hyperlinks, change the font, etc.
- Click Tokens to open the Tokens dialog box. In the Tokens dialog box, select and/or configure tokens to be added to the body of the e-mail. Click OK.
- Click Add Attachment to select an attachment with the New Attachment dialog box.
- Click Advanced to open and configure the Advanced Email Settings.
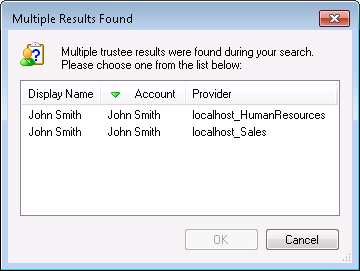
Note: If you type a trustee's name next to To, CC, or BCC, Workflow automatically searches your Trustee Directories for the trustee and the corresponding e-mail address. Your company may have two or more trustees (from different trustee directories) with the same name. For example, your company may have two John Smiths one in the Human Resources trustee directory and one in the Sales trustee directory. In this situation, when you type the trustee's name in the Email activity, the
 Multiple Results Found dialog box opens. In this dialog box, choose the trustee you want to send the e-mail to and click OK.
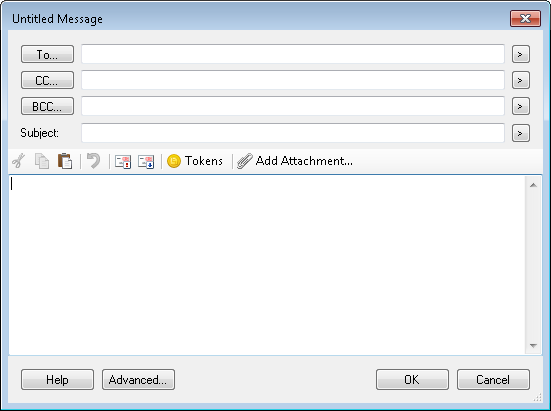
Using the Email Configuration dialog box
Note: The Email activity automatically finds users or groups that you have defined in the Trustee Directory Configuration dialog box. When you type the name of a configured user or group in the To, CC, or BCC fields and click OK, the name is replaced with the user or group's e-mail address.
Example: You can create a hyperlink that opens the Laserfiche website when the word "Laserfiche" is clicked. To create a hyperlink, use the following HTML code: <a href="http://www.laserfiche.com">Laserfiche</a>
Note: If you insert a token in an e-mail that you want to be interpreted as HTML, you must apply the HTML formatting tag in the token formatting section of the Token Dialog or Token Editor. If you do not apply the HTML tag, the token will be interpreted as plain text. If the token you want to be interpreted as HTML includes other tokens that have HTML code (<, >, &, etc.) that you do not want interpreted as HTML, you will need to escape the HTML code in those tokens by applying the HTML formatting tag. For example, you have a token, %(CompanyWebsite#"HTML"#), whose value is <a href="http://www.laserfiche.com">%(Name)</a>. The Name token may be replaced by text containing HTML characters (e.g., <Laserfiche>), and because the HTML formatting tag is applied to the root token %(CompanyWebsite#"HTML"'#"), those HTML characters would be interpreted as HTML in the e-mail. Because you do not want the Name token interpreted as HTML, apply the HTML formatting tag to the %(Name) token to toggle off HTML formatting and have the %(CompanyWebsite#"HTML"'#) token be replaced by the exact content of the Name token which is then hyper linked in the e-mail (e.g., <Laserfiche>).
Note: Some e-mail clients do not support displaying HTML, and some e-mail clients may have the HTML option disabled for security reasons.
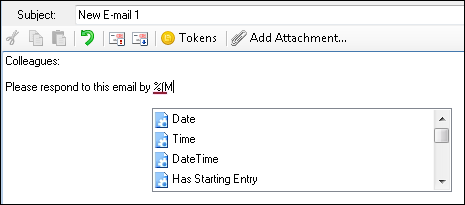
Tip: Start typing a token with the %(TokenName) format in the body of an e-mail, and a list of tokens appears as you type. Show me what this looks like.
 -
Find User
The Find User property box allows you to select the recipients for the Email activity. Learn more about configuring trustee providers.
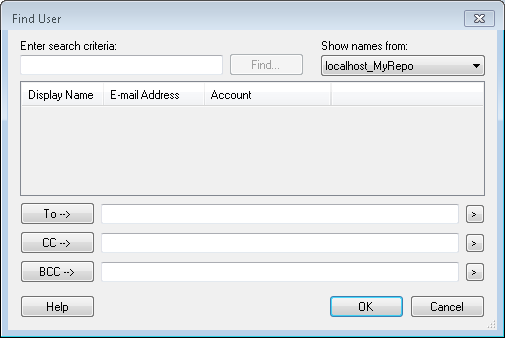
To configure the Find User property box
- Using the Show names from drop-down menu in the top right corner, select the source of the users or groups you want to e-mail.
- To find a user or group, perform a search in the top left corner.
- Find the user or group's name in the search results, and select it.
- Click To, CC, or BCC to assign the selected recipient to the e-mail. Click the Token button (right arrow)
 to use tokens.
 - Click OK.
Note: Alternatively, the Email activity will automatically find users or groups that you have defined in the Trustee Directory Configuration dialog box. When you type the name of a configured user or group in the To, CC, or BCC fields and click OK, the name will be replaced with the user or group's e-mail address.
-
New Attachment
The New Attachment property box allows you to add an attachment to an e-mail sent with the Email activity.
To use the New Attachment dialog box
- Add the Email activity to your workflow definition by dragging it from the Toolbox Pane and dropping it in the Designer Pane.
- Select the activity in the Designer Pane.
- Under Email in the Properties Pane, select Attach.
- In the New Attachment property box select the entry you want to attach.
- Click OK to attach the entry.

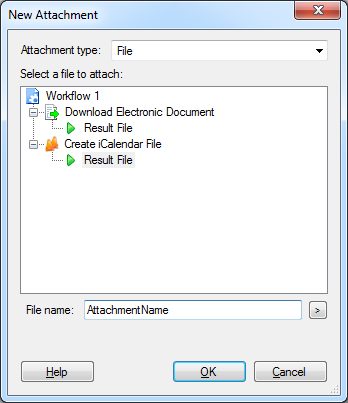
Next to Attachment type, choose between attaching a Laserfiche entry in the workflow or the resulting file from a Create iCalendar File activity or Download Electronic Document activity.
To attach the document that started the workflow, select Starting Entry.
To attach a document returned by another Workflow activity, expand the activity, and then select the document.
Example: To select a document returned by a Find Entry activity, expand Find Entry and then select Output Entry.
Specify whether the attachment is a document or a folder by selecting Document or Folder.
Note: If you specify that the attachment is a document, and it is really a folder, Workflow will apply the Folder Attachment Properties. Conversely, if you specify that the attachment is a folder, and it is really a document, Workflow will apply the Document Attachment Properties. In both cases, a warning will be filed in the Messages tab of the workflow's instance details, and the e-mail body will include a note saying that the attachment does not match the expected entry type.
Optional: Click Properties next to Document or Folder to open the Document Attachment Properties or the Folder Attachment Properties.
Expand the appropriate Create iCalendar File or Download Electronic Document activity and then select the Result File.
Specify a file name for the attachment.
-
Properties for New Attachment (Document Attachment)
The Document Properties for New Attachment dialog box configures advanced options for an attachment for the Email activity.
Using the Properties for New Attachment dialog box
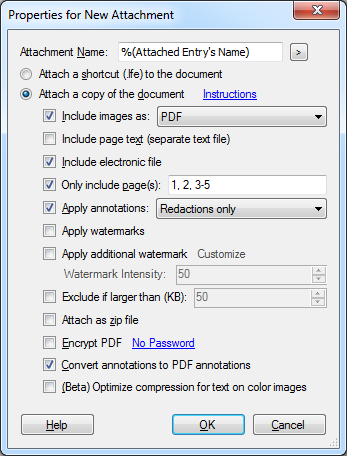
- In the Attachment Name dialog box, the default token, %(Attached Entry's Name), is replaced with the name of the entry in the repository. To use another name, manually enter a name, or click the Token button (right arrow)
 to use tokens.
 - Specify whether you want to attach a shortcut or a copy of the document.
- To attach a shortcut, select Attach a shortcut (.lfe) to the document. This option attaches the shortcut as an .lfe file, which allows the recipient to launch the Laserfiche Client and jump directly to the document in the repository.
- To attach a copy of the document, select Attach a copy of the document.
- Optional: If you select Attach a copy of the document, you can configure
 additional settings. Click the Instructions link for more information on attaching documents.
 - Include images as: Specifies the format in which image pages are sent. Select a format from the drop-down menu. If you select PDF or either of the TIFF formats, the document are sent as a multi-page file; if you select JPEG or PNG, the document are sent as multiple individual files.
- Include page text: Includes the text of the imaged document as a single .txt file.
- Include electronic file: Includes the electronic file portion of an electronic document in its native format.
- Only include page(s): Specifies a list of pages or a page range to include in the attachment. Pages not included in the range will not be part of the attachment. This option has no effect on electronic documents. More information.
- Apply annotations: Specifies what annotations are included in the attachment. You can choose Redactions only, All other annotations, or All annotations from the drop-down menu. This option has no effect on electronic documents.
- Exclude if larger than: Specifies the maximum size for an attached document. Use the scroll box (up-and-down arrows)
 to select a size. If the document is included in a zip file, the zip file's size is used. If you chose to attach a multi-page document as a JPEG or PNG, the combined size of the multiple individual files is used. Documents over the size limit are not attached.
 - Attach as zip file: Collects all of the files that make up the document (pages, text, and/or electronic files), and attaches them as a single zip file.
- Encrypt PDF: Sets a password for imaged documents attached as PDFs. When you select this option, you will be prompted to enter and then confirm a password to encrypt the PDF.
- Click OK.
Note: The Laserfiche shortcut format, .lfe, contains a pointer to a particular document or folder in Laserfiche. When a user clicks the .lfe shortcut, the shortcut attempts to open the Laserfiche Client and take them to the specified document or folder. This is the recommended way to share documents with other users who have access to your repository and have the Laserfiche Client installed, because it respects auditing and security settings and allows the user to see all elements of the document, including metadata. However, this format should not be used to share documents with people who do not have access to the repository, as it will not work for them.
Note: If your attachment is larger than 3 MB, you may need to apply this Microsoft Hotfix.
Example: Specify "1, 3, 5-7" to include pages 1, 3, 5, 6, and 7. You can also specify a page range that skips pages. For instance, specifying "2@2" includes all even-numbered pages, whereas specifying "2@3" includes every third page starting with page two.
Note: Included annotations are permanently 'burned' onto the copy of the image or text and cannot be removed.
Note: This setting can override the general attachment size limit in Advanced Email Settings.
Note: This option does not affect PDF electronic documents.
- In the Attachment Name dialog box, the default token, %(Attached Entry's Name), is replaced with the name of the entry in the repository. To use another name, manually enter a name, or click the Token button (right arrow)
-
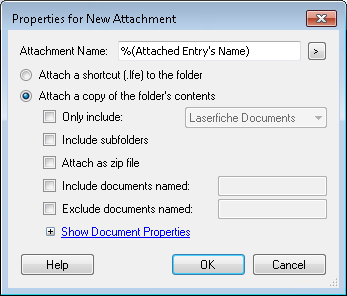
Properties for New Attachment (Folder Attachment)
The Folder Attachment Properties dialog box configures advanced options for an attachment for the Email activity.
Using the Folder Attachment Properties dialog box for folders
- In the Attachment Name box, the default token, %(Attached Entry's Name), is replaced with the name of the entry in the repository. To use another name, manually enter a name, or click the Token button (right arrow)
 to use tokens.
 - Specify whether you want to attach a shortcut or a copy of the folder.
- To attach a shortcut, select Attach a shortcut (.lfe) to the folder. This option attaches the shortcut as an .lfe file, which allows the recipient to launch the Laserfiche Client and jump directly to the folder in the repository.
- To attach a copy of the folder's contents, select Attach a copy of the folder's contents.
- Optional: If you chose to Attach a copy of the folder's contents, you can configure attachment settings.
- Only include: Specifies whether the attachment should only include Laserfiche documents or Electronic documents. Use the drop-down menu to choose a type. To include both, clear this option.
- Include subfolders: Includes subfolders and their contents in the attachment. The attachment includes the folder's contents, the subfolders and their contents, and folders within those folders, and so on until the end of the folder tree.
- Attach as zip file: Collects all the files that make up this attachment (all pages, text, and/or electronic files included in the folder's contents) and includes them in a single zip file, which are then attached.
- Include documents named: Limits the attachment to only include documents with a certain name. Use * to include more documents. Use semi-colons to list a variety of documents to include.
- Exclude documents named: Limits the attachment to exclude documents with a certain name. Use * to exclude more documents. Use semi-colons to list a variety of documents to exclude.
- Click Show Document Properties to view and configure the Document Attachments Properties dialog box for documents contained within the specified folder.
- Click OK.
Note: If you are attaching the folder as a shortcut or zip file, the name in the Attachment Name box becomes the name of the shortcut or zip file. If you are attaching the folder as a folder, the Attachment Name box renames each document attachment with the specified name. Therefore, we recommend to leave the name set to the default token if you are not attaching the folder as a shortcut or zip.
Note: The Laserfiche shortcut format, .lfe, contains a pointer to a particular document or folder in Laserfiche. When a user clicks the .lfe shortcut, the shortcut attempts to open the Laserfiche Client and take them to the specified document or folder. This is the recommended way to share documents with other users who have access to your repository and have the Laserfiche Client installed, because it respects auditing and security settings and allows the user to see all elements of the document, including metadata. However, this format should not be used to share documents with people who do not have access to the repository, as it will not work for them.
Note: If the folder contains many documents, we strongly recommend using this option.
Example: Select this option and type "Report" to include only documents named "Report", or type "*John*" to include only documents whose name contains the word "John." Alternatively, type "*Report*; *John*" to include documents with the word "Report" or documents with the word "John" in their names.
Example: Select this option and type "Agenda" to exclude documents named "Agenda", or type "*Sally*" to exclude documents whose name contains the word "Sally." Alternatively, type "*Agenda*; *Sally*" to exclude documents whose names contain "Agenda" or "Sally."
Note: If Include documents named and Exclude documents named refer to the same documents, then the documents is excluded.
Example: If you include documents named like "*Expense*" and exclude documents named like "*Report*", then documents named "Expense Report" are excluded.
- In the Attachment Name box, the default token, %(Attached Entry's Name), is replaced with the name of the entry in the repository. To use another name, manually enter a name, or click the Token button (right arrow)
- Advanced Settings


