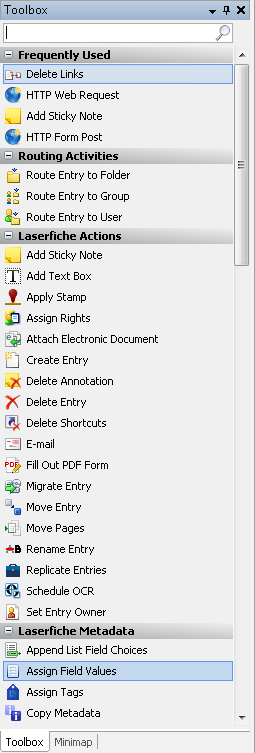
Toolbox Pane
There are several ways to work with this pane:
-
To open/close this pane
- Select the
 button from the toolbar or under View in the main menu. Alternatively, use the keyboard shortcut CTRL+3.
- Select the
-
To add an activity to a workflow definition
- Drag an activity from the Toolbox Pane and drop it in the Designer Pane, or right-click an activity and select Add to Workflow. Alternatively, double-click an activity.
-
To search for an activity in the Toolbox Pane
- Type in an activity name or a keyword in the Search the activities text box at the top of the Toolbox Pane. The list of activities will automatically narrow down to match your search term as you type in the search box. Click the red X
 to clear your search.
 - Optional: You can change the keywords associated with an activity by right-clicking on an activity and selecting Edit Keywords. Alternatively, you can change an activity's keywords from the Add/Remove Toolbox Activities dialog box, accessed by right-clicking anywhere in the toolbox, pointing to Toolbox, and selecting Add/Remove Activities.
- To add a keyword for an activity, type a word in the text box at the top of the dialog box and click Add.
- To remove a keyword for an activity, select a keyword from the list and click Remove.
- To reset the keywords for an activity, select Reset. When you reset, any added keywords will be removed from the list and any deleted keywords will be restored.
- Optional: You can configure the toolbox search to only search by activity name and not by keyword. To disable searching by keyword, right-click anywhere in the toolbox and point to Toolbox. Select Options, and select Disable searching by activity keywords. Alternatively, you can access the Toolbox Options by selecting Tools from the main menu, clicking Options, and selecting the Toolbox node.
Example: Linda's co-workers often send her workflows they have built but that do not run correctly. She has a series of activities she adds to these workflows to help her troubleshoot, such as the Try-Catch, Rethrow, Track Tokens, and Deadline activities. To help her easily access these activities, she adds the keyword "troubleshoot" to each of these activities. When a co-worker sends her a workflow, Linda imports the workflow and types "troubleshoot" in the toolbox search box. The activities in the toolbox are immediately narrowed down to show only the activities Linda will need to pinpoint the workflow's problem.
- Type in an activity name or a keyword in the Search the activities text box at the top of the Toolbox Pane. The list of activities will automatically narrow down to match your search term as you type in the search box. Click the red X
- To organize this pane
- Expand or Collapse a Category:
- Click the category to collapse or expand it.
- Click the minus or plus button next to the category title to collapse or expand the category.
- Select a category, and press the left arrow on your keyboard to collapse a category and the right arrow to expand a category.
- Add a Category: Right-click a category and select Add a Category. Alternatively, right-click an activity, point to Toolbox, and select Add a Category. Type a name for your new category where the New Category text appears. Drag and drop activities to move them between categories.
- Delete a Category: Right-click a category, and select Delete a Category.
- Rename a Category: Right-click a category, and select Rename Category. Type a new name for your category.
- Move a Category: Right-click a category, and select Move Up or Move Down to move the category to a new position. Alternatively, drag and drop a category to a new position in the toolbox.
- Sort Categories Alphabetically: Right-click a category, and point to Toolbox. Select Sort Categories to automatically organize the categories alphabetically.
- Reset the Toolbox: Right-click a category or on an activity in the toolbox, and point to Toolbox. Select Reset Toolbox to restore the toolbox's default settings. Any custom categories or added keywords will be lost. Deleted, moved, and renamed items will be restored to their original state. You will be prompted to ensure that you want to continue. Click Yes to reset the toolbox to its default settings. Click No to keep the toolbox the way you have configured it.
- Reset Activity: Right-click an activity, and select Reset Activity. Alternatively, you can reset an activity from the Add/Remove Toolbox Activities dialog box as described below. All changes to the activity's keyword list or name will be lost if you choose to reset the activity. You will be prompted to ensure that you want to continue. Click Yes to reset the activity to its default settings. Click No to keep the activity the way you have configured it.
- Additional Options: Additional options for configuring the toolbox are available in the Toolbox node of the Options dialog box. Open the Toolbox node of the Options dialog box by right-clicking anywhere in the toolbox, pointing to Toolbox, and selecting Options. Alternatively, select Tools from the main menu, click Options, and select the Toolbox node.
Note: If you have the option Always list toolbox activities alphabetically within each category selected in the Toolbox node of the Options dialog box, you will only be able to move activities between categories and not within categories because alphabetical order will be enforced within each category.
- Expand or Collapse a Category:
-
To add, remove, or rename activities in this pane
- Right-click a category or an activity in the toolbox, and point to Toolbox.
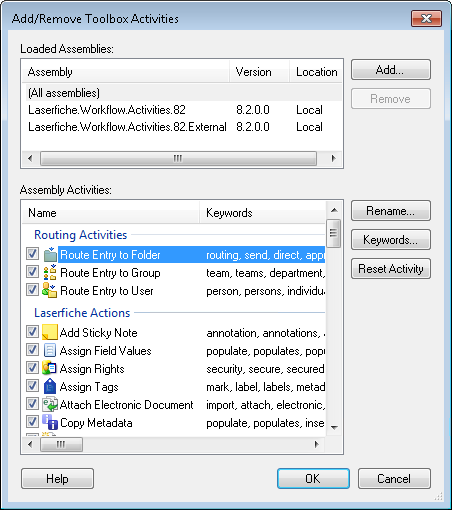
- Select Add/Remove Activities to open the
 Add/Remove Toolbox Activities dialog box.
 - The Loaded Assemblies box shows you the assemblies where the available activities are stored. The Laserfiche.Workflow.Activities.83 and Laserfiche.Workflow.Activities.83.External assemblies contain the activities for Workflow 12.0.
- To add an assembly that contains custom activities, click Add and browse for your assembly. Click Open to add the assembly.
- To remove an assembly, select an assembly from the Loaded Assemblies box and select Remove.
- The Assembly Activities box will show you the activities found in the assembly selected in the Loaded Assemblies box above. To see all activities, select All assemblies in the Loaded Assemblies box.
- To remove an activity from the toolbox, clear the checkbox next to the activity. Alternatively, you can remove an activity by right-clicking on the activity in the toolbox and selecting Delete.
- To add an activity to the toolbox, select the checkbox next to the activity.
- To rename an activity, select an activity from the list, and click Rename. Type a new name in the Rename dialog box, and click OK. Click Cancel to return to the list of activities without renaming.
- To change the keywords used when searching for an activity, select an activity from the list, and click Keywords. See the To search for an activity in the Toolbox section above for more information about adding and removing keywords.
- To reset an activity, select an activity from the list and click Reset. All changes to the activity's keyword list or name will be lost if you choose to reset the activity.
- Click OK to save your changes. A list of the changes you made will appear in a dialog box. Click OK to make the changes on the list, or click Cancel to return to the Add/Remove Toolbox Activities dialog box. If you want to close the Add/Remove Toolbox Activities dialog box without making changes, click Cancel.
Note: You cannot remove the Laserfiche.Workflow.Activities.83 and Laserfiche.Workflow.Activities.83.External assemblies.
Note: If you want to replace a custom activity assembly with a new version, you need to remove the existing assembly, close and re-open the Workflow Designer, and then add the new version of the assembly.

