Common and User Connection Profiles
For a workflow or business process to interact with a Laserfiche repository, the following connection information must be known: the Laserfiche Server, the repository, and the user that you want Workflow to interact with the repository as. This information is stored as a connection profile. Connection profiles for workflow and business process definitions are configured in the same way.
Tip: You can create master connection profiles that individual workflows and activities can copy information from. These profiles can also be set as the default connection profile that all new workflows will use unless another profile is specified. There are two types of these master profiles:
- Common Profiles are connection profiles available to anyone using the computer on which they are created.
- User Profiles are connection profiles available to only the Windows user who created the profile and only on the computer on which they are created.
To create a common or user connection profile
- There are many places where you can create a common or user connection profile:
- If you are working with a workflow that has not been configured with a default or custom connection profile and you add an activity that requires a connection profile, a prompt will appear. Use this prompt to create a connection profile, this will automatically be configured as a User Profile and will act as the default connection profile. Skip to step 4 if you are accessing the Profile Editor this way.
- Open a workflow in the Designer Pane. In the workflow's Connection Profiles property box, click Manage workflow connection profiles. In the Workflow Profile Manager, click Manage Connections.
- Select Options under Tools in the main menu. In the Options dialog box, select General and click Manage.
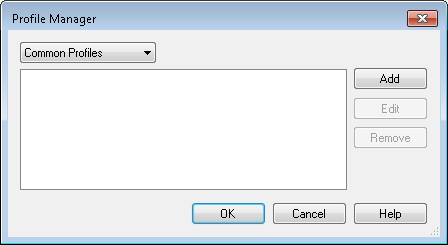
- Select Common Profiles or User Profiles from the drop-down menu in the Profile Manager dialog box depending on which type of profile you want to create.
- Click Add.
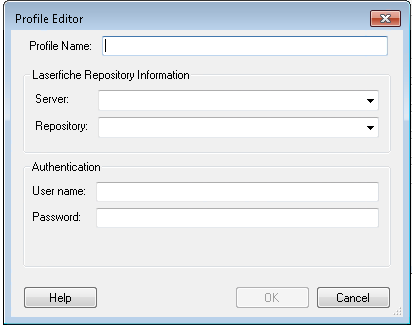
- In the Profile Editor dialog box, specify connection information.
- Profile Name: Type the name of your connection profile.
- Server: Type, or choose from the drop-down menu, the name of the Laserfiche Server that contains the repository you want to use.
- Repository: Type, or choose from the drop-down menu, a Laserfiche repository on the specified Laserfiche Server.
- User name: Specify a Laserfiche user with sufficient permissions and access rights (as defined in the Laserfiche Administration Console) to perform all actions that a workflow may call for. More information.
- Password: Type the user's password.
Example: If you add the Assign Field Values activity to your workflow or business process definition, the user you define must have sufficient rights to assign templates to all entries involved.
- Click OK. If the profile created cannot be validated, you will receive an error message.
To modify a common or user profile
- Open the Profile Manager dialog box either from a workflow's Connection Profile property box or from the Options dialog box as described in step 1 above.
- Use the drop-down menu to specify Common Profile or User Profile.
- Select a profile.
- Click Edit.
- In the Profile Editor, make any desired changes to the Profile Name, Laserfiche Server, Repository, or user name and password.
- Click OK.
To delete a common or user profile
Note: Once deleted, profiles cannot be recovered.
- Open the Profile Manager dialog box either from a workflow's Connection Profile property box or from the Options dialog box as described in step 1 above.
- Use the drop-down menu to specify Common Profile or User Profile.
- Select a profile
- Click Remove.

