Creating and Configuring a Capture Profile
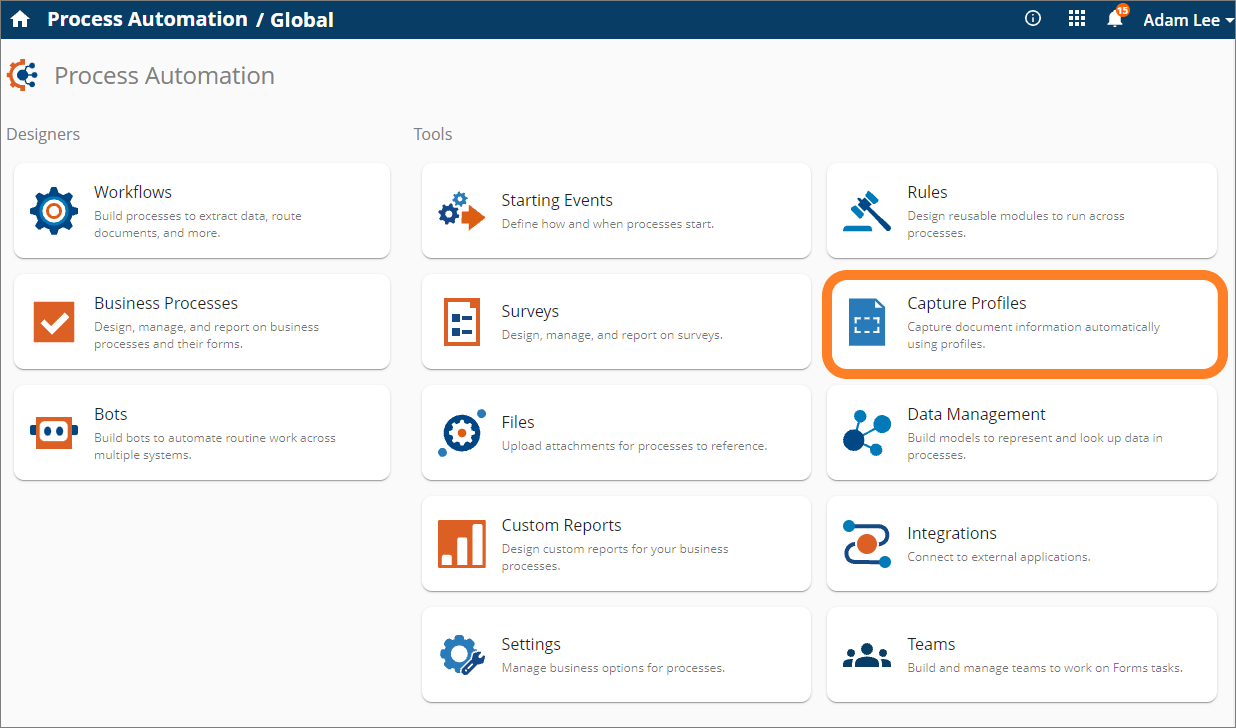
- Open the
 Capture Profiles page.
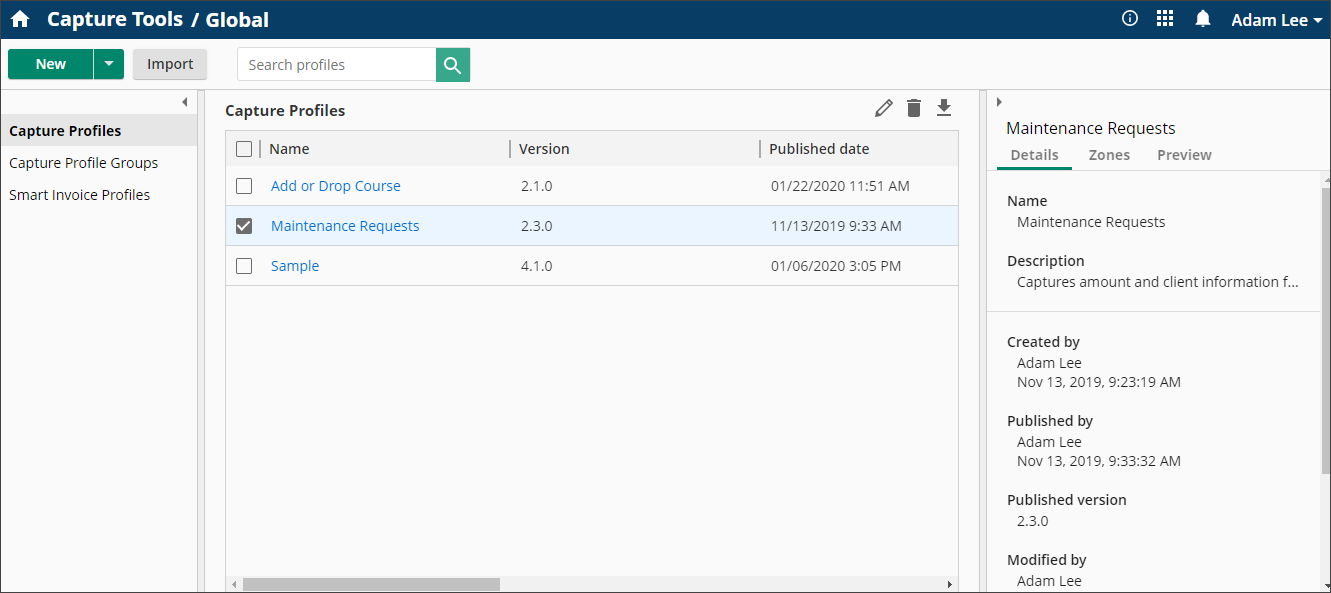
 - On the Capture Profiles page, click Capture Profile in the left pane. You can also click the New button or click the drop-down and select Capture Profile. Additionally, when creating the initial capture profile, you can click
 Click here to create a capture profile.
 - Give the capture profile a name and an optional description, then click Create.
- Click add a sample document to add one or more image or .pdf files (.png, .jpg, .gif, .bmp, and .tiff) that are samples of the pages you want to capture data from.
- Click choose files to upload to select image files.
- After uploading sample documents, click Save to start uploading the image files.
- Once created, the profile will automatically display the first page of the first sample document so you can start configuring the data to capture. If you want to work with a different sample document, use the drop-down menu in the top right to select a new document. Alternatively, click Manage sample documents from this drop-down menu to add or remove documents.
- To get started, use your mouse to draw boxes around each piece of information you want captured. You can capture both typed and handwritten information.
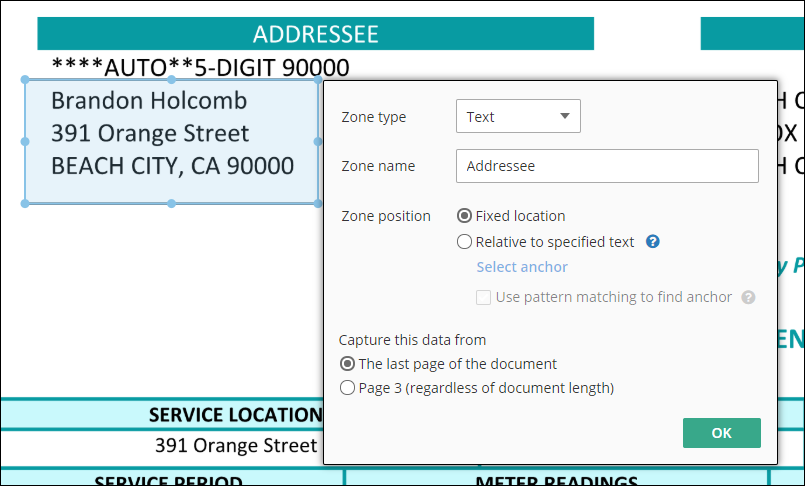
- The area you draw a box around is called a zone. The zone can be repositioned and resized. After you draw a box, a dialog box will appear with some zone options.
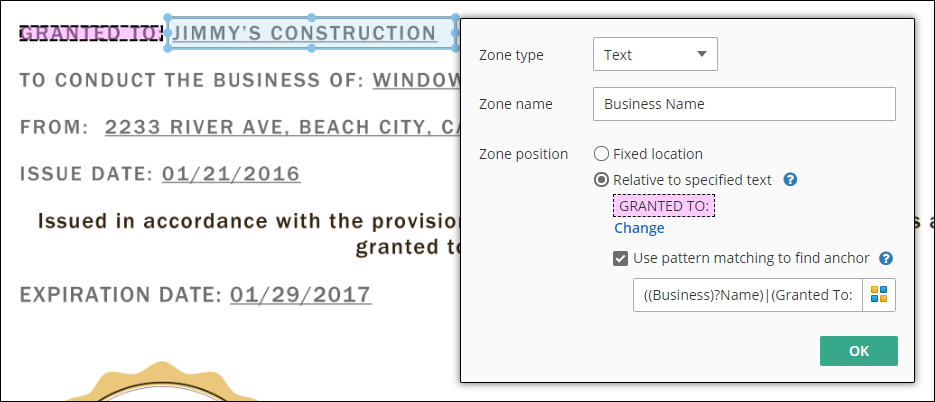
- Zone type: Select Text if you draw a box around alphanumeric information. This tells the profile the information you want to capture is text or numbers.
- Zone name: Give the zone a name so you can easily reference it later. If you leave the name blank and select an anchor (see Zone position below), the zone will automatically be named based on the anchor's text.
- Zone position:
- Fixed location: If the information will always be in the same location on every scanned page, select Fixed location.
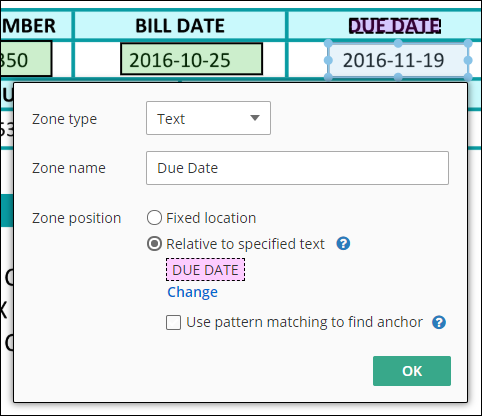
- Relative to specified text: In some instances, the scanned page may shift and the defined fixed location won't capture the correct information. To account for this, you can select
 Relative to specified text, and select some text to anchor the zone to. If the text is shifted on a page, the zone will be shifted by the same amount. For example, if you want to capture someone's name on a document and that name has a "Name" label, you can add a zone over the actual name and anchor that zone to the "Name" label. If the page is shifted when scanned, the profile will look for the "Name" anchor and find the desired text to be captured based on the location (relative distance) of the "Name" anchor.
Note: When multiple places on a page match an anchor's text, the proximity of each anchor to where that anchor was originally drawn is used to resolve the ambiguity. For example, if the page has a shipping address and billing address, and the anchor text is "address," the profile will use the anchor text that is closest to where you originally drew the anchor on the sample document. If the page only has one instance of the word "address," that text will be used to anchor the zone, no matter where the text is on the page.
Use pattern matching to find anchor: Select
 this option if you want to search the document for anchor text using a regular expression pattern. This accounts for instances when the anchor text you want to use to capture data does not always have the same format. For example, business licenses may label the name of the business Name, Business Name, Granted To, Company, etc. By using a pattern to find all the different variants of business name labels, you will be able to capture the business name, regardless of which business name label it follows. Clicking the Pattern Matching button to the right of the pattern text box will aid you when constructing your pattern. It lists helpful character classes, quantifiers, grouping constructs, metacharacters, alternations, and other options.
 Note: By default, the pattern matching anchors are not case sensitive. Use the inline option (?-i) to make them case sensitive.
Note: The anchor text you select can only span a single line.
- Capture this data from: If you have multiple sample pages and are defining a zone on the last sample page, you will be presented with this option. If the information you are capturing is always on the last page, even when the documents to be processed have a variable number of pages, select The last page of the document. If you have two pages in a sample document and the data to be captured will always be on page two, regardless of how many pages the document to be processed has, select Page x (regardless of document length).
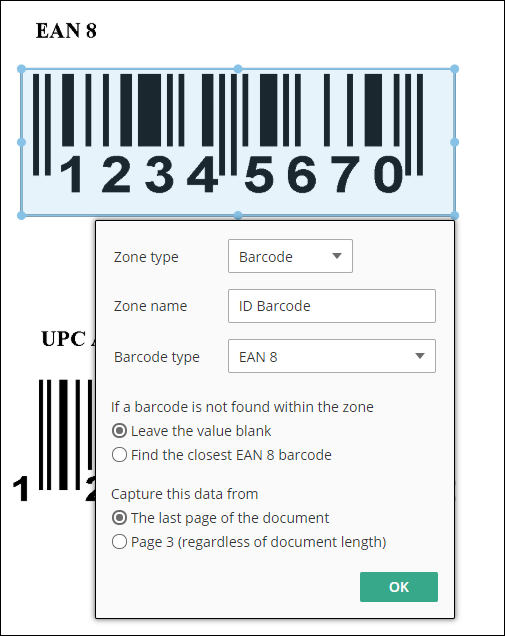
- Zone type: Select Barcode if you draw a box around a barcode.
- Zone name: Give the zone a name so you can easily reference it later.
- Barcode type: Select the type of barcode you want to capture from the drop-down menu. If you don't know the type of barcode is expected, select Any at the top of the list. The profile will choose the barcode type for you if it detects a barcode in that zone.
- If the barcode is not found within the zone: This option is useful for when a barcode is not always found within the defined zone. You can choose if you want the value to be left blank, or if you want the profile to find the closest barcode on the same page.
- Capture this data from: If you have multiple sample pages and are defining a zone on the last sample page, you will be presented with this option. If the information you are capturing is always on the last page, even when the documents to be processed have a variable number of pages, select The last page of the document. If you have two pages in a sample document and the data to be captured will always be on page two, regardless of how many pages the document to be processes has, select Page x (regardless of document length).
- Click OK .
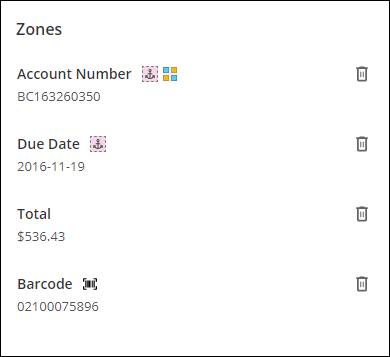
- The configured zones and information to be captured will be listed in the Zones pane on the right in the order they appear on the document. Some zones may have an icon next to them to indicate the zone type. Hovering over the icon will give you more information about the zone.
- A pink anchor icon indicates the zone is anchored to text on the document. Hovering over it will display the text it's anchored to.
- A pattern matching icon indicates a pattern is used to find text. Hovering over it will display the pattern used to find the desired text.
- Zones without these icons use a fixed location.
- If the zone value in the Zones pane does not match the value that appears on the page for that zone, it could be due to poor image quality of the sample page, causing poor OCR results. In this case, you can look into other Laserfiche tools like Quick Fields or Laserfiche Scanning to enhance the image quality before running the capture profile. You can also use pattern matching in Workflow to replace common OCR errors with the correct text.
- Clicking on a zone will jump to that specific zone and open the zone configuration dialog box so you can make any desired changes.
- To delete a zone,
 click the trash can to the right of the zone in the Details pane on the right, right-click the zone on the image and select Delete, or select the zone on the sample page and click the Delete key.
- Press the Save button in the toolbar to save the profile draft.
- After saving your profile, you'll want to test it and then publish it.
Note: When an image with a different orientation than the capture profile's sample image is processed, the capture profile may not capture the intended information (e.g., if the image is upside-down, it may retrieve text from "above" a text anchor instead of below the text anchor). Keep in mind the web client automatically rotates images, so an image that appears upright in the client may still be rotated (relative to the sample document) when processed by a capture profile.
Tip: To navigate around the document, you can use the Zoom in and Zoom out buttons and the Zoom size drop-down menu. You can also pan the image using the Pan button in the top toolbar.
Note: When drawing or resizing zones, make sure the boundary does not touch any unwanted text. Even text that is partially touching will be fully captured.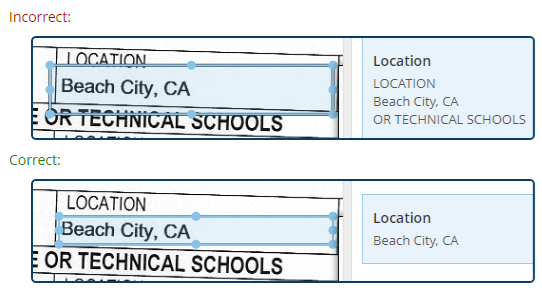
Note: For barcodes that include checksum characters, the checksum characters will be returned as part of the barcode value. The checksum will not be run.
To delete a capture profile
- Select the checkbox next to the profile you want to delete on the Capture Profiles page.
- Click the Delete
button in the toolbar.
To edit a capture profile
- Select the checkbox next to the profile you want to edit on the Capture Profiles page.
- Click the Edit
button in the toolbar.
