Capture Profiles
Capture profiles extract data from documents to be used in a business process. These profiles can extract both typed and handwritten data. There are two types of capture profiles, a capture profile and a smart invoice profile.
Capture Profile: A capture profile is created, configured, and published in the Capture Profile Designer, then a Run Capture Profile Workflow activity runs the profile and outputs tokens for the captured data that can be used later in the workflow to update metadata, name folders, and more.
Example: Joe creates a capture profile to capture data from his organization's utility bills. He creates a capture profile using a sample bill, draws boxes around the information he wants captured (text or barcodes), then tests the profile against additional sample bills to make sure the data is captured correctly. If the test results are correct, he can publish the capture profile, then use the Run Capture Profile activity in Workflow to run the profile, capture the information from the utility bills, and use that information later in the workflow to route the bills to different departments.
Smart Invoice Profile: A smart invoice profile uses machine learning to automatically capture the invoice date, invoice number, purchase order number, and total amount due and can also determine the vendor of the invoice by comparing invoice data to a vendor lookup table. Similar to capture profiles, the Run Capture Profile Workflow activity runs this smart invoice profile and outputs tokens for the captured data to be used later in the workflow. This activity can also retrieve information from a vendor lookup table to automatically gather vendor information from invoices.
Example: Joe opens the pre-configured invoice capture profile, clicks Test profile, and selects the invoice he wants to test the profile against to ensure the data is captured correctly. Joe can then use the Run Capture Profile activity in Workflow to run the profile, capture the invoice data, and use that information to fill out metadata and route invoices to the appropriate people.
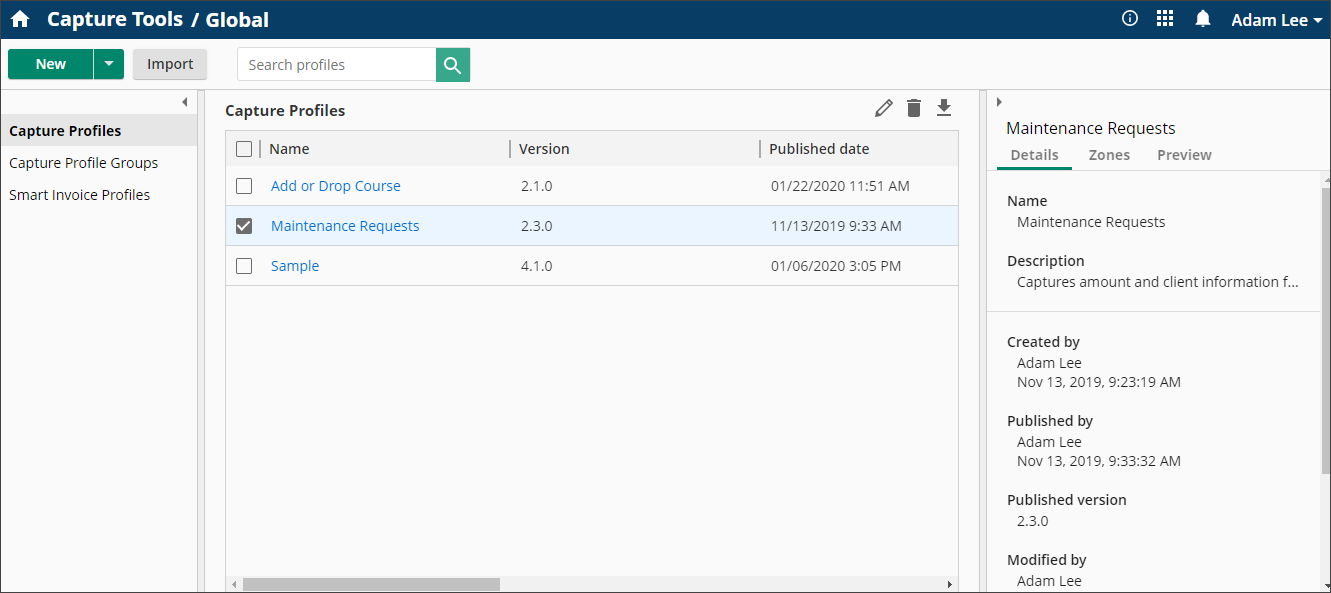
From the Process Automation page, click Capture Profiles to access the ![]() Capture Profiles page. When selecting a profile, you can view that profile's details, such as its name, who created and published it, when it was last modified and published, its type, and version under Details in the Details pane on the right. Under Zones, you can view the information being captured, and under Preview you can see a preview of the first page of the sample document. This preview can help quickly distinguish between profiles before opening them. Both panes can be expanded and collapsed to customize the profile list view. If you have an extensive list of capture profiles, you can search for the one you need in the search bar at the top of the page. Click the New button at the top to create a new capture profile or double-click an existing capture profile to open and modify it.
Capture Profiles page. When selecting a profile, you can view that profile's details, such as its name, who created and published it, when it was last modified and published, its type, and version under Details in the Details pane on the right. Under Zones, you can view the information being captured, and under Preview you can see a preview of the first page of the sample document. This preview can help quickly distinguish between profiles before opening them. Both panes can be expanded and collapsed to customize the profile list view. If you have an extensive list of capture profiles, you can search for the one you need in the search bar at the top of the page. Click the New button at the top to create a new capture profile or double-click an existing capture profile to open and modify it.
