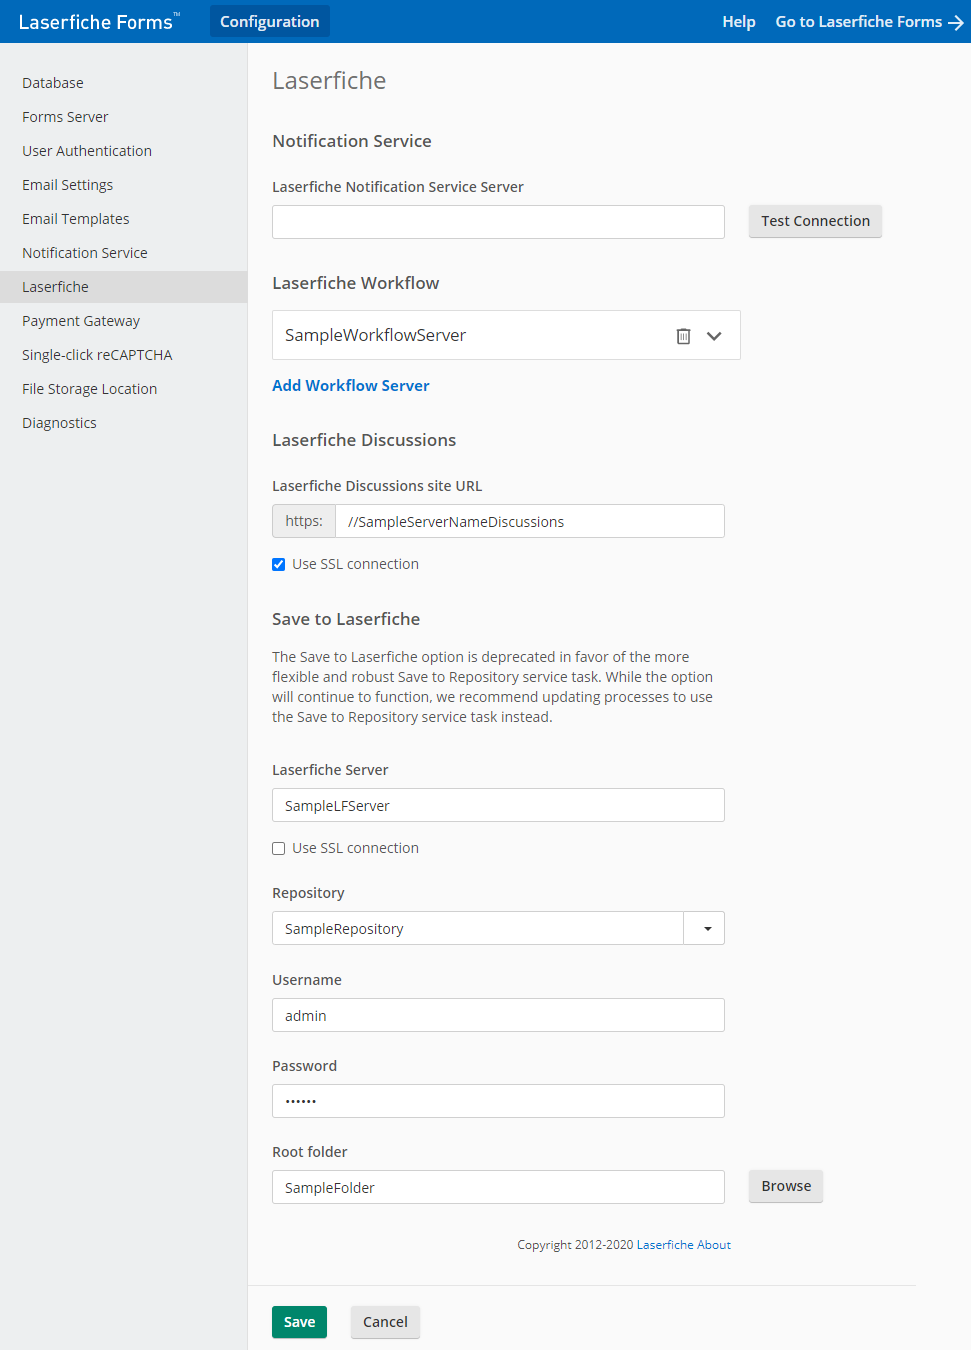
In the Laserfiche tab of the Forms Configuration page, you can specify the Workflow Server that Forms will use for service tasks that start workflows, the Discussions site that Forms will use for the Frequently Asked Questions (FAQ) feature. Additionally, if you configured Save to Laserfiche in a previous version of Laserfiche Forms, you can update repository settings here.
Note: The Save to Laserfiche option is being deprecated in favor of the more flexible and robust Save to Repository service task. If you had not already configured Save to Laserfiche in a previous version of Forms, the option will not be available to you in Forms 10 and later. If you are using the Save to Laserfiche option, we recommend updating your processes to use the Save to Repository service task instead.
Notification Service
Connect your Laserfiche Forms Server to a Laserfiche Notification Master Service. This service will receive updates from Laserfiche Forms Routing Service and send the updates via Laserfiche Notification Hub Service to make real-time updates to a user's task list
To specify a Notification Service for Laserfiche Forms to use
- Open the Forms Configuration page and click Laserfiche in the navigation.
- In the Laserfiche Notification Service Server field, type the name of the machine hosting the Laserfiche Notification Master Service. Make sure to include the port value. The port value can be configured by viewing the Laserfiche.PushNotificationService.Master.Host.exe.config configuration file in the Notification Service installation folder (C:\Program Files (x86)\Laserfiche\Laserfiche Notification\Service).
Configuring Laserfiche Forms to Communicate with Workflow
For Laserfiche Forms to communicate with Workflow, you must tell Forms which Workflow server to use. In addition, the Workflow server must have its Web Services feature installed and configured to connect to Laserfiche Forms.
To specify Workflow servers for Laserfiche Forms to use
- Open the Forms Configuration page and click Laserfiche in the navigation.
- Click Add Workflow Server.
- In the Laserfiche Workflow Server field, type the name of the machine hosting the Laserfiche Workflow server you want Laserfiche Forms to use. If the Workflow server uses a port other than the default, specify the port after the server name (e.g., workflowServer:port).
- To secure network communications between Forms and Workflow, select Use TLS connection.
- Click Test Connection to verify that Forms can reach the selected server.
- If multiple Laserfiche Workflow servers will be used, repeat steps 2 through 5 above.
- Click Save.
Configuring Laserfiche Discussions
Connect your Forms Server to the Laserfiche Discussions to display frequently asked questions next to a form. This pane contains questions and answers associated with a specific group in Laserfiche Discussions and can serve as an invaluable tool for answering users' most common questions. Learn how to display this pane.
Note: Only forms that start a process (i.e., the forms specified in Message Start Events) can display the FAQ pane.
Example: The people in Pleasant County can fill out a form if they want to rent a public facility for an event. There are several common questions people have about renting facilities such as, how much will it cost? How long can I rent the facility for? Am I responsible for clean up? etc. Pleasant County created a "Public Facilities" group in Laserfiche Discussions where they answered all these questions. Then they chose to display these FAQ on the "Rent a Facility" form. Because the FAQ are right next to the form and because the public can submit questions right there, the number of phone calls they've had to field about facility rentals has dramatically decreased.
To configure a connection to Laserfiche Discussions
- Open the Forms Configuration page and click Laserfiche in the left navigation.
- In the Laserfiche Discussions site URL text box, type the URL of your Discussions site in the format //machine.com/SocialBPM.
- Optionally, select Use TLS connection. If you configure your Forms Server to use TLS, use TLS for Laserfiche Discussions.
- Click Save.
Configuring Save to Laserfiche
Tip: For more control over where, when, and how forms are saved to your repository, we recommend using the Save to Repository service task in your process instead of the Save to Laserfiche feature. The Save to Repository service task lets you specify the folder path for the saved form, apply metadata to the form, include the action history with the form, and more.
When Save to Laserfiche is enabled on a process's Publish page, submitted forms will be saved to the repository as PDF or TIFF images. In addition, you can also save process information in an XML file along with submitted forms. Learn more about enabling Save to Laserfiche.
When a form is saved to the repository, it is saved along with other instance information in folder created for that business process instance. This business process folder stored at the location specified on this page.
Note: Each form submission will be saved as a new imaged document. However, if version control is enabled on your Save to Laserfiche folder, only one imaged document will be created for each form, with additional submissions saved as versions in that document's version history.
To configure Save to Laserfiche
- Open the Forms Configuration page and click Laserfiche in the left navigation.
- Under Save to Laserfiche, enter the name of the machine where your Laserfiche Server is installed. If the Laserfiche Server is not using port 80, use the format: servername:port for this field.
- Under Repository, enter the credentials the Forms server will use to access the repository for storing submitted forms and process information.
- In the Root folder field, specify the location in the repository where Laserfiche Forms will store information.
Note: Ensure that the selected folder has a default volume. Form submissions will only be saved to the repository if the Save to Laserfiche folder has a default volume.
- Click Save at the bottom of the page.
Note: This user must have the Create Folders, Create Documents, Write Metadata, and Modify Contents entry access rights on the specified folder with a scope of This folder, subfolders, and documents. In addition, this user must also have the necessary rights to the volume associated with the Save to Laserfiche directory of the repository.
The generic folder structure for a submission saved to the repository is:
<installation location>\businessprocess\instance
Assigning templates with Save to Laserfiche
Business process information (name, ID, initiator, start date, etc.,) can be associated with fields and templates in your repository. These templates and fields can be assigned to the business process folder, instance folder, and form submission created with the Save to Laserfiche feature.
You must create the templates and fields in the Laserfiche Administration Console and then assign the fields and templates to Laserfiche Forms in the SaveToLFConfigruation.xml file (as described below).
Note: Any files uploaded as part of a form submission will be saved to the Laserfiche Repository along with the submitted form.
- Open the SaveToLFConfiguration.xml file. In most installations, this will be located at C:\Program Files\Laserfiche\Laserfiche Forms\Forms\bin. However, if the Laserfiche Forms install directory is in a different location, you'll need to navigate there, and then go to Laserfiche Forms\Forms\bin.
- In the <LFFolderOfBusiness Process> section, find the line that says <LFTemplateName>value</LFTemplateName> and replace value with the name of the template you want to use for the business process folder.
- In the <LFFieldName> section, replace the values of the <BusinessProcessId> and <BusinessProcessName> elements with the desired field names.
- Save and close the SaveToLFConfiguration.xml file.
- For your changes to take effect, you must reset the Laserfiche Forms Routing Service.
- Open the SaveToLFConfiguration.xml file. In most installations, this will be located at C:\Program Files\Laserfiche\Laserfiche Forms\Forms\bin. However, if the Laserfiche Forms install directory is in a different location, you'll need to navigate there, and then go to Laserfiche Forms\Forms\bin.
- In the <LFFolderOfBPInstance> section, find the line that says <LFTemplateName>value</LFTemplateName> and replace value with the name of the template you want to use for the business process instances folder.
- In the <LFFieldName> section, replace the values of the <InstanceId>, <Initiator>, and <StartDate> elements with the desired field names.
- Save and close the SaveToLFConfiguration.xml file.
- For your changes to take effect, you must reset the Laserfiche Forms Routing Service.
- Open the SaveToLFConfiguration.xml file. In most installations, this will be located at C:\Program Files\Laserfiche\Laserfiche Forms\Forms\bin. However, if the Laserfiche Forms install directory is in a different location, you'll need to navigate there, and then go to Laserfiche Forms\Forms\bin.
- In the <LFDocumentOfSubmission> section, find the line that says <LFTemplateName>value</LFTemplateName> and replace value with the name of the template you want to use for form submissions.
- In the <LFFieldName> section, replace the values of the <FormId>, <FormName>, <SubmissionId>, <Submitter>, <SubmissionDate>, <Action>, and <Comment> elements with the desired field names.
- Save and close the SaveToLFConfiguration.xml file.
- For your changes to take effect, you must reset the Laserfiche Forms Routing Service.
Related Topics