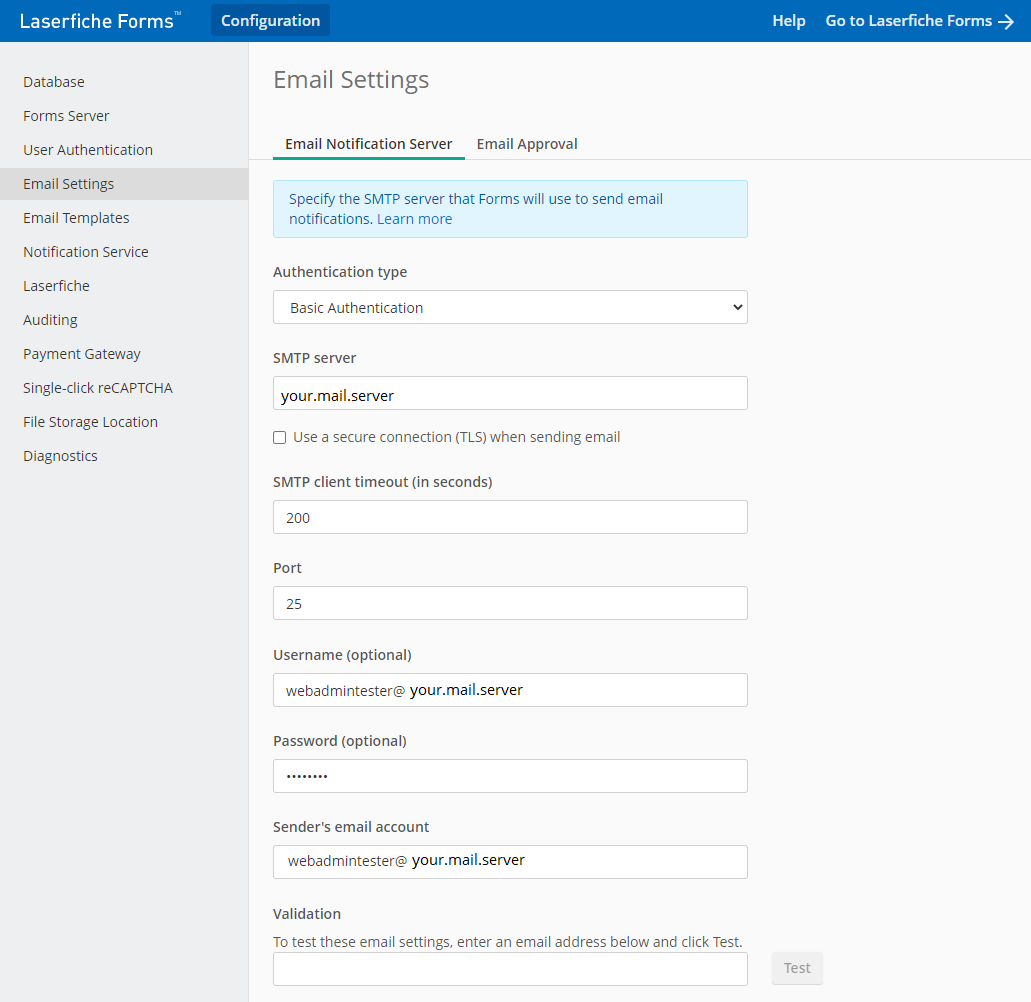
In the Email Settings tab of the Forms Configuration page, you can specify the SMTP server that Forms will use to send email notifications and the IMAP server it will use when processing email approvals. Laserfiche Forms sends email notifications in business processes as part of user tasks and email service tasks, when a user saves a form submission draft, and when a user cannot remember the password they specified to access their form submission.
![]() Show me the Email Settings configuration tab
Show me the Email Settings configuration tab
Configuring email notification settings
- Open the Laserfiche Forms Configuration page to the Email Settings tab.
- Select the authentication type to be used. For Microsoft 365 OAuth 2.0 or Google OAuth 2.0, see below.
- In the SMTP server field, enter the machine where your SMTP email server is located.
- In the Port field, enter the port number the Forms Server will use to communicate with your email server.
- Optional: If necessary, enter the credentials the Forms Server will use to access the email server.
- In the Sender's email account field, enter the email address that emails sent by Forms will appear to come from.
- When you have finished configuring the options in the Email Settings tab, click Save.
Tip: Verify your settings work by entering an email in the Test field and clicking Test.
The email messages associated with these notifications are saved as templates, which can be modified on the Email Templates tab of the Forms Configuration page.
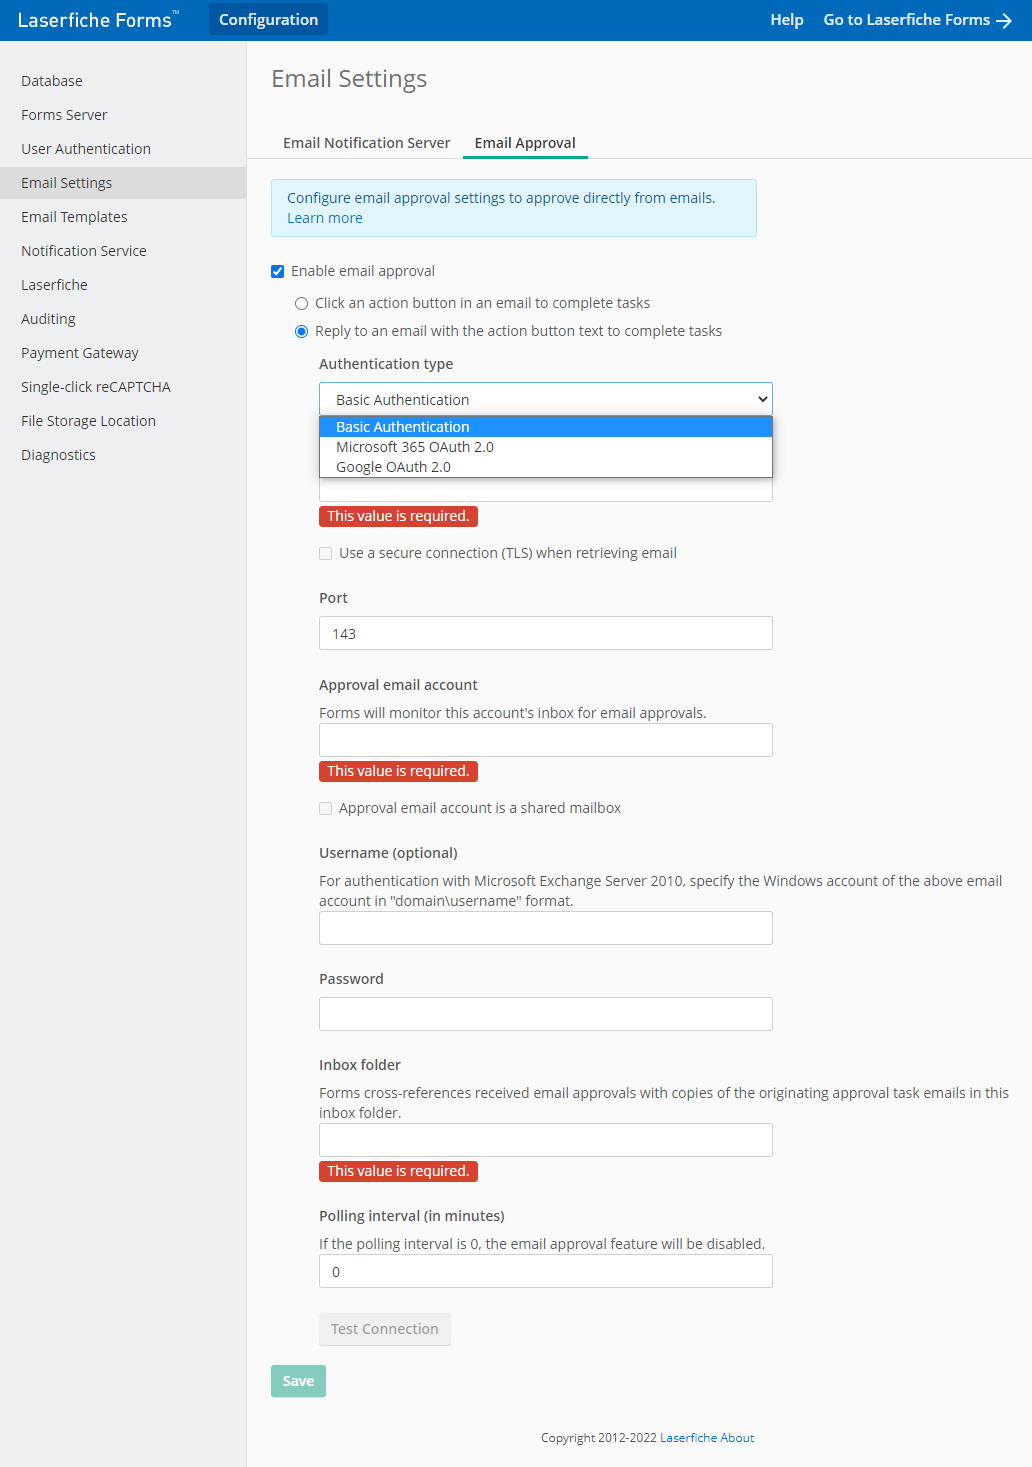
Configuring email approval settings
![]() Show me the Email Settings configuration tab
Show me the Email Settings configuration tab
- Open the Laserfiche Forms Configuration page to the Email Settings tab.
- Click the Email Approval Server tab.
- Select the authentication type to be used. For Microsoft 365 OAuth 2.0 or Google OAuth 2.0, see below.
- In the IMAP server field, enter the machine where your IMAP email server is located.
- In the Port field, enter the port number the Forms Server will use to communicate with the email server.
- Next to Approval email account and Password, enter the credentials the Forms Server will use to access the email server.
- In the Inbox folder field, enter the folder that Forms will use to store reference copies of approval task emails. When an approver approves or rejects a task, Forms will cross-reference the reference copy of the original approval email in this folder with the received approval email before routing to the next step in the Forms process. Forward slashes (/) will be interpreted as subfolder separators. Learn more about configuring approval email folders in Outlook.
- In the Polling interval field, specify how often (in minutes) Laserfiche Forms will check for new emails. If this field is set to 0, the email approvals feature will be disabled.
- Select Use TLS connection when receiving emails to use TLS with email approvals.
- When you have finished configuring the options in the Email Settings tab, click Save.
Note: All emails in the folder you specify will be marked as read, even if they are unrelated to a form approval because Forms must read each email as it processes it.
Tip: Verify your settings work by clicking Test Connection.
Microsoft 365 OAuth 2.0 Authentication
With an active Azure subscription, you can use Microsoft 365 OAuth 2.0 for connecting to email servers for notification and approval.
Prerequisites:
- Have a Microsoft Azure account with an active subscription. Create your Azure free account today | Microsoft Azure
- Have a Microsoft Entra ID Tenant. Create a new tenant. Create an Microsoft Entra ID tenant | Microsoft Docs
- Have created an email account for use as the Approval email account and that this account can access Outlook successfully.
- Have created a Entra ID account for use in authenticating the Forms server with Azure.
- IMAP must be enabled on the account to be used.
Azure Application Registration:
Register a new application in Azure with access to web APIs. Quickstart: Register an application with the Microsoft identity platform | Microsoft Docs
- Provide a name for the application, and set application security appropriate for your use.
- Configure the application for web API access. Quickstart: Configure a client application to access a web API | Microsoft Docs
- Configure the Redirect URI url to be the same as the Forms Config page such as "http://localhost/FormsConfig" or "https://{FormsServer}/FormsConfig"
Note: the URL is case sensitive.
- Configure the Redirect URI url to be the same as the Forms Config page such as "http://localhost/FormsConfig" or "https://{FormsServer}/FormsConfig"
- Add credentials to the application.
- Create a New client secret.
Note: We recommend setting the expiration to Never so that you won't need to create a new one and update the related Email server configuration used in Forms when the secret expires.
Important: Record the Client secret for use in the Forms Config page.
- Create a New client secret.
Forms Configuration:
- Open the Forms Configuration page, select Email Settings, and either Email Notification or Email Approval Settings, and then select the Authentication type of Microsoft 365 OAuth 2.0 from the drop-down.
- For the Sender's or Approval email account, enter the address created for this purpose. If this is a shared mailbox, check the shared mailbox checkbox.
- Input the Application (client) ID from Azure.
- Input the Client secret created in the Azure setup.
- Optional: Input the Directory (tenant) ID.
Note: The Directory (tenant) ID is required if your application account type is Accounts in this organizational directory only (Single-tenant).
- Click Authorize and sign in using the Entra ID account to be used for authentication of the application.
Note: The Entra ID account used must have access rights to the email account used.
- Email Approval Only:After specifying the email account and inbox folder to monitor on the Forms Configuration page, you'll need to ensure that the reference copy of the approval email is automatically routed to the inbox folder you specify.
- Email Approval Only:Set the Polling interval to a positive integer to activate the feature.
- Click Save.
Google OAuth 2.0 Authentication
With an active Google Cloud subscription, you can use Google OAuth 2.0 for connecting to Gmail email servers for notification and approval.
Prerequisites:
- Have a Google Gmail account .
Configuring Google OAuth Access
Register a new project in Google Cloud console with access to the Gmail APIs.
- Provide a name for the project, and enable the Gmail API.
- Configure the OAuth consent screen.
- Set User Type to External.
- Enter an Application Name.
- Enter your Forms server's domain name for the Authorized domains.
- Skip setting of Scopes.
- Add your gmail to the Test users.
- Create the Credentials.
- Select OAuth client ID from the CREATE CREDENTIALS dropdown.
- Set the application type to Web application.
- Configure the Authorized JavaScript origins url to be the same as the Forms server's domain name, such as "http://localhost" or "https://{FormsServer}"
- Configure the Authorized redirect URIs url to be the same as the Forms Configuration page, such as "http://localhost/FormsConfig" or "https://{FormsServer}/FormsConfig"
Note: the URLs are case sensitive.
Click CREATE. A dialog with your client ID and client secret will be displayed. Copy and record them in a file or download a JSON file containing the credential for later reference.
Forms Configuration
- Open the Forms Configuration page, select Email Settings, and either Email Notification or Email Approval Settings, and then select the Authentication type of Google OAuth 2.0 from the drop-down.
- For the Sender's or Approval email account, enter the address created for this purpose.
- Input the client ID from Google.
- Input the Client secret from Google.
- Click Authorize and sign in using the Gmail account to be used for authentication of the application.
Note:You may see a warning about an unverified app because the app you have registered in the Google API Console is not verified. You don't need to go through the verification process as only system administrators will be configuring the email settings and providing credentials to authenticate with Google.
- Email Approval Only: Input the Inbox folder for cross-referencing received email approvals with copies of the originating approval task emails.
- Email Approval Only: After specifying the email account and inbox folder to monitor on the Forms Configuration page, you'll need to ensure that the reference copy of the approval email is automatically routed to the inbox folder you specify.
- Email Approval Only: Set the Polling interval to a positive integer to activate the feature.
- Click Save.

