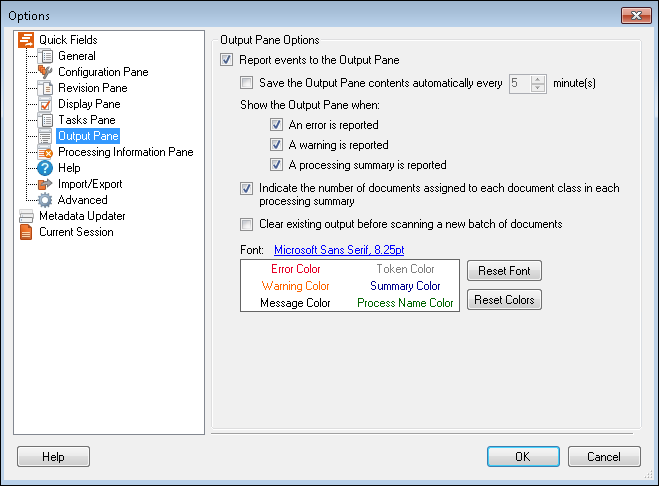
The ![]() Output Pane node under Quick Fields in the Options dialog box enables you to configure settings associated with the Output Pane.
Output Pane node under Quick Fields in the Options dialog box enables you to configure settings associated with the Output Pane.
To configure the Output Pane settings
- Select Tools, Options, expand the Quick Fields node, and select Output Pane.
- Under Output Pane Options, configure the following options.
- Report events to the Output Pane: Select this option if you want events recorded and displayed in the Output Pane. If cleared, not only will the pane not be displayed, but events will not be recorded at all. Selecting this option after it has been cleared starts reporting events from that point forward.
- Save the Output Pane contents automatically every __ minute(s): Specify if text in the Output Pane should be automatically saved and, if so, how often (enter minutes between 1 and 60).
Tip: Output Pane content is saved to the location specified in the session's General node.
- Show the Output Pane when: Specify whether the pane should become visible if a specific event occurs. To enable this setting, select one or more of the following options.
- An error is reported: The pane will be displayed if an error occurs during scanning or processing. For example, if a document class was configured to perform a lookup on an Excel file, and the file could not be found, an error would be reported and the Output Pane would be displayed.
- A warning is reported: The pane will be displayed if a warning occurs during scanning or processing. For example, Amber adds a script to her session that is not functional. When she runs the session, a warning will be reported and the Output Pane will be displayed.
- A processing summary is reported: The pane will be displayed anytime a processing summary is created. A processing summary details the number of pages that were processed, documents that were identified and unidentified, and errors that were encountered during scanning and processing. In most cases, a processing summary will always be reported.
Note: If configured to display after specific events, the Output Pane will appear after all scanning and processing is complete.
- Indicate the number of documents assigned to each document class in each processing summary: Specify whether the processing summary should report the number of documents each document class was able to identify.
Example: The
screenshot below illustrates the Output Pane with (left screenshot) and without (right) this option selected. The highlighted text will only be included if this option is selected. This text represents that the document class named Document Class 1 was able to identify one document that consisted of four pages.
- Clear existing output before scanning a new batch of documents: Specify if you want the Output Pane cleared when a new batch of documents begins scanning.
- Font: Select a default font for the pane.
Note: Font and color selections will only apply to the Output Pane display in Quick Fields, not to output logs.
- In the colors box, specify the colors for each type of text in the pane. Click the colored phrase to change its color. Click Reset Font or Reset Colors to undo your changes and return to the default font and colors, which are listed below.
- Errors are red
- Warnings are orange
- Regular messages are black
- Token text is gray
- Summaries are blue
- Process name text is green

