Output Pane
![]() Output Pane displays information about the processes performed by Quick Fields during processing. This information, the Output Log, can also be exported as a text file. By default, the Output Pane is not displayed when Quick Fields is opened. To open it, click View from the menu, point to Panes and select Output. You can configure the Report events to the Output Pane option to not log anything or appear only when an error and/or a warning is logged. To change this setting, click Tools from the menu, select Options then Output Pane.
Output Pane displays information about the processes performed by Quick Fields during processing. This information, the Output Log, can also be exported as a text file. By default, the Output Pane is not displayed when Quick Fields is opened. To open it, click View from the menu, point to Panes and select Output. You can configure the Report events to the Output Pane option to not log anything or appear only when an error and/or a warning is logged. To change this setting, click Tools from the menu, select Options then Output Pane.

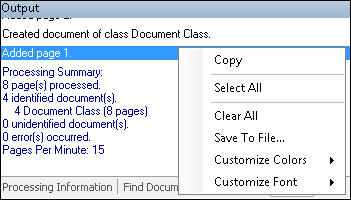
Note: The Processing Information Pane contains some of the same information as the Output Pane, but it is formatted differently. Only the Output Pane contains the processing summary.
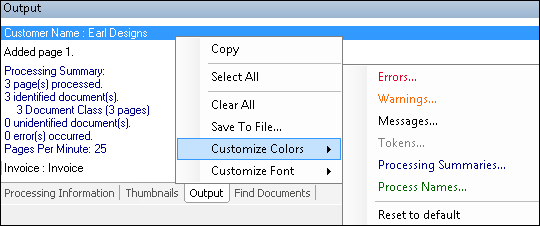
The information in the Output Pane is coded by type, with different colors for errors, warnings, messages, tokens, processing summaries, and process names.
To change the colors
- Right-click in the Output Pane.
- Point to
 Customize Colors.
 - Select a category.
- Select a color.
- Optional: To create a new color, select a palette box and click Define Custom Colors. Select the color you want and click Add to Custom Colors. The color will appear in the palette box. Then select that color
- Click OK.
Note: You can return to the default colors by pointing to Customize Colors and selecting Reset to default.
To change the font
- Right-click in the Output Pane.
- Point to Customize Font.
- Select Change font.
- Pick the desired font, font style, and font size.
- Click OK.
Note: You can return to the default font by pointing to Customize Font and selecting Reset to default.

Note: You can also configure the colors and change the font in the Options dialog under Output Pane.
The Output Log can be exported as either a Rich Text Format document (.rtf) to preserve the color settings or as a plain text file (.txt), which will not preserve the color settings.
To export the Output Log
- Select Export Output Pane Contents from the Action menu or right-click in an open area of the Output Pane and select Save To File.
- By default, the file name will be the current date. Rename it if desired.
- Select Rich Text Format or Text File.
- Click Save.
You can copy some or all of the information in the Output Pane and paste it into the application of your choice, such as Microsoft Word.
To copy some of the information from the Output Pane
- Select the desired text.
- Right-click and select Copy.
- Paste it into the application of your choice.
To copy all the information from the Output Pane
- Right-click in an open area of the Output Pane and click Select All.
- Right-click again and select Copy.
- Paste it into the application of your choice.
You can clear all the information in the Output Pane. For instance, if you begin scanning and then stop, the information up to the point where you stopped will be recorded in the Output Pane. You may want to keep this information, or clear it all and start over.
To clear all the information from the Output Pane
- Right-click in the Output Pane and select Clear All.
Tip: You can double-click on an action in the Output Pane to be taken directly to the page where the action took place. For example, double-clicking "Added page 5" will take you to page 5 of the document.