Manually Extending the Activity Proxy
There are two common situations in which you may want to modify your custom activity’s proxy code directly:
- You already generated your proxy and want to make a small change without having to generate the entire file again.
- You need to make a modification to your custom activity which is not possible with the Activity Proxy Generator alone.
Modifying your code to implement validation
One of the most important reasons to modify the activity proxy manually is to implement validation of a property on your activity. To implement validation for a property, find the following method in your activity proxy code:
protected virtual void ValidateProperty_<PropertyName>
(IValidationErrorCollection collection)
where <PropertyName> is the name of your property as declared in your activity proxy (not its displayed name).
Example: If you want to ensure that the UserInput string property’s value is specified (not blank) in the Workflow Designer, you can use the following code in your proxy:
protected virtual void ValidateProperty_UserInput
(IValidationErrorCollection collection)
{
if (string.IsNullOrEmpty(this.UserInput))
{
collection.AddError("This property must be specified.");
}
}
Note: The method ValidateProperty_UserInput is automatically generated by the Activity Proxy Generator if you include a property named UserInput. By default, the body of this method will be empty (except for some comments). You can report errors or warnings by calling collection.AddError or collection.AddWarning. These methods can be called multiple times within the same method if you want to show multiple errors or warnings.
Customizing properties and other options in your code
You may want to further change your activity proxy without regenerating its code with the Activity Proxy Generator. This section introduces a few of the lines of code that you might want to modify.
The following items are some of the attributes that you might see on your activity proxy class. These attributes affect the entire activity.
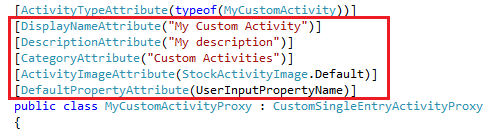
- DisplayNameAttribute: Specifies a default value for the activity's name. An activity's name appears next to the activity's icon in the Designer Pane and can be changed in the Activity Name property box. This value is also used to represent the activity in the Toolbox.
- DescriptionAttribute: Specifies a default value for the activity's description. An activity's description appears in the activity's Activity Description property box when the activity is added to a workflow. This value also appears as a ToolTip for the activity in the Toolbox.
- CategoryAttribute: Specifies which Toolbox category your activity appears in by default.
- ActivityImageAttribute: Specifies the image for your custom activity. The image appears in the Toolbox Pane and when your activity is added to a workflow.
- DefaultPropertyAttribute: Specifies the property that will be edited if you double-click the activity in the Workflow Designer.
Example: To change the activity’s display name from “My Activity” to “My New Activity,” change: [DisplayNameAttribute("My Activity")] to [DisplayNameAttribute("My New Activity")]
The following items are some of the attributes that you might see on individual properties. These attributes only affect the corresponding property.
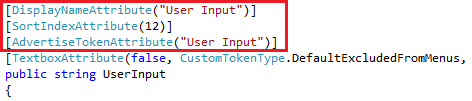
- DisplayNameAttribute: Specifies the name of the property as it appears in the Properties Pane.
- SortIndexAttribute: When compared to other properties, determines the order in which this property will appear in the Properties Pane, from top (lowest number) to bottom (highest number).
- AdvertiseTokenAttribute: Specifies whether this property provides a token. The token’s name is specified by the string parameter of this attribute. The token’s value will be the value of the property when the activity runs. If this attribute is not present, no token will be produced for this property.
- Other: Most properties will have one or more attributes that determine the user interface used for configuring the property in the Properties Pane. In the above example, the property has a TextboxAttribute that will provide a Textbox control when a user is configuring the property.
Hint: In Visual Studio, you can find out more about the attributes’ parameters by using the keyboard shortcut CTRL+SHIFT+SPACE to show a ToolTip describing the current parameter (based on the location of the cursor). You can press the up and down arrow keys on the keyboard to cycle through available overrides.
You can also set the default value of a property from the activity proxy. The most common way to do this is to initialize the backing field for the property. The backing field is usually a private field with a similar name to the property, such as
private string userInput = "";
In this example, you could change the default value of the UserInput property by replacing "" with your default value.