Script Tokens Pane
The Script Editor's Script Tokens Pane allows you to indicate the tokens your script produces and that will be available to other activities.
To open the Script Tokens Pane
- Click the Script Tokens tab at the bottom of the Script Editor. Alternatively, click View from the main menu and select Script Token Registration, or use the keyboard shortcut CTRL+R.
To add tokens from your script to the Script Tokens Pane
- Click the Auto Detect Tokens button
 on the toolbar of the Script Tokens Pane. Any tokens you created with your script via the SetTokenValue or SetActivityTokenValue methods will be listed in the pane. To modify these tokens, see the edit section below.
Note: By default, the Script Editor will automatically detect the creation of tokens in your script files and add them to the Script Tokens pane when the Script Editor is closed. To change this behavior, clear the Automatically detect tokens when the Script Editor is closed option in the Script Editor Options.
To create a new token with the Script Tokens Pane
- Click the New Token button
 in the upper left corner of the pane's toolbar.
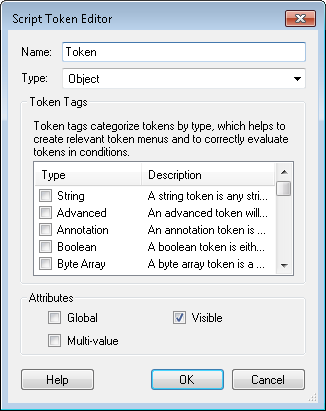
 - In the Script Token Editor dialog box, type a name for your token next to Name.
- Next to Type, select what type of value the token will store from the drop-down menu. Token types include string, Boolean, integer, and other common programming types.
- Optional: Select one or more tags for your tokens under Token Tags. More information.
- Under Attributes, select one or more of the following attributes
- Global: Select this attribute to give your tokens the format %(TokenName) instead of %(ActivityName_TokenName).
- Visible: Select this attribute to make this token available to other activities in your workflow in the token menu or Token Dialog.
- Multi-value: Select this attribute to allow your token to have multiple values. More information.
- After configuring your token, click OK.
- In your script, you can use the SetTokenValue or SetActivityTokenValue methods to set the value of the token you just created. If you do not set the value of the token, its value will be blank.


Note: Any token value that is an object that implements the System.Collections.ICollection interface will cause the token to be treated as a multi-value token regardless of whether this attribute is selected. We recommend that if you want to create a multi-value token, your token's value's class should implement System.Collections.ICollection.
To edit tokens in the Script Token Pane
- To modify a token, select the token in the Script Token Pane and click the edit Token button
 on the Script Token Pane's toolbar menu. Make any desired changes in the Script Token Editor, and click OK.
 - To change a token's attributes (as configured in the Script Token Editor dialog box), select or clear Global, Multi-value, and/or Show (corresponds with the Visible attribute).
- To rename a token, click the token's name in the list of tokens. Type a new name for the token.
- To delete a token, select a token in the list, and click the red X
 on the Script Tokens Pane toolbar.
 - To delete all tokens in the list, click the clear all button
 on the Script Tokens Pane toolbar. Note that this action is irreversible.
 - To show (make visible) or hide all tokens in the list, right-click in the Script Tokens Pane and select Show all tokens or Hide all tokens. (See the attributes list above for more information on showing or hiding tokens.)

Note: Use the SetTokenValue method with global tokens, and the SetActivityTokenValue method with non-global (i.e., activity) tokens.