Step 4: Activity Proxy Properties
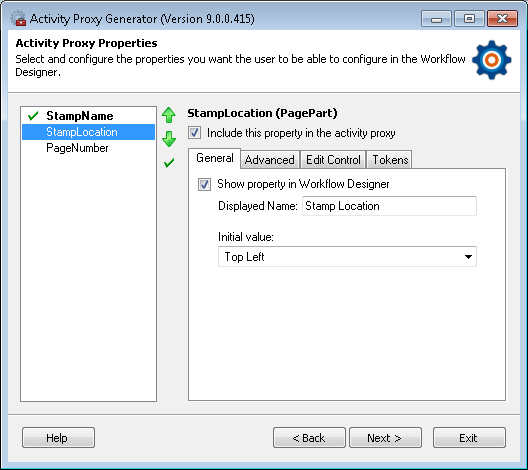
The ![]() Activity Proxy Properties step of the Activity Proxy Generator lest you specify which properties will be visible to the user in the Workflow Designer’s Property Pane and how those properties will be configured. This section of the Activity Proxy Generator offers a tremendous amount of flexibility for a variety of different property types.
Activity Proxy Properties step of the Activity Proxy Generator lest you specify which properties will be visible to the user in the Workflow Designer’s Property Pane and how those properties will be configured. This section of the Activity Proxy Generator offers a tremendous amount of flexibility for a variety of different property types.
Specifying Your Properties
The list on the left side of this step displays the properties that can appear on the Workflow Designer’s Property Pane. For properties to appear in this list, you must declare them as public properties in the code for your activity’s runtime component, and they must have both a get and a set accessor. You can define as many properties as you want for your activity.
Customizing Your Properties
- If more than one property is defined, the properties will appear in the Workflow Designer’s Properties Pane in the same order as they appear in the list on the left. You can use the green up and down arrows
 to reorder the properties.
 - Select a property and click the checkmark button
 to set it as the default property. The default property will be edited when the user double-clicks the activity in the Workflow Designer's Designer Pane.
 - You can also choose not to include a certain property in the activity proxy code by selecting the property and clearing the Include this property in the activity proxy checkbox.
- To configure a property, select it in the left column and configure the following tabs on the right (if available). Click the links below for more information about the configuration options in each tab.
- The General tab lets you specify the selected property's display name, initial value, and whether the property is visible in the Properties Pane of the Workflow Designer.
- The Advanced tab allows you to choose from several advanced settings for the selected property.
- The Edit Control tab lets you configure the user interface for the selected property as it will appear in the Property Pane of the Workflow Designer.
- The Tokens tab allows you to configure the selected property so that it creates a token for other activities to use.
Example: You might want to use a public property in your runtime component’s implementation but do not want this public property visible in the Workflow Designer.
After configuring your properties, click Next to continue to Step 5: Code Generation Options.
