Distributed Computing Cluster
Laserfiche Distributed Computing Cluster lets you divide resource intensive processes among multiple CPUs and computers. OCR (Optical Character Recognition) is a very resource intensive task and a queue of documents can quickly build if documents are being processed one at a time. If you can distribute the OCR process, then documents can be processed in parallel. How many documents can be processed at the same time depends on the number of CPUs you allocate for processing.
Specify a Distributed Computing Cluster Scheduler for Workflow to use from the following places:
- The Distributed Computing Cluster node of the Workflow Administration Console.
- In the Schedule OCR activity's Distributed Computing Cluster Scheduler property box, select Manage Schedulers from the Use the following scheduler drop-down menu.
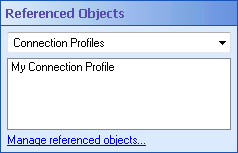
- If you have already configured one or more Distributed Computing Cluster Schedulers with the Schedule OCR activity, you can configure schedulers from the workflow's Referenced Objects property box. (To view and edit this
 property box, select a blank area in the Designer Pane and click the Advanced button
  at the top of the Properties Pane.) Select Distributed Computing Cluster Schedulers from the drop-down menu, and click the Manage referenced properties link. In the Referenced Object Manager, click Add or Edit.
To add or modify an Distributed Computing Cluster Scheduler
- In the
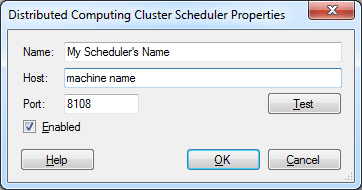
 Distributed Computing Cluster Scheduler Properties dialog box, next to Name, give the scheduler a unique display name. This name is necessary to distinguish between multiple Distributed Computing Cluster Schedulers.
 - Next to Host, type the name of the machine that handles distributed computing.
- Next to Port, specify the port you want to use when communicating with the Distributed Computing Cluster Scheduler.
- Optional: Click Test to ensure Workflow can connect to the scheduler.
- Select the Enabled check box to enable the Distributed Computing Cluster Scheduler, or clear the Enabled check box if you want to disable the scheduler. You may have multiple Distributed Computing Cluster Schedulers and want one disabled while you configure another one.
- When finished, click OK.
- Optional: If you accessed this dialog box from the Workflow Administration Console, the Distributed Computing Cluster Scheduler Manager dialog box will appear. You can select an existing scheduler and click Edit to change it, click Delete to remove it, or double-click the green check
 or red X
  in the Enabled column to toggle its status between enabled and disabled. Learn more.
 - Optional: If you accessed this dialog box from the Workflow Designer, the Referenced Object Manager will appear and you can select an existing Distributed Computing Cluster Scheduler and click Edit to change it.
- Click Close to exit the Distributed Computing Cluster Scheduler Manager or Referenced Object Manager.
To assign a different scheduler to multiple activities in a workflow
Tip: You are setting up a new Distributed Computing Cluster Scheduler and want your workflows to use this new scheduler. Instead of individually updating each Schedule OCR activity, you can update all the activities at once with the Reassign option.

