Changing Document and Folder Volumes
A volume represents the physical hard drive location where images, text, and electronic files for a particular document are stored. Although folders are not stored in volumes, you can also set a volume on a folder; that volume will serve as the default volume for documents created in that folder. (See Options: New Documents: General for more information on default volumes.)
You can also assign a document to a particular volume, or to its parent folder's volume, during document creation or import. See Import and New Document Dialog Box for more information.
Note: A migration in progress can be stopped by clicking Cancel under the progress bar. Entries migrated before the cancellation will remain in the new volume location.
Migrating Documents to a Volume
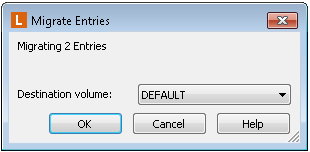
- From the folder browser, select the documents to be migrated.
- In the Tasks menu of the Windows client or the More Actions -> Advanced menu of the web client, select Migrate Entries.
- In the
 Migrate Entries dialog box, select the volume to be assigned to your documents.
Assigning a Volume to a Folder
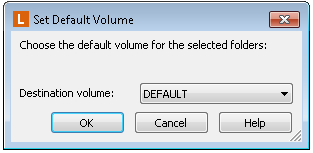
In the Windows client
- From the folder browser, create or select the folder whose contents you want stored on a specific volume.
- In the Tasks menu, click Set Default Volume.
- Choose the Destination volume from the drop-down menu.
In the web client
- Select a folder and select the Details tab of the metadata pane.
- Expand the Show Advanced section.
- Next to Default Volume, select a volume from the drop-down menu.