You can organize your documents by creating folders and then storing documents within them, either by creating new entries in those folders or by moving existing entries into the folders. As in Windows, folders can also contain subfolders, allowing you to further customize the way your entries are organized.
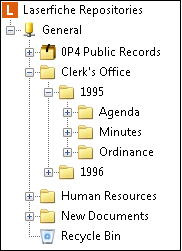
Example: The ![]() following illustration provides an example of how an organization could set up their folder structure. The first level of folders categorizes documents according to department. Each department is then split up according to the type of documents it handles. A third level breaks the type of documents into smaller categories. Browsing through folders configured in this fashion allows a user to quickly narrow down the amount of information that he or she needs to deal with.
following illustration provides an example of how an organization could set up their folder structure. The first level of folders categorizes documents according to department. Each department is then split up according to the type of documents it handles. A third level breaks the type of documents into smaller categories. Browsing through folders configured in this fashion allows a user to quickly narrow down the amount of information that he or she needs to deal with.
Creating Folders
- Navigate to the folder in which you want to create a new folder.
- Do one of the following:
- From the toolbar, click New Folder
 .
. - In the Windows client, from the File menu, point to New and click Folder.
- Right-click in the Contents Pane, point to New, and click Folder.
- Your new folder will be created in the current folder. Type in a name for the new folder and press Enter.
Moving Entries
- From the folder browser, select the entry you want to move.
- Do one of the following:
- Drag and drop the item to the new location. You can also drag an drop items across Windows client windows, or across browser windows in the web client.
- If you are using the Windows client, Press CTRL + X or click Cut in the Edit menu. Select the folder where you want the item, and press CTRL + V or click Paste in the Edit menu.
- If you are using the web client, select one or more documents or folders and click the Move To button, or right-click and select Move To. Navigate to the folder where you want to move the document or folder and click Paste.
Note: If your repository is configured to use classification levels, and a classification level has been assigned to the entry, it can only be moved to a folder with an equal or higher classification level. See Classification Levels for more information.
Copying Entries
A copy of an entry will contain most of the same information as the original. For instance, a copy of a document will contain all of its pages, electronic file information, annotations, and most of its metadata, and a copy of a folder will contain all of the documents within that folder. However, copied documents (whether copied individually or as part of a folder) will not contain document relationship, link group or version information from the original.
To copy entries
- In the folder browser, select the entry you want to copy.
- Do one of the following:
- In the Windows client, hold down the CTRL key while you drag and drop the entry in the folder where you want a copy created. Or, press CTRL + C or click Copy in the Edit menu, select the location where you want the copy created, and press CTRL + V or click Paste in the Edit menu.
- In the web client, right-click the entry and select Copy. Navigate to the new location, right click, and select Paste, Paste Shortcut, or Paste Folders Only
Note: By default, entry access rights for entries will be included when you copy and paste them. You can change this setting in Options: Browser: Settings in the Laserfiche Windows client, or Settings: Entry Copy: General in the Laserfiche web client.
Renaming Entries
From the folder browser
- Select the entry you want to rename in the folder browser.
- Do one of the following:
- In the Windows client, from the File menu, select Rename. Or, press F2.
- Right-click the item, and click Rename.
- Specify the new name, and press the Enter key.
From the document viewer
- Open the document.
- Do one of the following:
- In the Windows client, from the File menu, select Rename. Or, press F2
- In the web client, from the More Actions menu, select rename.
- Specify the new name, and click OK.
