Token Formatting
You can apply formatting to tokens so that the information that replaces them will automatically fit certain characteristics, such as a certain date format, percentage, currency, decimal, number of digits, or other formatting. The Token Editor will help you insert and test token formatting. The standard for formatting a token is %(Token#"Expression"#), where token is the name of the token and expression is a .NET formatting expression.
Example:%(count#"D4"#) will format the value of the count token to always have four digits. If 23 is inserted in a token with this format, the result will be 0023.
Note: The regional settings such as date and currency are Windows regional settings found in the Control Panel for the computer running Quick Fields.
The types of formatting that can be applied to tokens in Quick Fields are:
- Numeric
- Date and Time
Token Formatting - Numeric
You can use .NET formatting specifiers to have data stored in tokens automatically formatted to specified numeric settings. Standard format specifiers can be used to format numbers according to some of the most frequently used choices. Custom format specifers will work for the same options allowed by the standard ones, and also allow you to further customize or combine formatting choices. You can type these specifiers directly in the tokens or use the Token Editor to insert the specifier and test the formatted token.
Example: Lisa is processing order forms. She wants to use the order numbers as document names. The order numbers can have various numbers of digits, so she wants to add leading zeros so the names will be sorted in true numeric order. Currently, the maximum number of digits in an order number is five, but she decides to allow eight digits so she can continue to use the same system well into the future. She can do this using either standard or custom numeric format specifiers. In either case, she can begin by opening the Token Editor and selecting Include Formatting. Then she can use either of the following options:
| Formatting Specifier | Resulting Token | Result when tested with "334" | |
| Standard | D8 | %(Order#"D8"#) | 00000334 |
| Custom | 00000000 | %(Order#"00000000"#) | 00000334 |
Note: The regional settings such as date and currency are Windows regional settings found in the Control Panel for the computer running Quick Fields.
Standard Numeric Format Specifiers
The following specifiers can be used to format numbers according to standard rules.
Example: Maggie is processing lab reports that include numbers in decimal form that she wants to store as percentages in Laserfiche fields.
| Formatting specifier | Formatted token | Test value | Result |
| P | %(Zone 1#"P"#) | .12 | 12.00 % |
| Specifier | Type | Function |
|---|---|---|
| C or c | Currency | Formats the value to the local currency settings. |
| D or d | Decimal | Formats the part of the number before any decimal point. Specify a minimum number of digits. Example:D8 for a minimum of eight digits. Leading zeroes will be appended to create the appropriate number of digits. |
| E or e | Exponent | Specify a number of digits after the decimal point. Example: e4 for four digits after the decimal. |
| F or f | Fixed point | Formats the part of the number after the decimal point. Specify the desired number of decimal places. Example: F3 for three digits after the decimal. Zeroes will be used to create the appropriate number if necessary. |
| P or p | Percent | Converts the value to a percentage. |
Custom Numeric Format Specifiers
The following specifiers can be combined to format numbers to specific patterns.
Example: Homer wants to format the value of a token named Zone 1 so that the numbers before the decimal place have a comma separating the thousands place, if one exists, but does not want to append leading zeroes. He also wants the numbers to have exactly four digits after the decimal, even if that means appending zeroes.
| Formatting specifier | Formatted token | Test value | Result |
| #,###.0000 | %(Zone 1#"#,###.0000"#) | 1425.99 | 1,425.9900 |
| #,###.0000 | %(Zone 1#"#,###.0000"#) | 623.877 | 623.8770 |
| Specifier | Type | Function |
|---|---|---|
| 0 | Zero placeholder | Will be replaced if there is a value in that position; otherwise, will appear as a 0 in the result. |
| # | Digit placeholder | Will be replaced if there is a value in that position; otherwise, nothing will appear. |
| . | Decimal point | Represents the location of the decimal separator. Only the first decimal point in a string will be used. |
| , | Thousand separator and number scaling | Can be used to insert commas as a thousands separator in numbers. Also, one or more immediately to the left of the explicit or implicit decimal point can be used to display numbers in terms of some other amount (e.g., 3,000,000 in millions is 3). |
| % | Percentage placeholder | Multiplies a number by 100 and inserts a % sign. |
| E0, E+0, E-0, e0, e+0, e-0 | Scientific notation | Formats the number using scientific notation. The number of 0 characters indicates the minimum number of digits to output for the exponent. |
| \ | Escape character | Causes the following character to be used literally, even if it is otherwise one of the formatting specifiers. |
| 'ABC' or "ABC" | Literal string | The characters inside the single or double quotes will be used in the result as is, and do not affect formatting. |
| ; | Section separator | Used to separate formats for positive, negative, and zero numbers in the format string. Using these, you can specify three different types of formats to be applied depending on the type of number. |
For more information on .NET numeric formatting specifiers, see the Microsoft Developers' Network (MSDN) site:
- http://msdn.microsoft.com/en-us/library/dwhawy9k.aspx
- http://msdn.microsoft.com/en-us/library/0c899ak8.aspx
Token Formatting - Date and Time
You can format tokens to automatically convert dates and times entered into them into specified formats. A standard format string is a single letter that represents a format that your data will automatically be converted to. A custom format string is a group of symbols that indicate the exact format for the information. Standard format strings are just shortcuts for frequently used formats that could also be achieved with custom format strings. You can type these specifiers directly in the tokens or use the Token Editor to insert the specifier and test the formatted token.
Note: A Laserfiche field that is specifically a date field will automatically format a date inserted into it to match the computer's regional settings without additional formatting. You might want to add date formatting to a token if you are using it in a character field or in another function such as document name or folder path.
Note: The regional settings such as date and currency are Windows regional settings found in the Control Panel for the computer running Quick Fields.
Note: A single-character date/time format string will be interpreted as a standard date/time format string. Multiple-character date/time format strings will be interpreted as custom strings. To use a single-character custom string, include a % sign before the character or a space before or after it.
Standard Date and Time Format Strings
Standard date and format strings can be inserted into Quick Fields tokens to format the values to match patterns determined by the regional settings of the computer where Quick Fields is installed. View the regional settings in the control panel of the computer running Quick Fields to determine how these strings will format your tokens.
- Formatted token: %(DateTime#"g"#)
- Input: January 23, 2009, 0:00
- Result:
- 1/23/2009 12:00 AM (English - United States)
- 23/01/2009 00:00 (French - France)
- 2009-01-23 00:00 (French - Canada)
| Specifier | Type | Function |
|---|---|---|
| d | Short date pattern | Formats date and time strings to the short date pattern defined in your computer's regional settings. |
| D | Long date pattern | Formats date and time strings to the long date pattern defined in your computer's regional settings. |
| t | Short time pattern | Formats date and time strings to the short time pattern defined by your computer's settings (hours and minutes). |
| T | Long time pattern | Formats date and time strings to the long time pattern defined by your computer's settings (hours, minutes, and seconds). |
| f | Full date/time pattern (short time) | Represents a combination of the long date (D) and short time (t) patterns, separated by a space. |
| F | Full date/time pattern (long time) | Represents a combination of the long date (D) and long time (T) patterns, separated by a space. |
| g | General date/time pattern (short time) | Represents a combination of the short date (d) and short time (t) patterns, separated by a space. |
| G | General date/time pattern (long time) | Represents a combination of the short date (d) and long time (T) patterns, separated by a space. |
| M | Month day pattern | Displays the month and day according to your computer's regional settings. |
| Y or y | Year month pattern | Displays the year and month according to your computer's regional settings. |
| u | Universal sortable pattern | Always formats to a pattern with a four-digit year first, followed by 2-digit month, day, year, hour, minute, and seconds. |
Custom Date and Time Format Strings
You can also create custom strings to format dates and times to any combination of date and time formats. A popular use for this is to use dates extracted from your documents to create document names or folder paths according to a standardized system.
Example: Chris wants to organize his documents into folders labeled with the last two digits of the year and the abbreviation for the month. He formats a token that contains the date accordingly and places it into the folder path for the document class.
- Formatted token: %(Zone 1#"yy-MMM"#)
- Input: January 23, 2009
- Result:
- 09-Jan (English-United States)
- 09-jan (Portuguese-Brazil)
- 09-ene (Spanish-Spain)
Note: On most Windows computers, the system clock's resolution is approximately 10-15 milliseconds, so while seconds can be formatted to additional digits, they may not be accurate beyond that threshold.
| Specifier | Type | Function |
|---|---|---|
| / | Date separator | Used to differentiate years, months, and days. May be replaced by the date separator defined in the computer's regional settings, if that is different. |
| : | Time separator | Used to differentiate hours, minutes, and seconds. May be replaced by the time separator defined in the computer's regional settings, if that is different. |
| " or ' | Quoted string indicator | The value in between quotation marks will be interpreted literally, not as a formatting specifier. |
| % | Single custom format specifier indicator | To use a single custom format specifier, precede it with the % symbol. For example, to use M for the month section of a custom formatting string, write %M. |
| \ | Escape character | A character preceded by the backslash character (\) will be interpreted literally, not as a formatting specifier. |
| d | Day: 1-31 | Represents the day of the month as a number from 1 through 31. A single-digit day will be formatted without a leading zero. |
| dd | Day: 01-31 | Represents the day of the month as a number from 01-31. A single-digit day will be formatted with a leading zero. |
| ddd | Abbreviated day of the week | Represents the abbreviated name of the day of the week as defined in the computer's regional settings. |
| dddd (etc.) | Full day of the week | Represents the full name of the day of the week as defined in your computer's regional settings. |
| M | Month: 1-12 | Represents the day of the month as a number from 1 through 12. A single-digit month will be formatted without a leading zero. |
| MM | Month: 01-12 | Represents the day of the month as a number from 01 through 12. A single-digit month will be formatted with a leading zero. |
| MMM | Abbreviated month | Represents the abbreviated name of the month according to the computer's regional settings. |
| MMMM | Full month | Represents the full name of the month according to the computer's regional settings. |
| y | Year: 1-2 digits | Formats the year to a one or two-digit number. If the year has more than two digits, the lowest order two will be displayed. If the first of the two digits is a zero, the number will be displayed without the leading zero. |
| yy | Year: 2 digits | Formats the year to a two-digit number. If the year has more than two digits, the lowest order two will be displayed. If the first of the two digits is a zero, the number will be displayed with a leading zero. |
| yyy | Year: 3 or more digits | Formats the year to a number with three or more digits. if the year has fewer than three digits, it will be formatted with leading zeroes. If it has more than three, they will all be displayed. |
| yyyy | Year: 4 digits | Formats the year to a four-digit number. If the year has fewer than four digits, it will be formatted with leading zeroes. If it has more than four digits, only the four lowest-order digits will be displayed (except in the case of the Thai Buddhist calendar, which may display five digits). |
| yyyyy (etc.) | Year: 5 or more digits | Formats the year to the number of digits equal to the number of ys. If the year has fewer digits than specified, it will be padded with leading zeroes. |
| g, gg, etc. | Era | Represents the period or era, for example, A.D. This specifier will be ignored if the date to be formatted does not have a period or era association. |
| h | Hour: 1-12 | Represents the hour as a number from 1 through 12. If the hour is a single digit, it will be formatted without a leading zero. |
| hh | Hour: 01-12 | Represents the hour as a number from 01 through 12. If the hour is a single digit, a leading zero will be appended. |
| H | Hour: 0-23 | Represents the hour as a number from 0 through 23. If the hour is a single digit, it will be formatted without a leading zero. |
| HH | Hour: 00-23 | Represents the hour as a number from 00 through 24. if the hour is a single digit, a leading zero will be appended. |
| m | Minutes: 0-59 | Represents the number of whole minutes since the last hour. If the number is a single digit, it will be formatted without a leading zero. |
| mm | Minutes: 00-59 | Represents the number of whole minutes since the last hour. A single digit will be appended with a leading zero. |
| s | Seconds: 0-59 | Represents the number of whole seconds since the last minute. If the number is a single digit, it will be formatted without a leading zero. |
| ss | Seconds: 00-59 | Represents the number of whole seconds since the last minute. A single digit will be appended with a leading zero. |
| f, ff, fff, etc. | Fractions of a second | Each f represents a digit of the seconds fraction to display. A zero will be displayed if the digit is zero. |
| F, FF, FFF, etc. | Fractions of a second | Each F represents a digit of the seconds fraction to display. Nothing will be displayed if the digit is zero and there is no other value after it. |
| t | First character of the AM/PM designator | The first character of the designator for whether the time is before or after noon, as determined by the computer's regional settings |
| tt | AM/PM designator | The designator for whether the time is before or after noon, as determined by the computer's regional settings |
For more information on .NET date and time formatting, see the Microsoft Developers' Network (MSDN) site at
- http://msdn.microsoft.com/en-us/library/az4se3k1.aspx
- http://msdn.microsoft.com/en-us/library/8kb3ddd4.aspx
Token Syntax
Tokens have the following format (syntax): %(TokenName). This syntax lets both you and the software know when a bit of text will behave like a token.
Note: The syntax used for tokens has changed from Laserfiche 7 to Laserfiche 8 and later. All tokens should now be in the following format: %(token).
You can edit the syntax even further if you want to apply functions, indexing, formatting, or regular expressions. However, the Token Dialog and Token Editor will automatically create this syntax for you when you choose different options in these dialog boxes.
- Functions: %(TokenName#@FunctionName@#). The function's name is placed between #@ and @#. Multiple functions are separated by a semi colon. If the function has a parameter, such as if you specified a delimiter for the Split function, then the parameter is placed between parentheses: %(TokenName#@FunctionName(Parameter)@#).
- Indexing: %(TokenName_All#[n]#) where n equals the index number of the value you want the token to be replaced by. The syntax to have a token be replaced by all values separated by a delimiter is: %(TokenName_All#[delimiter]#). The delimiter is placed between #[ and ]#.
- Formatting: %(TokenName#".NET formatting expression"#). A .NET formatting expression is placed between #" and "#.
- Regular Expressions: %(TokenName#<RegularExpression>#). The regular expression is placed between #< and >#, directly after the token name.
The forward slash character "/" is an escape character in token syntax. You should escape any characters that will make the token's syntax ambiguous. Show me an example. The Token Dialog and Token Editor automatically escape characters when necessary.
Example: If you precede a token with a forward slash, when the session runs, the token itself will be returned and not its value. For instance, you want to use a token when defining a URL in a field, and you type: http://CompanyName/%(EmployeeID) in the field. When the session runs, the /%(EmployeeID) will be replaced with the characters /%(EmployeeID) instead of a forward slash and the token value. To return the token value, escape the forward slash with another forward slash. For example, http://CompanyName //%(EmployeeID) would return http://CompanyName/12345.
Example: You want to delimit a multi-value token with the character "]". Because "]" has syntactic meaning when indexing a token, you will need to escape it in the token's syntax: %(TokenName_All#[/]]).
Multi-Value Tokens
A multi-value token contains two or more distinct values. The following processes can return a multi-value token: Assign Token Value, Retrieve PDF Form Content, Token Accumulator, OmniPage Zone OCR, Barcode, and Pattern Matching.
Note: You can make any token a multi-value token using the Split function in the Token Editor.
Example: Laura uses a multi-value token to populate a field. Her token contains three phone numbers, each of which is a separate value. In this situation, the corresponding field will only contain the first phone number. If the field accepts multiple values, all three phone numbers will be populated in the multi-value field.
Note: In most cases, when you use this type of token, it will only return the first value of the multi-value token. This is also the case when using multi-value tokens in sticky notes. Only the first value will be returned.
Note: You can use the Token Accumulator process to accumulate values from one or more tokens across a range of pages within the same document and create a multi-value token with those values.
The following options are available to modify the value that is returned by a multi-value token.
- Specify the delimiter that should be used to separate values.
Use the following syntax: %(ZoneName#[delimiter]#). For example, %(ZoneName#[ | ]#) will use <blank space>|<blank space> as the delimiter, such as 1 | 2 | 3.Note: Numbers cannot be used as delimiters because they are reserved for indexes. (See below).
- Specify that only a single value should be returned.
If you only need a single value in a multi-value token, use the following syntax: %(ZoneName#[n]#) where n equals the index number of the value you want. For OmniPage Zone OCR, index 1 is the text on the first OCRed line. For barcode, index 1 is the first barcode. For example, %(ZoneName#[3]#) will return the third line of text or barcode. If n is less than zero, Quick Fields will count from the bottom up. For example,%(ZoneName#[-1]#)will return the last line of text or barcode, while %(ZoneName#[-5]#)will return the fifth value from the bottom-up.Note: Do not specify a range of index numbers that should be returned. For example, %(ZoneName#[1-3]#) would not work. In fact, 1-3 would be used as a delimiter.
Token Dialog
You can view, modify, and format tokens in the Token Dialog. The Token Dialog gives you the flexibility to configure tokens to meet your needs.
To use the Token Dialog
- Click the token button (right arrow) next to the text box you want to enter a token in.
- Select Token Dialog.
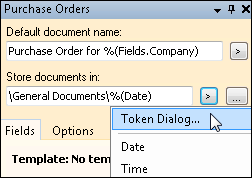
- In the Tokens dialog box, select a token. The Tokens section displays tokens you can select. Available options include: standard tokens and tokens specific to the processes in your current Quick Fields session. To find a specific token, expand the process that produces the token you are looking for or type a token name in the Search for tokens field at the top of the list (e.g., to find tokens that have "Date" in their names, type "Date").
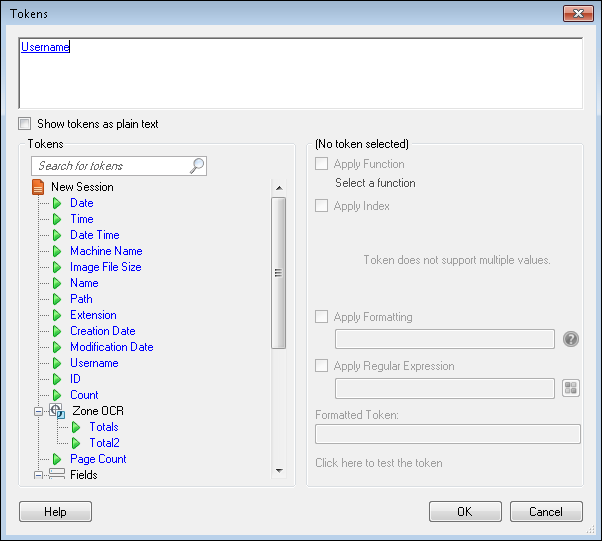
- Configure the selected token. The right pane enables you to configure the selected token with functions, indexing, formatting, and/or regular expressions. See the Token Editor section for how to configure these options.
- Optional: Add text or more tokens. The top pane displays the token you have selected to use. You can type text alongside this token. This text is included with the token in the text box from which you opened the Token Dialog. Additionally, you can configure more tokens by repeating steps 3-5. Click Show token as plain text (below the top pane) to show how the text appears in the original text box.
- Click OK.
Token Editor
The Token Editor lets you modify token values with functions, indexing, formatting, and regular expressions.
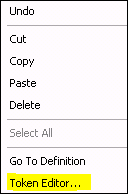
Example: Bill wants to name entries with the current month and year. At the top of the Tasks Pane, when the document class is selected in the Session Configuration Pane, he selects the Date token for the Document Name by clicking the token button (right arrow) . Because the Date token is replaced by the current month, day, and year, Bill needs to modify the token so it only returns the month and year. To access the token editing options, he right-clicks the token and selects Token Editor.
To customize a token:
- Right-click any token that appears in a text box.
- Select Token Editor
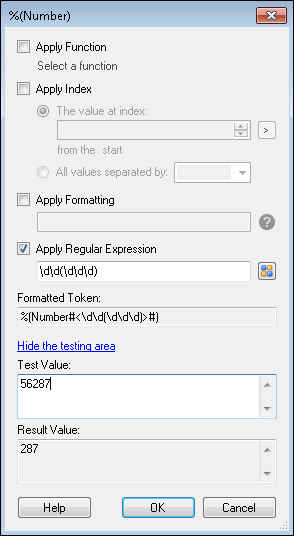
- The Token Editor dialog box will appear.
To use the Token Editor
- In the Token Editor dialog box, select one or more of the following options: Apply Function, Apply Index, Apply Formatting, and/or Apply Regular Expression.
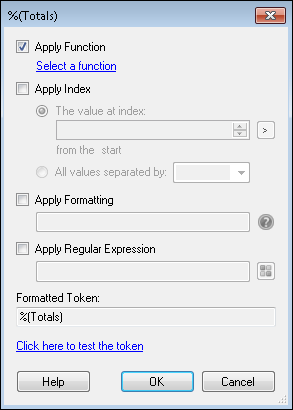
Note: Operations in the Token Editor are applied in the following order: function, index, formatting, regular expression.
- Apply Function: This feature lets you edit the token value with one or more pre-configured operations. Click Select a function to access the Token Functions dialog box. See Token Functions for more information.
- Apply Index: For tokens that accept multiple values, you can replace the token with one of the values or all the values separated by one or more characters. The format for a token that includes an index is: %(Token#[index]#).
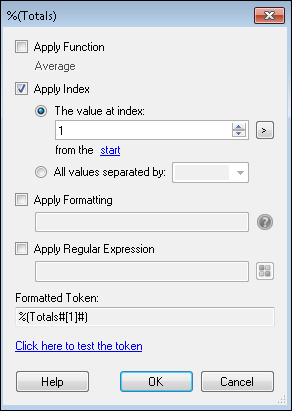
- The value at index: To specify which value a multi-value token will be replaced by, type the value's index number in the text box or using the scroll up-and-down arrows. Alternatively, click the token button (right arrow) to specify an index using tokens. Values are given an index number according to the order in which they are added.
- By default this editor will count the values from the start of a multi-value list.
Example: Typing an index value of 1 will retrieve the 1st value in the list (the oldest value), typing an index of 2 will retrieve the 2nd value, etc. To retrieve a value near the end of the list, click the start link to change it to end. When the link says end, the indices will count from the end of the list. Therefore, typing an index value of 1 will retrieve the last value in the list (the newest value), typing an index value of 2 will retrieve the second to last value, etc.
Example: Misty is scanning documents that include multiple barcodes containing various pieces of information. When she configured her barcode process, she set it to read the whole page rather than individual zones. Her token from that process contains the values from all the barcodes on the page. She wants to extract only the value from the second barcode on the page, so she specifies the index 2 representing the second barcode.
Note: If you are counting values from the start and you specify an index greater than the total number of values in the token, the token will be replaced by the last value. If you are counting values from the end and you specify an index greater than the total number of values in the token, the token will be replaced by the first value.
Note: If you type a character or string of characters other than an integer or a token in this text box, none of the token's values will be extracted. Instead, the All values separated by option below will be selected and the character(s) will be used to separate each token value.
- By default this editor will count the values from the start of a multi-value list.
- All values separated by: This option will have the token replaced by all values, separating them by one or more specified characters. Type one or more characters in the text box next to this option, or select a character from the drop-down menu.
- The value at index: To specify which value a multi-value token will be replaced by, type the value's index number in the text box or using the scroll up-and-down arrows. Alternatively, click the token button (right arrow) to specify an index using tokens. Values are given an index number according to the order in which they are added.
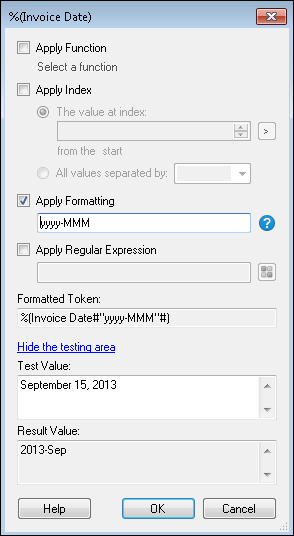
- Apply Formatting: You can apply formatting to tokens so the information that replaces them will be automatically presented in a specific way, such as in a certain date format, a percentage, a currency, a decimal, a specific number of digits, etc. The standard for formatting a token is %(Token#"Expression"#), where token is the name of the token and expression is a .NET formatting expression.
- Apply Regular Expression: This feature lets you modify the token value using regular expressions. The format for a token that includes a regular expression is %(Token#<regex>#).Click the pattern matching button to select from a list of regular expressions
Example: Including the formatting yyyy-MMM would yield the formatted token %(Invoice Date#" yyyy-MMM"#). When the value September 15, 2013 is entered in the token, the value returned will be 2013-Sep.
Note: If your token name contains special characters such as , ( ) # < and so on, you can enclose the token name with [ ].
Example: When the Support Department opens a new case, a support engineer creates an entry and includes the case number in the entry's name. Entry names could be either "Case #12345" or "Case12345." To standardize the naming convention, the organization wants to rename the entries with only the case number. The organization applies the regular expression Case\s*#?(\d+) to the Entry Name token. This regular expression removes the word "Case," the "#" symbol if present, and any white spaces from the name. The edited Entry Name token will be replaced by only the case number (i.e., 12345) and can be used to rename the entries.
Note: To use Pattern Matching expressions, you must have the Pattern Matching add-on installed.
- Apply Function: This feature lets you edit the token value with one or more pre-configured operations. Click Select a function to access the Token Functions dialog box. See Token Functions for more information.
- Optional: Test your token. After applying a token function, regular expression, index, or formatting, click the Click here to test the token link. In the Test Value box, type in one or more sample token values. (You can test a multi-value token by typing values on multiple lines.) The Result Value box will show how the options you configured above will affect the token's value.
- Click OK.
Token Functions
Token functions allow you to edit a token value with one or more pre-configured operations. All available token functions are accessible through the Token Editor dialog box.
Note: Applying a token function will only change the value of the token in that one location. If you want all instances of a token value changed to be the result of a function, use Assign Token Value to create a token with the new value.
To configure token functions
- To open the Token Editor dialog box, right-clicking any token that appears inside a text box and select Token Editor in its context menu.
- In the Token Editor dialog box, select the checkbox next to Apply Function then click Select a function.

- In the Token Functions dialog box, move the functions you want to apply to the token from the left column to the right column by clicking the green right arrow. Functions will be applied to the token in the order they appear in the right column. You can change the order by selecting the function you want to move and using the green up-and-down arrows .
Note: Operations in the Token Editor are applied in the following order: function, index, formatting, regular expression.
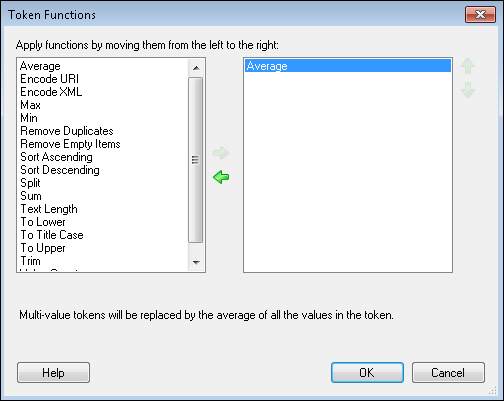
- Click OK to return to the Token Editor. Below are the different functions you can apply.
- Average: Determines the average of all values in a multi-value token and replaces the token with the average. Non-numeric values will be ignored.
- Encode URI: Converts a token's characters (except RFC 2396 unreserved characters) to their hexadecimal representation so the token can be used in a web address. More information.
Example: If you apply this function, http://My Website.com will be converted to http://My%20Website.com. You may want to use this function with tokens used in the HTTP Web Request and HTTP Form Post activities so the URLs resolve correctly.
- Encode XML: Allows you to escape XML characters, such as <, >, ", ', and &, and replace them with their encoded values. Choose this option if your token includes XML characters you want displayed as text in emails or other places. If you do not encode the XML with this function, email clients may try to interpret the XML instead of simply displaying the text.
Example: If you apply this function, <tag> will display as <tag>;.
- Max: Determines the largest value in a multi-value token and replaces the token with the largest value.
- Min: Determines the smallest value in a multi-value token and replaces the token with the smallest value.
- Remove Duplicates: Removes duplicate values from multi-value tokens.
- Remove Empty Items: Removes empty values from multi-value tokens.
- Sort Ascending: Organizes the values in a multi-value token from smallest to largest.
- Sort Descending: Organizes the values in a multi-value token from largest to smallest.
- Split: Divides a single-value token into a multi-value token. The single-value token is divided whenever a specified character or characters appears in the token. When you apply this function, a text box appears for you to specify the characters the token will be divided at.

Example: If the token's value is "Jan;Bob;Sue" and you specify ";" as the delimiter, then the result of this function will be a token with three values: Jan, Bob, Sue. If the token's value is Animal Control Department Health Department Human Resources Department Accounting Department, and you specify "Department" as the delimiter, the resulting multi-value token will have four values: Animal Control, Health, Human Resources, Accounting.
Tip: If the single-value token has spaces between the delimiter and the next value, combine this function with the "Trim" function to remove those extra spaces from the multi-value token.
- Sum: Adds together all the values in a multi-value token and replaces the token with the sum.
- Text Length: Counts the number of characters in the token's value and replaces the token with this number.
- To Lower: Converts all letters in the token's value to lowercase.
- To Title Case: Capitalizes the first letter of each word in the token to uppercase. If a word in the token is all capital letters (like an acronym) it will not be affected by this function. If there is a capital letter in the middle of the word, it will convert that letter to lowercase (i.e., "helLo" will be converted to "Hello," and "O'Neil" will be converted to "O'neil.").
Tip: If your token is in all capital letters and you want to convert it to title case, first apply the "To Lower" function and then the "To Title Case" function.
- To Upper: Converts all letters in the token's value to uppercase.
- Trim: Removes any white spaces before or after a token's value.
- Value Count: Counts the number of values in a multi-value token and replaces the token with this number.
