Working with Documents in Quick Fields Scanning
Once documents are scanned into Quick Fields Scanning, you can review and modify them before storing them in Laserfiche. For example, you can rename a document, split a document into multiple documents, edit the document's metadata, etc.
Identifying Unidentified Documents in Quick Fields Scanning
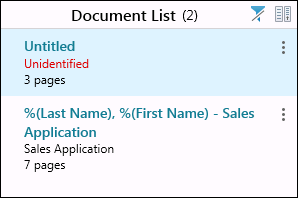
If scanned documents are not identified, Unidentified will be displayed below the document name in the Document List Pane or at the top right of the document's row in Pages View. In this case, you will need to identify the document by assigning the correct document class to it. You will not be able to edit the document's name, fields, templates, tags, or storage location until it has been identified.
Note: You can filter the Document List to display only unidentified documents.

To assign a document class to an unidentified document
- Click the Unidentified link below the document name in the Document List Pane.
- Click the More actions button
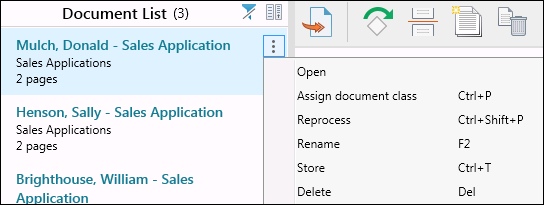
 next to the document in the Document List Pane or Pages View, then click Assign document class.
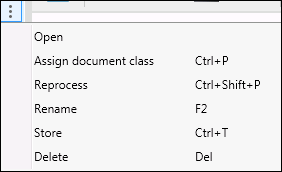
- Right-click the document in the Document List Pane or Pages View and select Assign document class.
- Select the document and press CTRL + P.
In the Choose Document Class dialog box, select the checkbox next to the document class the unidentified document belongs to. If there is a long list of document classes, you can type the document class name in the Search box at the top of the dialog box.
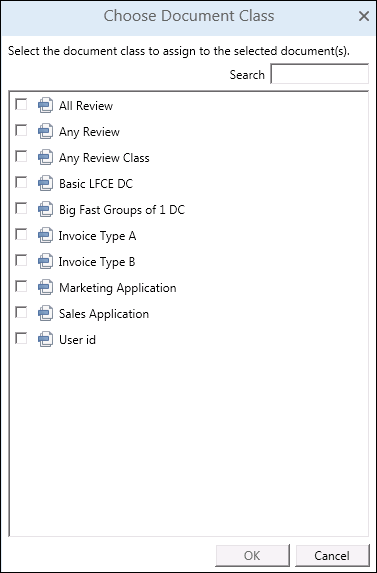
Note: You can assign a document class to multiple documents at a time.
Once the document has been identified, the newly assigned document class's processes will run automatically.
Viewing Documents in Quick Fields Scanning
After documents have been scanned into Quick Fields Scanning, they will appear in the Document List Pane and in Pages View.
Navigating Through Documents
To navigate through documents in the Document List Pane
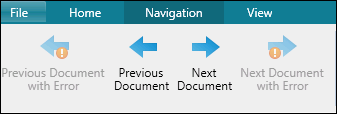
- Click the Previous Document and Next Document buttons under Navigation in the ribbon.
- Use keyboard shortcuts: ALT+LEFT for the previous document and ALT+RIGHT for the next document.
- Click on one document in the list and press the up and down arrows.
- Manually click through the document list.
The corresponding document in Pages View will be selected and vice versa.
To navigate through a document's pages
- Pages View displays each page of every document as a thumbnail. Click the page you want to view. You can also click on a page and press the right and left arrows to navigate through the pages of each document.
To navigate through documents with errors
You may want to navigate to documents with errors so you can correct them before storing the documents in Laserfiche.
- Click the Previous Document with Error and Next Document with Error buttons under Navigation in the ribbon.

- Use keyboard shortcuts: ALT+SHIFT+LEFT for the previous document with an error and ALT+SHIFT+RIGHT for the next document with an error.
Tip: Selecting a document in the Document List Pane or Pages View will select and expand the accompanying data in the Messages Pane.
Viewing Document Images
You can open documents to view their pages, thumbnails, and text.
To view a document's images and thumbnails
- Double-click the document in the Document List Pane.
- Click the More actions button
 to the right of the document in the Document List Pane and click Open.
- Click the More actions button
 to the right of the document in Pages View and click Open.
- Click the
 Open Document button in the Pages View toolbar.
- Double-click the document in the Pages View.
- Select the page thumbnail in the Pages View and press ENTER.
By default, the Document List Pane, Metadata Pane, Image Pane, and Thumbnails Pane will be displayed.
Reprocessing Documents in Quick Fields Scanning
In some cases, you may need to manually assign a document class to a document and run the newly assigned document class's processes on that document.
Example: Julie scans a batch of applications and notices two applications scanned as one document. She uses the Split option to split the document into two documents, assigns the appropriate document classes, and runs the document class's processes.
After you assign a document class to a document, you can reprocess it by
- Right-clicking the document in the Document List Pane and selecting Reprocess.
- Right-clicking in the document's row in the Pages View and selecting Reprocess.
- Clicking the More actions button
 next to the document in the Document List Pane or Pages View, then clicking Reprocess.
- Selecting the document and pressing CTRL + SHIFT + P.
Note: You can reprocess multiple documents at a time. Each document will rerun that document class's processes.
Note: You must assign a document class to an unidentified document before the Reprocess option will be available.
Modifying Documents in Quick Fields Scanning
Scanned documents may need to be modified before sent to Laserfiche. For example, if a document is scanned with an incorrect name or an upside down page, these issues can be fixed in Quick Fields Scanning before sending the documents to the repository.
In the Document List Pane
- Select the document and press F2.
- Select the document, click the More actions button
 , and select Rename.
In Pages View
- Click in the document's row and press F2.
- Click the More actions button
 in the top right of the document's row and select Rename.
 - Right-click in an empty space in the document's row and select Rename.

In the Metadata Pane
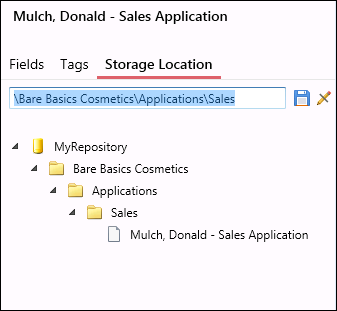
- Click on the document's name at the top of the Metadata Pane on the right, and enter a new name. Navigating away from the document will save the new name.
- Click on the document's name at the top of the Metadata Pane on the right, enter a new name, and press Enter. The new name will be displayed under Storage Location.
- Select the document in the Metadata Pane under Storage Location.Right-click the document or press F2 to rename it.
Note: You can only rename an unidentified document if the session allows storing unidentified documents. In other cases, you will need to identify the document before it can be renamed. You also cannot rename multiple documents at a time.
You can rotate document pages that were scanned in the wrong orientation.
In Pages View and the Thumbnails Pane
- Select the page and press Ctrl + Alt + R.
- Select the page and click the Rotate button in the toolbar.
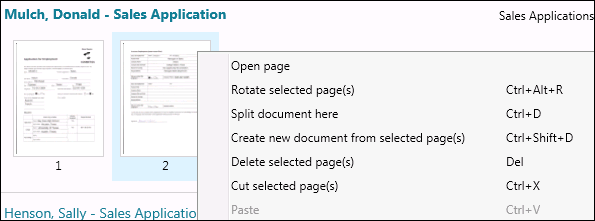
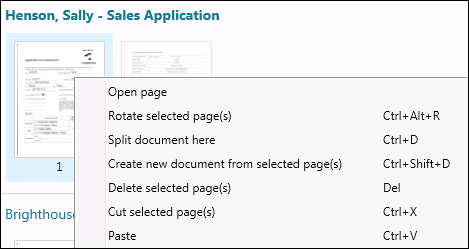
- Right-click the page and select Rotate selected page(s).
In the Image Pane
- Right-click the image displayed and select Rotate this page.

Note: You can rotate multiple pages at a time by using CTRL or SHIFT to select multiples pages in a document. You can only rotate multiple pages inside a single document.
Pages from one document can be moved to another document.
To move pages from one document to another document
In Pages View
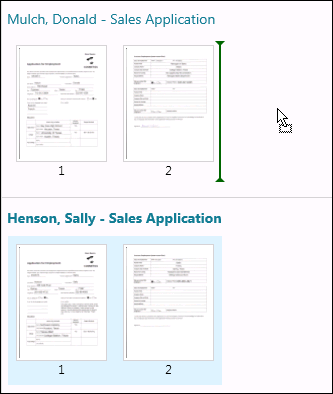
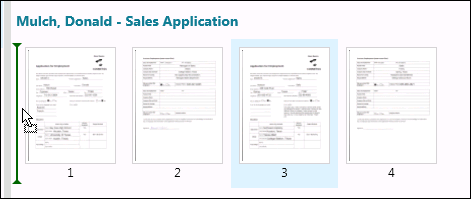
- Select the pages in the document and drag them into another document. An insertion bar will display where the pages will be placed within the document.
- Select the pages, right-click a selected page, and select Cut selected page(s). Right-click in the other document where you want the pages pasted and select Paste. Alternatively, use the Cut and Pastetoolbar buttons.

If pages are scanned in the incorrect order, you can easily rearrange them.
To rearrange a document's pages
- Navigate to the document containing the pages you want to rearrange in Pages View.
- Select the page in the document and drag it to its correct location within the document. An insertion bar will display where the page will be placed.
- You can also rearrange pages by using the cut and paste options. Right-click the page(s) you want to move and select Cut selected page(s). Right-click where you want the page(s) pasted and select Paste. Alternatively, use the Cut and Pastetoolbar buttons.


Note: You can use these same cut and paste options in the Thumbnails Pane.
You can remove pages from one document and create a new, separate document with those pages.
To create a new document from one or multiple pages of an existing document
- Navigate to the document in Pages View.
- Select the page(s) you want to make a new document and do one of the following
- Right-click a selected page and select Create new document from selected page(s).

- Click the Create new document button in the toolbar.

- Right-click a selected page and select Create new document from selected page(s).
- The new document will appear below the original document.
You can split a document by removing the page you are viewing and all the pages that follow it and moving them to a new, separate document.
- Navigate to the document in Pages View.
- Select the page you want as the first page of the new document and do one of the following
- Right-click the selected page and select Split document here.

- Click the Split Document button in the toolbar.

- Right-click the selected page and select Split document here.
- The new document will appear below the original document.
You can also right-click an image in the Image Pane and select Split document here.

You can delete certain pages of a document, or the document as a whole.
In the Document List Pane
- Click the More actions button
 next to the document and select Delete.
- Right-click the document and select Delete.
- Select the document and press DELETE on the keyboard.
In Pages View
- Click the More actions button
 in the top right of the document's row and select Delete.
- Right-click in an empty space in the document's row and select Delete.

To delete multiple pages at a time, use CTRL or SHIFT to multi-select pages. You can click the Delete all Documents button under Home in the ribbon to delete all scanned documents.

Note: You will always be prompted when clicking the Delete All Documents button, even if Deleting documents is selected under Prompts in the Options dialog box.
In the Image Pane
- Right-click the image and select Delete this page.

In Pages View
- Select the page you want to delete and press DELETE on the keyboard.
- Select the page you want to delete and press the Delete button in the toolbar.

- Right-click the page you want to delete and select Delete selected page(s).

To delete multiple pages at a time, use CTRL or SHIFT to multi-select pages.
You can change where one or more documents will be located when sent to the Laserfiche repository.
- Select the document in the Document List Pane or Pages View.
- Select Storage Location in the Metadata Pane on the right.
- Click the Edit button
 at the top of the Metadata Pane next to the location path.
 - Type a new repository path. If the path entered includes a folder that doesn't exist, it will be created when the document is sent to the repository. Press the Save button
 to save the path.
 - Alternatively, under Storage Location in the Metadata Pane, you can reorganize folders (rename, delete, and create new folders) and drag and drop documents where you want them located. See the Storing Documents topic for more information.
Note: You can change the location for multiple documents at a time by selecting more than one document in the Document List Pane before clicking the Edit button  in the Metadata Pane.
You can modify the template, fields, and tags assigned to documents before storing them to Laserfiche.
To change a document's template and/or fields
- Select the document in the Document List Pane.
- Select Fields in the Metadata Pane on the right.
- The Template drop-down contains a list of all the templates available to choose from in the Laserfiche repository. Select a template and fill in the template's field values.
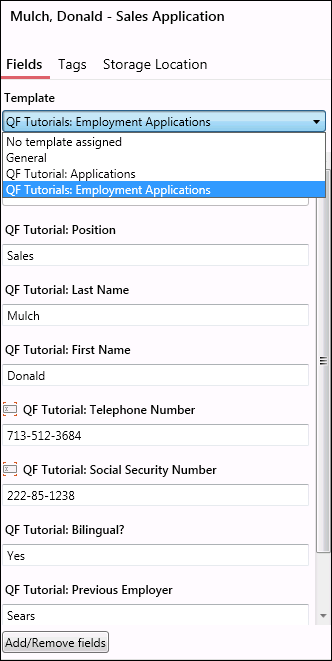
Note:Dynamic fields are supported in Quick Fields Scanning.
- Click the Add/Remove fields button at the bottom of the pane to add or remove fields from the document.
Note: Non-empty fields will be kept as independent fields when changing the template.
- Fill in the appropriate field values. You will have to follow any field constraints set on specific fields.
Note: Quick Fields Scanning uses .NET to evaluate field constraints. For more information, see the Regular Expressions reference.
Fields with a magnifying glass next to them are zoom fields. If you are viewing a document's page in Document View, clicking in a zoom field will take you to the location of the value on the document.
Templates and fields can be edited for multiple documents at a time as long as the documents have been identified. If a document is not identified, you will not be able to change its fields or template. Unidentified documents will either display No template assigned or the template assigned to it in Quick Fields.
Note: If changes are made to a field or template definition in the Laserfiche Administration Console, those changes must be republished to the Quick Fields Server in order for them to be available in Quick Fields Scanning.
- Select the document(s) in the Document List Pane.
- Select Tags in the Metadata Pane on the right.
- A drop-down menu with a list of available repository tags will be displayed. Select a tag and click Apply. You can continue to select tags from the list to add multiple tags to the document(s), clicking Apply between each addition.
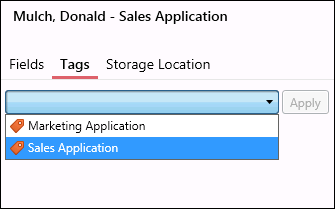
Note: Tags can be applied to multiple documents at a time.
You can identify an unidentified document or change the document class assigned to a document.
In the Document List Pane
- Select the document and press Ctrl + P.
- Select the document, click the More actions button
 , and select Assign document class.
- If the document is unidentified, click the Unidentified link below the document name in the Document List Pane.
In Pages View
- Click in the document's row and press Ctrl + P.
- Click the More actions button
 in the top right of the document's row and select Assign document class.
- Right-click in an empty space in the document's row and select Assign document class.

Select the new document class from the Choose Document Class dialog box and click OK.

