Customizing Your Quick Fields Experience
Quick Fields has many options that can be customized to your individual experience from general application settings to advanced settings.
Note: With the exception of session settings, all options in this dialog box only apply to the user currently logged into the machine.
To open the Options dialog box
- Select Options under Tools in the menu bar.
- In the Options dialog box, select Quick Fields, Metadata Updater, or Current Session to configure options for each.
Note: Each node is organized inside a category (e.g., Quick Fields, Metadata Updater, Current Session). Double-click a category to show/hide its nodes.
Quick Fields Options
Under Quick Fields, you can configure options that will apply to the current installation of Quick Fields.
Quick Fields Options: General
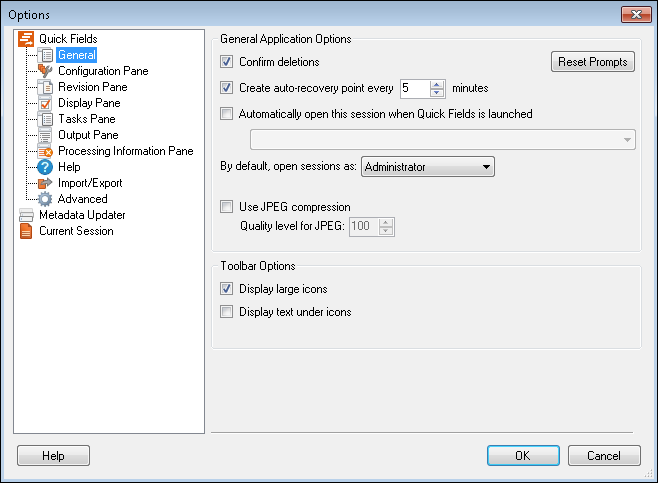
The General node under Quick Fields lets you configure general application and toolbar settings.

To configure the General settings
- Select Tools, Options, expand the Quick Fields node, and select General.
- Under General Application Options, select or clear the following options.
- Confirm deletions: Select this option if you want Quick Fields to prompt you to confirm your deletion inside a session (e.g., process, image enhancement, scanned document).
- Create auto-recovery point every __ minutes: Specify how often Quick Fields should save recent changes to your session. This feature prevents you from losing work due to unexpected behavior on your machine (i.e., machine freezes).
Note: This feature does not automatically overwrite your session. It saves a temporary session file under <System's Temporary Files Location>\Laserfiche\Quick Fields\Autosave (your system's temporary files location is set in Microsoft Windows' Environmental Variables screen). If Quick Fields closes unexpectedly, it will prompt you to open the recovered session the next time the program is launched.
- Automatically open this session when Quick Fields is launched: Specify a default session for Quick Fields to open to. If this option is enabled, Quick Fields' Start Page will be skipped each time the program is opened.
- By default, open session as: Specify a default session mode.
- Use JPEG compression: Selecting this option will change the default format of color or grayscale pages generated from PDFs or images scanned through Quick Fields using Laserfiche Capture Engine, WIA capture engine, TWAIN, or ScanConnect scan sources. As of Laserfiche 8.1, the default file format for pages generated from PDFs and scanned color and grayscale images is TIFF-LZW. This format is large in size and provides high image quality that is generally accepted as an electronic archival format for text documents. If you are concerned about document size, selecting this option will reduce the file size by changing the default file format to JPEG. A JPEG is about 10 times smaller in size than a TIFF-LZW. If you choose to use JPEG compression, there will be some sacrifices in image quality and archiving acceptability.
- Quality level for JPEG: Define the JPEG compression quality level for incoming pages generated from PDFs, documents scanned in from a Laserfiche repository, and documents scanned using a physical scanner.
- Under Toolbar Options, specify the type of icons that should be used and whether descriptive text should appear below icons.
Quick Fields Options: Configuration Pane
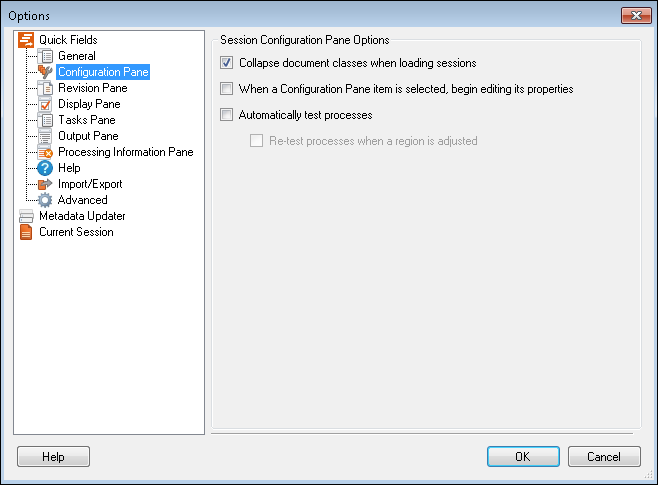
The Configuration Pane node under Quick Fieldslets you configure settings associated with the Session Configuration Pane.
Note: If a password is assigned to your session, the following settings will only apply when a session is opened as an administrator. The Session Configuration Pane is not visible to operators.
To configure the Configuration Pane settings
- Select Tools, Options, expand the Quick Fields node, and select Configuration Pane.
- Under Session Configuration Pane Options, select or clear the following options.
- Collapse document classes when loading sessions: Specify whether document classes should be expanded or collapsed when a session is opened.
- When a Configuration Pane item is selected, begin editing its properties: Specify what should happen when you select an item in the Session Configuration Pane. If this option is selected, the Tasks Pane will become active when an item is selected in the tree. If this option is disabled, the Session Configuration Pane will remain active when an item is selected.
Tip: Selecting this option enables you to quickly navigate in the Tasks Pane using the keyboard.
- Automatically test processes: Specify whether processes should be automatically tested when you select them in the tree. If this option is not selected, processes will only be tested when you click Test Processes or Test Current Process in the Tasks Pane.
- Re-test processes when a region is adjusted: Specify whether processes that have zones (e.g., OmniPage Zone OCR) should be automatically re-tested each time the region is adjusted via a mouse (changing the zone coordinates in the Tasks Pane does not apply). This option can only be selected if Automatically test processes is also selected.
Quick Fields Options: Revision Pane
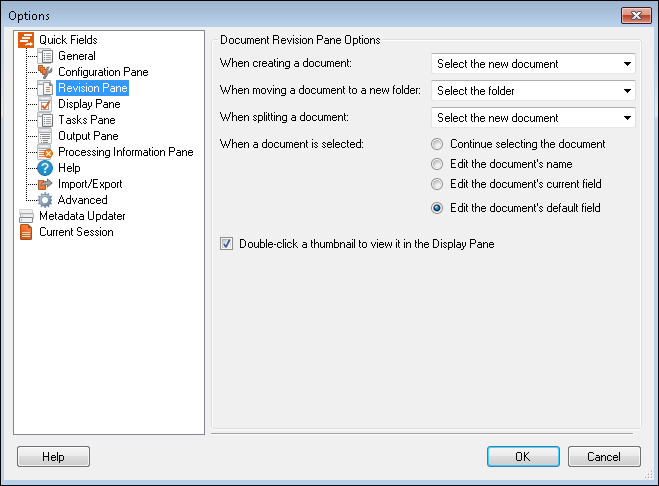
The Revision Pane node under Quick Fieldslets you configure settings associated with the Document Revision Pane.
Note: If a password is assigned to your session, some of the following settings will only apply to operators who have been granted specific permissions.
To configure the Document Revision Pane settings
- Select Tools, Options, expand the Quick Fields node, and select Revision Pane.
- Under Document Revision Pane Options, configure the following options.
- When creating a document: Select the document that should become active when you create a new document from the selected page. If you select Do not change the selection, the original document will remain active.
- When moving a document to a new folder: Select the item that should become active when you move a document from one folder to another.
- When splitting a document: Select the document that should become active when you create a new document starting at the first page selected. If you select Do not change the selection, the original document will remain active.
- When a document is selected: Specify where your cursor should be placed when you select a document: in the document's Name text box, in the text box associated with the most recently edited field, or the default field.
- Double-click a thumbnail to view it in the Display Pane: Specify how many clicks you should perform on a thumbnail to display the image in the Display Pane. If this option is selected, a double-click is required. If this option is cleared, only a single click is required.
Quick Fields Options: Display Pane
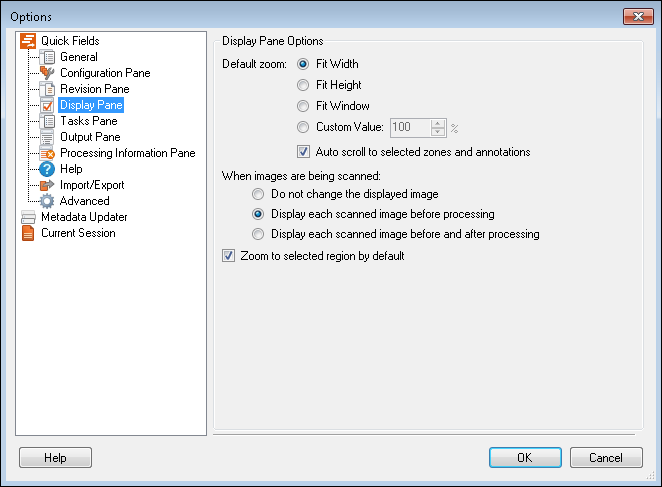
The Display Pane node under Quick Fields lets you configure settings associated with the Display Pane.
To configure the Display Pane settings
- Select Tools, Options, expand the Quick Fields node, and select Display Pane.
- Under Display Pane Options configure the following options.
- Default Zoom: Select one of the following options to specify the pane's default zoom percentage.
- Fit Width: Images will be scaled by their width. For most images, you may have to scroll up/down to view the entire image, though the image size will appear large enough to make out small details.
- Fit Height: Images will be scaled by their height. For most images, you will be able to view the entire image without scrolling, though the overall image size may appear too small to make out small details.
- Fit Window: The image will be sized so that it fits the current size of the Display Pane.
- Custom Value: Enables you to enter a default zoom number. Enter a number between 25 and 450.
- Auto scroll to selected zones and annotations:
Tip: To quickly set the Display Pane's zoom percentage, double-click an image.
- When images are being processed: Specify the image that should appear in the Display Pane during scanning and processing.
- Do not change the displayed image: The pane will not change. The image displayed in the pane before scanning and processing started will stay on the screen.
Note: This option will result in the best performance.
- Display each scanned image before processing: The image about to be processed will be displayed in the pane.
- Display each scanned image before and after processing: The image will be displayed in the pane before and after it's processed.
- Do not change the displayed image: The pane will not change. The image displayed in the pane before scanning and processing started will stay on the screen.
- Zoom to selected region by default: This option controls what happens when you draw a rectangle on the image in the Display Pane. If selected, drawing a rectangle will zoom in on the image. If cleared, drawing a rectangle will not zoom in. This is useful if you just want to select a region and copy it without zooming in on it.
Quick Fields Options: Tasks Pane
The Tasks Pane node under Quick Fields lets you configure settings associated with the Tasks Pane.
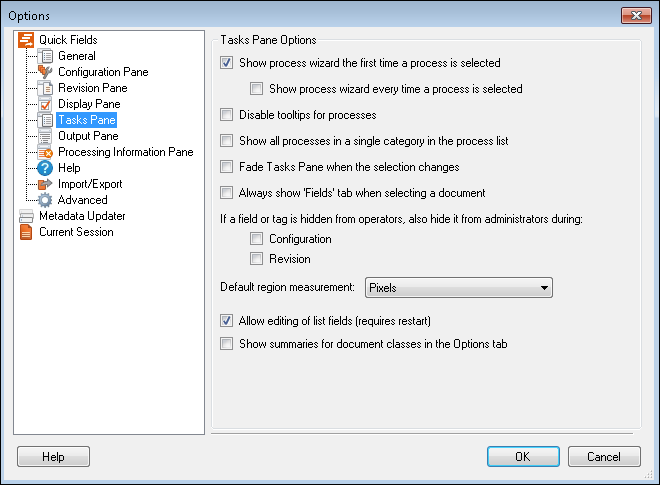
To configure the Tasks Pane settings
- Select Tools, Options, expand the Quick Fields node, and select Tasks Pane.
- Under Task Pane Options, configure the following options.
- Show process wizard the first time a process is selected: Specify how you prefer configuring image enhancements and processes. If this option is selected, wizards will be the default method (wizards prompt you to configure each setting one at a time). If this option is cleared, all settings will be displayed in the Tasks Pane when you add an image enhancement or process.
- Show process wizard every time a process is selected: Choose what the contents of the Tasks Pane should be when you select an image enhancement or process in the Session Configuration Pane. If this option is selected, the item's configuration wizard will appear. If this option is cleared, all settings associated with an image enhancement or process will be displayed in the Tasks Pane. This option can only be selected if Show process wizard the first time a process is selected is also selected.
- Disable tooltips for processes: Specify whether descriptive images and/or text should appear when your mouse rolls over an image enhancement or process in the Tasks Pane.
- Show all processes in a single category in the process list: Specify if you want all categories removed from the Tasks Pane, leaving all processes alphabetized in a single category.
- Fade Tasks Pane when the selection changes: Specify whether the Tasks Pane should fade from one state to another.
- Always show 'Fields' tab when selecting a document: Specify whether the fields tab should always be visible in the Tasks Pane when a scanned document is selected. If this option is cleared, the Tasks Pane will display the most recently used tab: Fields, Tags, or Settings.
- If a field/tag is hidden from operators, also hide it from administrators during: Specify whether hidden metadata should be visible to administrators. This setting only applies to fields and tags that have been hidden from operators using the Configure Fields dialog box.
- Select Configuration to hide metadata when an administrator selects an item in the Session Configuration Pane.
- Select Revision to hide metadata when an administrator selects an item in Document Revision Pane.
- Default region measurement: Specify if the unit of measure for the processes with zones should default to pixels or percent.
- Allow editing of list fields (requires restart):
- If this option is selected, you will be able to type text into the list field box, add tokens, or select a value from the list's drop-down menu.
- If this option is not selected, the field will behave as a list drop-down menu unless you add a token. If you add a token, you will be able to type text in the field.
Note: When the list field is behaving as a drop-down menu, typing characters will scroll to the values that begin with the group of characters you enter.
- Show summaries for document classes in the Options tab: Specify if you want summaries displayed under each option in a document class's Options tab.
Quick Fields Options: Output Pane
The Output Pane node under Quick Fields lets you configure settings associated with the Output Pane.
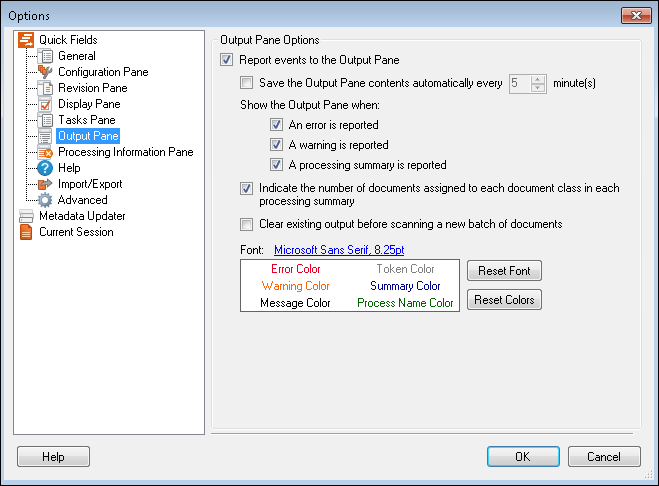
To configure the Output Pane settings
- Select Tools, Options, expand the Quick Fields node, and select Output Pane.
- Under Output Pane Options, configure the following options.
- Report events to the Output Pane: Select this option if you want events recorded and displayed in the Output Pane. If cleared, not only will the pane not be displayed, but events will not be recorded at all. Selecting this option after it has been cleared starts reporting events from that point forward.
- Save the Output Pane contents automatically every __ minute(s): Specify if text in the Output Pane should be automatically saved and, if so, how often (enter minutes between 1 and 60).
Tip: Output Pane content is saved to the location specified in the session's General node.
- Show the Output Pane when: Specify whether the pane should become visible if a specific event occurs. To enable this setting, select one or more of the following options.
- An error is reported: The pane will be displayed if an error occurs during scanning or processing. For example, if a document class was configured to perform a lookup on an Excel file, and the file could not be found, an error would be reported and the Output Pane would be displayed.
- A warning is reported: The pane will be displayed if a warning occurs during scanning or processing. For example, Amber adds a script to her session that is not functional. When she runs the session, a warning will be reported and the Output Pane will be displayed.
- A processing summary is reported: The pane will be displayed anytime a processing summary is created. A processing summary details the number of pages that were processed, documents that were identified and unidentified, and errors that were encountered during scanning and processing. In most cases, a processing summary will always be reported.
Note: If configured to display after specific events, the Output Pane will appear after all scanning and processing is complete.
- Indicate the number of documents assigned to each document class in each processing summary: Specify whether the processing summary should report the number of documents each document class was able to identify.
Example: The screenshot below illustrates the Output Pane with (left screenshot) and without (right) this option selected. The highlighted text will only be included if this option is selected. This text represents that the document class named Document Class 1 was able to identify one document that consisted of four pages.
- Clear existing output before scanning a new batch of documents: Specify if you want the Output Pane cleared when a new batch of documents begins scanning.
- Font: Select a default font for the pane.
Note: Font and color selections will only apply to the Output Pane display in Quick Fields, not to output logs.
- In the colors box, specify the colors for each type of text in the pane. Click the colored phrase to change its color. Click Reset Font or Reset Colors to undo your changes and return to the default font and colors, which are listed below.
- Errors are red
- Warnings are orange
- Regular messages are black
- Token text is gray
- Summaries are blue
- Process name text is green
Quick Fields Options: Processing Information Pane
The Processing Information Pane node under Quick Fields lets you configure settings associated with the Processing Information Pane.
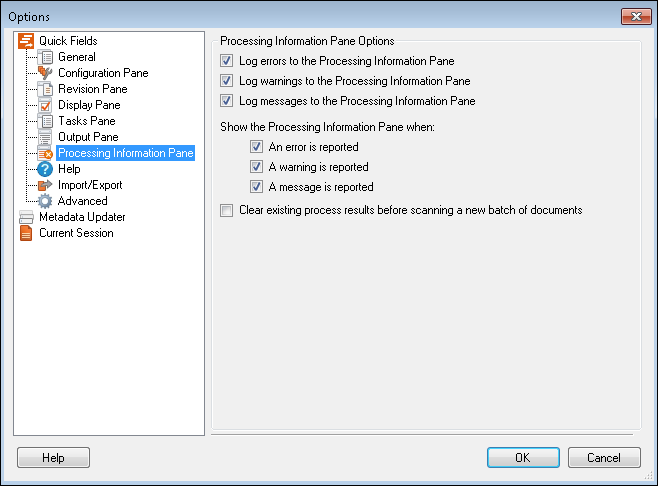
To configure the Processing Information Pane settings
- Select Tools, Options, expand the Quick Fields node, and select Processing Information Pane.
- Under Processing Information Pane Options, configure the following options.
- Log errors to the Processing Information Pane: Specify if you want errors reported and displayed in this pane.
- Log warnings to the Processing Information Pane: Specify if you want warnings reported and displayed in this pane.
- Log messages to the Processing Information Pane: Specify if you want messages reported and displayed in this pane.
- Show the Processing Information Pane when: Specify whether the pane should become visible if a specific event occurs. To enable this setting, select one or more of the following options.
- An error is reported: The pane will be displayed if an error occurs. For example, if a document class was configured to perform a lookup on an Excel file, and the file could not be found, an error would be reported and the Processing Information Pane would be displayed.
- A warning is reported: The pane will be displayed if a warning occurs. For example, Sam adds the following items to his document class (in this order): OmniPage OCR, Despeckle. Since the image enhancement is intended to improve the image for OCR purposes, a warning would be reported and the Processing Information Pane would be displayed.
- A message is reported: The pane will be displayed anytime a message is reported. For example, Mark's document class performs a lookup on a database. Each returned value would be returned as a message.
- Clear existing process results before scanning a new batch of documents: If this option is selected, the contents of the Processing Information Pane will be deleted before the next batch of documents are processed.
Quick Fields Options: Help
The Help node under Quick Fields lets you choose if you want Quick Fields tips displayed when working with processes.
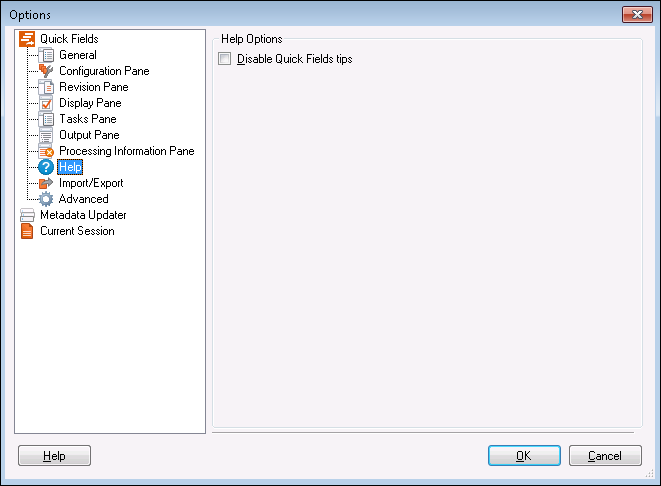
For example, if you place a Text Identification process before an OCR process, a tip will appear informing you the OCR process may need to be placed before the Text Identification process. The tip will automatically disappear after 3-4 seconds unless you hover over it or click somewhere on it.

- Selecting Disable Quick Fields tips will remove the Quick Fields process tips.
Quick Fields Options: Import/Export
The Import/Export node under Quick Fields lets you select which settings will be retained when sessions are imported or exported from Quick Fields. This is useful when, for example, you have customized the keyboard shortcuts and pane layout to suit the way you work, and do not want these changed by a session imported from another machine.
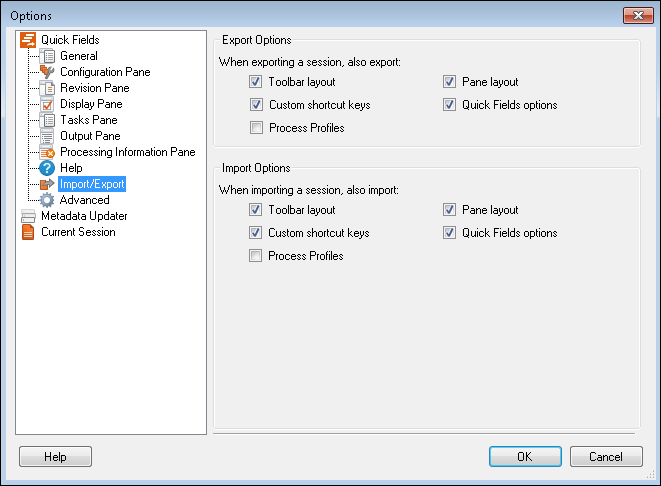
To configure the Import/Export settings
- Select Tools, Options, expand the Quick Fields node, and select Import/Export.
- Under Export Options, select the custom settings you want to retain when exporting sessions from this Quick Fields installation.
- Under Import Options, select the custom settings you want to retain from sessions you are importing into this Quick Fields installation.
The options that can be selected are:
- Toolbar layout
- Pane layout
- Custom shortcut keys
- Quick Fields options (includes Quick Fields and Metadata Updater options. Current Session options will always be imported or exported.)
Quick Fields Options: Advanced
The Advanced node under Quick Fields lets you configure advanced settings.
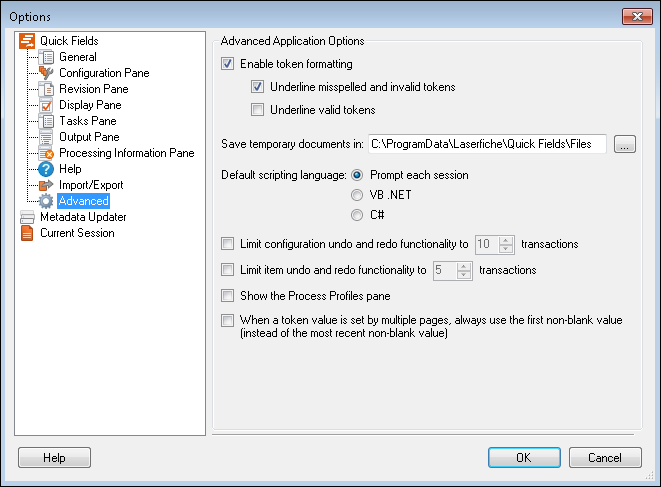
To configure the Advanced settings
- Select Tools, Options, expand the Quick Fields node, and select Advanced.
- Under Advanced Application Options, configure the following options.
- Enable token formatting: Specify whether tokens should be formatted in a way that identifies them as valid or invalid. If this option is selected, you should also select one or both of the following options.
- Underline misspelled and invalid tokens: Invalid tokens will be underlined in red.
- Underline valid tokens: Valid tokens will be underlined in green.
Example: Blake uses the token returned by the Token Retriever process to define the name of processed documents. A week later, Mike changes the name of the Token Retriever process, which invalidates the corresponding token. If the Underline misspelled and invalid tokens option is selected, both users will be able to quickly determine that the token used to define document name is invalid.
- Enable token formatting: Specify whether tokens should be formatted in a way that identifies them as valid or invalid. If this option is selected, you should also select one or both of the following options.
- Save temporary documents in: Specify a temporary location for scanned images to be stored before they are sent to the repository.
- Default scripting language: Specify a default programming language for Quick Fields' Script Editor. This setting will be inherited by all new sessions (existing sessions will not be affected). If you always work in the same language, select this language. If you work in different languages, select Prompt each session.
Tip: To change a specific session's default language, select Tools, Options, expand the Current Session node, and select General.
- Limit configuration undo and redo functionality to __ transactions: Enables you to limit the history of the configuration undo/redo feature.
- Limit item undo and redo functionality to __ transactions: Enables you limit the history of the item undo/redo feature.
- Show the Process Profiles pane: Specify if you want the Process Profiles pane displayed. By default, it's hidden.
- When a token value is set by multiple pages, always use the first non-blank value (instead of the most recent non-blank value): For processes that are configured to retrieve information from multiple pages and save that information as a token, by default, the last non-blank value found is the one that is used. Select this option if you want to use the first non-blank value found instead.
Metadata Updater Options
Under Metadata Updater, you can configure how often Quick Fields will update metadata and how the changes will be handled.
Metadata Updater Options: General
The General node under Metadata Updater in the Options dialog box enables you to configure the Metadata Updater utility.
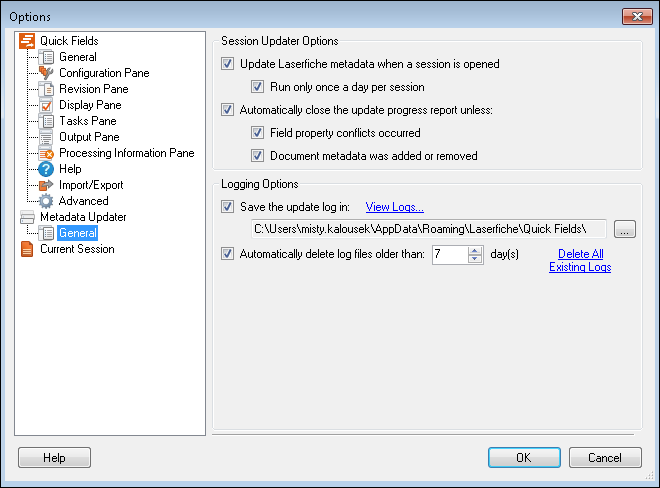
To configure the General settings
- Select Tools, Options, expand the Metadata Updater node, and select General.
- Update Laserfiche metadata when a session is opened: Specify whether the utility should automatically run when a session is opened.
- Run only once a day per session: Specify whether the utility should only run once a day, per session. This option enables you to keep your sessions up-to-date but avoid having to wait for the utility to run each time a session is opened.
- Automatically close the update progress report unless: The utility displays a progress report as it runs. This option enables you to specify whether the utility should remain open after it has finished running, allowing you view the progress report. If you select this option, you can also specify the following conditions:
- Field property conflicts occurred: The utility will only remain open if changes are made to a field associated with a document class (e.g., a field is deleted or renamed).
- Document metadata was added or removed: The utility will only remain open if changes are made to a template or tag associated with a document class (e.g., a template or tag is deleted).
Note: Sessions opened from the Quick Fields Server will automatically always update the metadata. Therefore, the options configured under Session Updater Options will apply to local sessions and be ignored for sessions opened from the Quick Fields Server.
- Save the update log in: If this option is selected, a log file will be created each time the Metadata Updater is performed (regardless of whether the session is updated). To specify where the log is created, click Browse.
Tip: To quickly open the log directory, click View Logs.
- Automatically delete log files older than __ days: If the utility has been configured to create a log file, you can specify the maximum age for logs before they should be automatically deleted. If this option is cleared, log files will not be automatically deleted.
Tip: To quickly delete all log files, click Delete All Existing Logs.
Current Session Options
Under Current Session, you can configure settings for only the current Quick Fields session.
Current Session: General
The General node under Current Sessionlets you specify a number of general session settings, such as a default location to save Output Pane contents and a default language for the Script Editor.
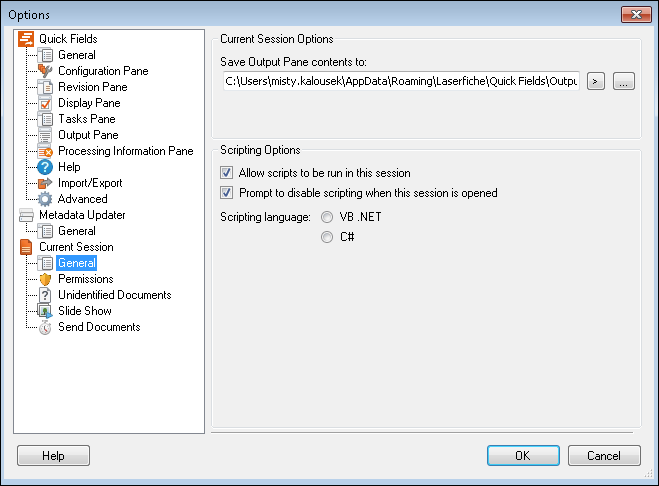
Tip: You can define these settings when creating a session if you are using the full or standard wizard (select the General option on the Additional Session Settings screen). To access these settings for an existing session, select Tools, Options, Current Session, General.
To configure the general session options
- For Save Output Pane contents to, specify where Output Pane contents should be saved. Click the Browse button to select a location in your repository. You can also enter static text, click
 to use tokens, or use a combination of the two.
Tip: This setting only applies if Quick Fields has been configured to automatically save Output Pane contents.
- Under Scripting Options, configure the following options
- Allow scripts to be run in this session: Specify if scripts can be run in the current session.
- Prompt to disable scripting when this session is opened: Specify if you want to prompt the user to disable scripting when the current session is opened.
- Scripting Language: Specify a default programming language for Quick Fields' Script Editor. The Script Editor will open in this language by default.
Current Session: Permissions
The Permissions node under Current Sessionlets you specify session permission settings, such as requiring a password to administer or open a session, and what actions scanner operators should have.
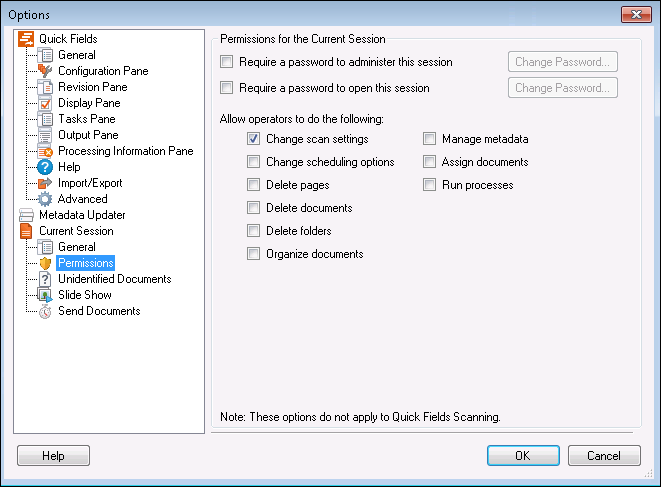
Tip: You can define these settings when creating a session if you are using the full or standard wizard (select the Permissions option on the Additional Session Settings screen). To access these settings for an existing session, select Tools, Options, Current Session, Permissions.
To configure session permissions
- Specify the following password settings:
- Require a password to administer this session: A password will be required to edit the session (e.g., to modify a process or image enhancement, to choose a different scan source, to change the default document name). If a password is assigned, users will be prompted to specify how they want to log in to the session: as an Administrator or as an Operator.
Tip: Unless all users with access to the Quick Fields machine need to be able to edit session settings, you should assign a password. This prevents scanner operators from changing a session's settings and possibly causing it to incorrectly process documents.
- Require a password to open this session: A password will be required to open and run the session. If a password is assigned, users will be prompted to specify how they want to log in to the session: as an Administrator or as an Operator.
Tip: This option is especially important if a session's document classes have been configured not to require login credentials each time repository access is required. Since credentials are not required, anyone with access to the Quick Fields machine can create documents in the repository using a session that does not require a password to open it.
Warning: A password cannot be reset. If a password is lost, you must recreate the session.
- Require a password to administer this session: A password will be required to edit the session (e.g., to modify a process or image enhancement, to choose a different scan source, to change the default document name). If a password is assigned, users will be prompted to specify how they want to log in to the session: as an Administrator or as an Operator.
- To specify what actions scanner operators should be able to perform, configure the following options. These settings will only apply if your session has an administrator password, an operator password, or both.
- Change scan settings: Ability to change a session's scan source or modify the scan source's setup, options, or settings.
- Change scheduling options: Ability to modify when a document is sent to the repository: manually, immediately, or at a scheduled time.
- Delete pages: Ability to delete pages from scanned documents.
- Delete documents: Ability to delete scanned documents.
- Delete folders: Scanned documents are organized into folders based on their destination location. This permission enables users to delete folders.
- Organize documents: Ability to create a new document starting from the first page selected and create a new document from the selected pages. This setting does not apply to an operator's ability to move the selected document(s) to a new folder or the ability to drag and drop pages.
- Manage metadata: Ability to change the template and/or fields assigned to a document. Does not affect the operator's ability to populate existing fields, add tags, or change a document's default volume.
- Assign documents: Ability to assign or re-assign scanned documents to an existing document class in the session.
- Run processes: Ability to run processes on scanned documents.
Note: Some of the above permissions do not apply if the session has been configured to immediately send documents to the repository. For example, the ability to delete documents is irrelevant if documents are not stored in Quick Fields after scanning.
Note: These permission do not apply in Quick Fields Scanning.
Current Session: Unidentified Documents
The Unidentified Documents node under Current Sessionlets you specify what should happen to a session's unidentified documents.
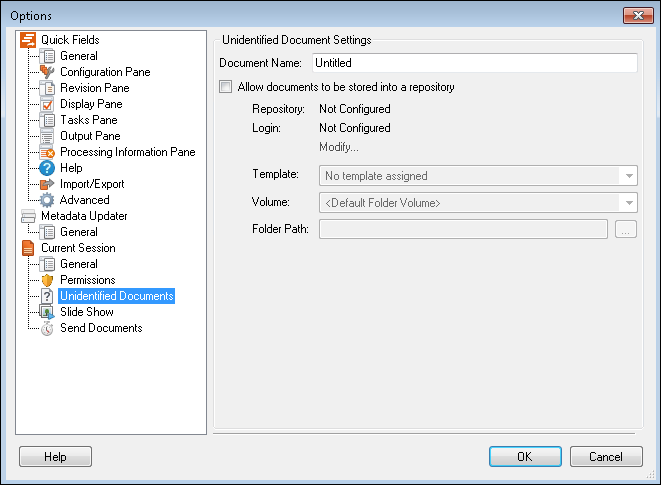
Tip: You can define these settings when creating a session if you are using the full or standard wizard (select the Unidentified Documents option on the Additional Session Settings screen).
To configure unidentified document options
- For Document name, specify the name that should be applied to unidentified documents. Documents that share the same name will be automatically renamed when they are stored. For example: UnidentifiedDocument, UnidentifiedDocument(2), UnidentifiedDocument(3).
Note: Do not use tokens to name the document.
- By default, unidentified documents will not be sent to the repository; they will stay in Quick Fields waiting to be manually identified and/or stored. To change this setting, select Allow documents to be stored into a repository and complete the steps below. If you do not select this option, skip the following steps.
Note: This option requires the Document Classification add-on or Quick Fields Agent.
Note: If this option is enabled, unidentified documents will be sent to the repository according to the session's delivery schedule settings.
- Select Modify to specify the destination location for unidentified documents.
- In the Session Connection Manager dialog box, configure the following options and click OK.
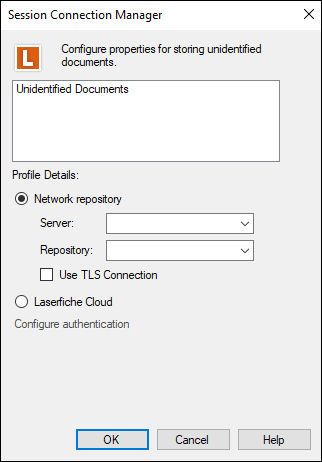
To define a Laserfiche Network repository connection
- Select the Network Repository radio button.
- Next to Server, specify the server where the repository is located.
- Once a server has been specified, the repositories on that server will be listed in the Repository drop-down menu. Select the repository you want to connect to.
- To configure Quick Fields to use secure network communications when connecting to Laserfiche, select the Use TLS Connection checkbox.
- Click Configure authentication and select if you want to sign in using Windows authentication, password authentication, or Laserfiche Directory server authentication
- Select Windows authentication to log in using the Windows credentials associated with the user running the session.
- Select Laserfiche authentication to enter credentials associated with a Laserfiche account.
- Optionally, select the Laserfiche Directory Server tab to sign in using Laserfiche Directory Server.
- Enter your Laserfiche Directory Server username and password.
- Click Windows Authentication and sign in using your Windows account.
- Sign in using SAML authentication.
Note: Laserfiche Webtools Agent lets Quick Fields and Quick Fields Scanning connect to a Laserfiche repository with Laserfiche Directory Server authentication using a longer session so you will not have to enter credentials continuously to stay connected.
- For Template, select a template to be added to all unidentified documents. If you do not want to assign a template, select No template assigned from the drop-down list.
- For Volume, select a volume for unidentified documents. Optionally, select Default Folder Volume to store documents in the default volume assigned to the destination folder.
- For Folder Path, specify where unidentified documents should be stored. Click the Browse button to select a location in your repository. If no folder path is defined, unidentified documents will be stored in the repository's root directory.
Note: If you select Default Folder Volume, the folder in question must have a default volume. If it does not, the session will be unable to store unidentified documents.
Current Session: Slide Show
The Slide Show node under Current Sessionlets you configure a session's slide show settings, such as whether images should appear in full screen mode and how long each image should be displayed.
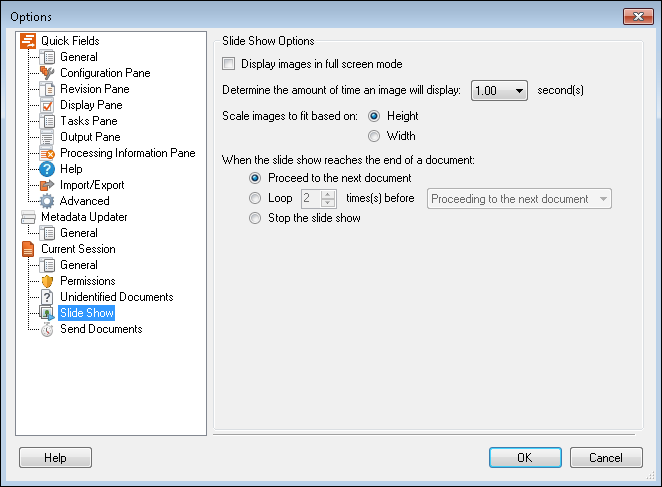
Tip: You can define these settings when creating a session if you are using the full or standard wizard (select the Slide Show option on the Additional Session Settings screen).
To configure slide show options
- Display images in full screen mode: Select this option for the slide show to open in a maximized window.
- Determine the amount of time an image will display: Specify how long each image should appear on the screen (in seconds).
- Scale images to fit based on: Choose how images should be scaled to fit the Quick Fields window: by height or by width.
Tip: For most images, if you select Height, you will be able to view the entire image without scrolling, though the overall image size may appear too small to make out small details. If you select Width, you may have to scroll up/down to view the entire image, though the image size will appear large enough to make out small details. Note that this would be reversed for images in horizontal (landscape) orientation.
- When the slide show reaches the end of a document: Specify what should happen when the slide show reaches the end of a document: proceed to the next document, loop a certain number of times before either proceeding to the next document or stopping, or just stop the slide show.
Tip: To manually stop slide show at any time, press ESC.
Current Session: Send Documents
The Send Documents node under Current Session in the Options dialog box enables you to specify when scanned documents should be sent to the repository.
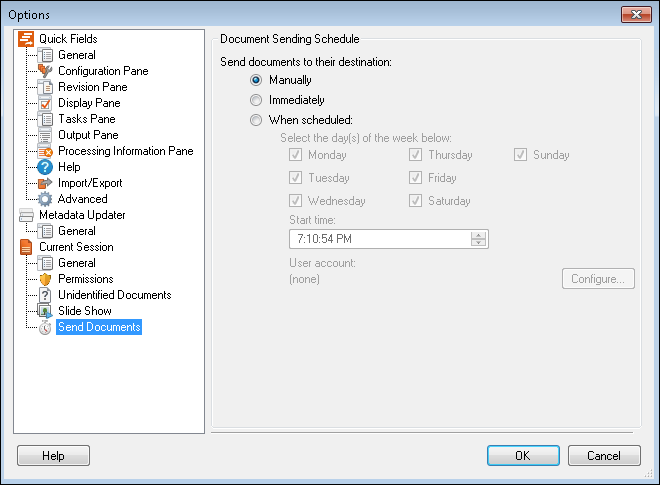
Tip: You can define these settings when creating a session if you are using the full or standard wizard (select the Delivery Schedule option on the Additional Session Settings screen).
Note: If you have configured your session to store unidentified documents in a repository, these documents will be stored according to the delivery schedule assigned to your session.
To configure when to send documents to the repository
Select one of the following options:
- Manually. Documents will stay in Quick Fields after processing. Select this option to review or edit documents before sending them to the repository (e.g., to add metadata, split up a document, rearrange the page order).
- Immediately. Documents will be automatically stored immediately after they are scanned and processed.
- When Scheduled. This option enables you to create a schedule for document storage. If you select this option, a Microsoft Windows Scheduled Task will be created on your machine. Select one or more days and enter a time. Click Configure to enter a Windows account for the task to run as (e.g., domain\username).
Tip: The Post-Processing stage in your session enables you to perform time-intensive tasks (e.g., full-page OCR) during the storage process, instead of the scanning and processing stages. In many cases, this feature should be used with the When Scheduled option, as it enables you to perform such tasks during non-peak/non-work hours.
Tip: By default, the task will run even if the user is not logged into the machine. To configure this or other options, open the Scheduled Task in Windows. You can access the task in Windows 10 by clicking Start, type Run in the search box and press ENTER. Enter "control schedtasks" and click OK. The Task Scheduler window will open. Quick Fields tasks will contain the name of your session and will be associated with a Quick Fields icon. Double-click a task to configure its settings.
