Toolbars
Quick Fields toolbars provide ready access to frequently used actions and settings. Toolbars can be hidden or customized to suit your particular needs.
Showing, Hiding, and Configuring Toolbars
You can show or hide different toolbars, and also select which buttons to show or hide on each toolbar. This helps you customize the Quick Fields interface to your particular needs.
To show or hide toolbars
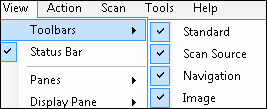
- From the View menu, hover over Toolbars.
- A check mark will appear next to the toolbars that are displayed. To hide a toolbar, click it to remove the check mark. Click the toolbar again to display it.

To show or hide toolbar buttons
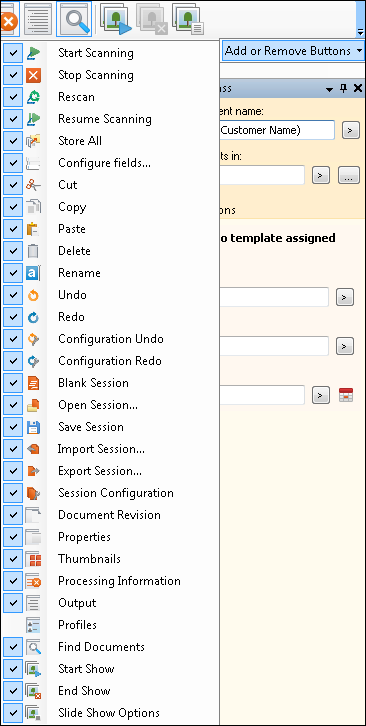
- Click the arrow at the far right of the toolbar and hover over Add or Remove Buttons.
- A check mark will appear next to the name of the buttons displayed. To hide a button, click it to remove the check mark. Click the button again to display it.

Standard Toolbar
| Item | Function |
|---|---|

|
Starts scanning |

|
Stops scanning |

|
Rescans the page's image |

|
Continues scanning from the last page scanned |

|
Stores all documents in the Laserfiche repository |

|
Configure fields for the current document class |

|
Cuts the selection and puts it on the clipboard |

|
Copies the selection and puts it on the clipboard |

|
Inserts the clipboard contents |

|
Deletes the selected item |

|
Renames the selected item |

|
Undo |

|
Redo |

|
Configuration Undo |

|
Configuration Redo |

|
Creates a new blank session |

|
Opens an existing session |

|
Saves the active session |

|
Imports a session from a previously exported file |

|
Exports a self-contained session file |

|
Shows the Session Configuration Pane |

|
Shows the Document Revision Pane |

|
Shows the Tasks Pane |

|
Shows the Thumbnails Pane |

|
Shows the Processing Information Pane |

|
Shows the Output Pane |

|
Searches processed documents |

|
Starts a slideshow |

|
Ends the slideshow |

|
Displays the slideshow options page |
Image Toolbar
This toolbar appears above an image in the Display Pane. It lets you configure how an image is displayed.
| Item | Function |
|---|---|

|
Pans an image. Drag in the direction you want to review |

|
Zooms in |

|
Displays an image at a preset zoom setting. Select Fit to match the current size of the Laserfiche Scanning window |

|
Zooms out |

|
Rotates an image 270 degrees (left) |

|
Rotates an image 270 degrees (right) |

|
Allows you to configure sample pages |
Navigation Toolbar
This toolbar appears below an image in the Display Pane. It lets you navigate through and modify processed documents and pages.
| Item | Function |
|---|---|

|
Displays a document's previous page |

|
Displays a specific page in a document |

|
Displays a document's next page |

|
Shows the first page of the Document Revision Pane's next document |

|
Shows the first page of the Document Revision Pane's next document |

|
Create document: Pulls selected pages out of a document and moves them to a new, separate document |

|
Split document: Pulls a page and all following pages out of a document and moves them to a new, separate document |

|
New Folder: Changes a single document's destination to a folder named New Folder |

|
Deletes the currently displayed page |

|
Displays the previous document in the Revision Pane with an error. Hover over the error icon for more information |

|
Displays the next document in the Revision Pane with an error |

|
Shows or hides the Image Pane |

|
Shows or hides the Text Pane |
Scan Source Toolbars
Quick Fields uses different toolbars for different scan sources. Below are the different scan source toolbars
Universal Capture
| Item | Function |
|---|---|

|
Opens the Universal Capture settings dialog box |
Search Directory  |
Defines the source location to scan images from. Click the folder button to browse to and select a location |
| File Type | Defines the type of images to scan |
TWAIN/ScanConnect Toolbar
| Item | Function |
|---|---|

|
Opens the scanning source's Scanner Setup dialog box. This dialog box will differ based on the scanner |
| Paper Size | Defines the size of the pages you will be scanning. If you will be scanning different sizes, select Auto |
| Paper Source | Defines how pages will be scanned (i.e., using a scanner's paper feeder or flatbed) |
| Color | Defines the color type of the pages you will be scanning (e.g., black and white or color) |
WIA Scan Engine Toolbar
| Item | Function |
|---|---|

|
Opens the scanning source's Scanner Setup dialog box. This dialog box will differ based on the scanner |
| Paper Size | Defines the size of the pages you will be scanning |
|
Paper Source |
Defines how pages will be scanned (i.e., using a scanner's paper feeder or flatbed) |
| Color | Defines the color type of the pages you will be scanning (e.g., black and white, grayscale, or color) |
Laserfiche Capture Engine Toolbar
| Item | Function |
|---|---|

|
Opens the Laserfiche Capture Engine settings dialog box |
Retrieve items from  |
Defines the location in your repository to retrieve files from. Click the folder button to browse to and select a location |
| Documents matching |
Defines the name filter. This option will not appear if Laserfiche Capture Engine has been configured using Laserfiche advanced search syntax Example: The following filter specifies that Laserfiche Capture Engine should only retrieve documents whose names start with "sample" and end with a single digit: sample?. In this filter, the question mark acts as a wildcard. |
| Assigned template |
Defines the template filter. This option will not appear if Capture Engine has been configured using Laserfiche advanced search syntax Example: If General is selected, only documents that have been assigned the General template will be retrieved. |