Laserfiche Capture Engine Settings
Connection
When you first open Laserfiche Capture Engine, you will need to define a connection to the repository you want to retrieve entries from. You can do this in the Connection section of the Laserfiche Capture Engine dialog box.
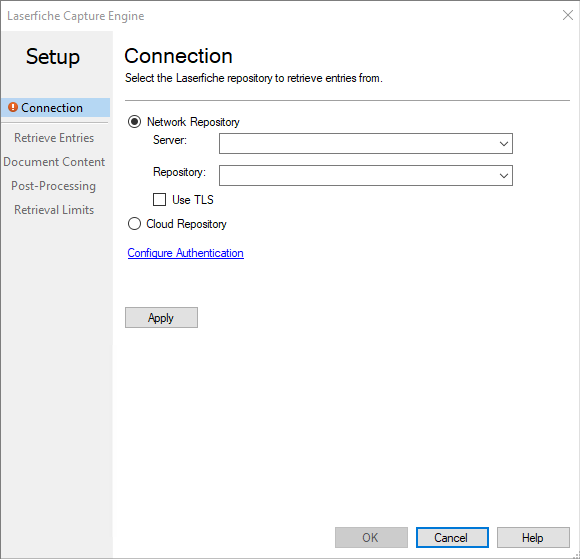
To define a Laserfiche network repository connection
- Select the Network Repository radio button.
- Next to Server, specify the server where the repository is located.
- Once a server has been specified, the repositories on that server will be listed in the Repository drop-down menu. Select or type in the name of the repository you want to connect to.
- To configure Quick Fields to use secure network communications when connecting to Laserfiche, select the Use TLS checkbox.
Note: If you do not use the fully qualified domain name (i.e., servername.laserfiche.com) when entering the server name, you will not be able to authenticate using TLS. You will receive an Internal SSL error when attempting to validate the connection.
- Click Configure Authentication to specify the sign-in credentials the document class will use to connect to Laserfiche.
- Select Windows authentication to log in using the Windows credentials associated with the user running the session.
- Select Laserfiche authentication to enter credentials associated with a Laserfiche account.
- Optionally, select the Laserfiche Directory Server tab to sign in using Laserfiche Directory Server.
- Enter your Laserfiche Directory Server username and password.
- Click Windows Authentication and sign in using your Windows account.
- Sign in using SAML authentication.
Note: Laserfiche Webtools Agent lets Quick Fields and Quick Fields Scanning connect to a Laserfiche repository with Laserfiche Directory Server authentication using a longer session so you will not have to enter credentials continuously to stay connected.
- Click Validate to validate the connection, then click OK.
- Click Apply.
To define a Laserfiche Cloud repository connection
- Select the Cloud Repository radio button.
- Click Configure Authentication.
- Enter your Laserfiche Cloud account ID and click Next. You can find the ID in Account Administration under the Plan tab (if you are signed in as an administrator) or in Repository Administration under Summary (if signed in as a user with appropriate access).
- If single sign-on (SSO) has been configured, you can sign in using your identify provider or enter your Laserfiche Cloud username and password and click OK.
Note: Windows authentication cannot be used to connect to Laserfiche Cloud.
Note: The Laserfiche Cloud session connection will only be connected for a certain amount time. After this time period, users will have to authenticate the session connection again.
- Click Apply.
If a connection has already been defined, you can click Change to modify it.
Note: Some actions require you to provide sign-in information again. For example, if an administrator changes the account password for the account used to connect to the repository, a Laserfiche Login dialog box will appear when trying to scan. This is because Laserfiche Capture Engine needs the new password to connect to the repository.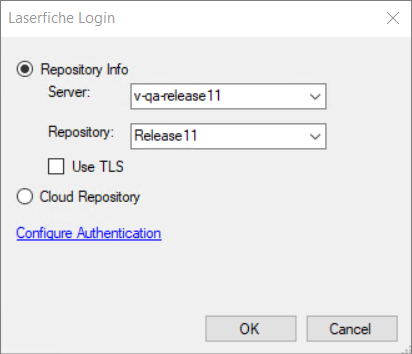
Retrieve Entries
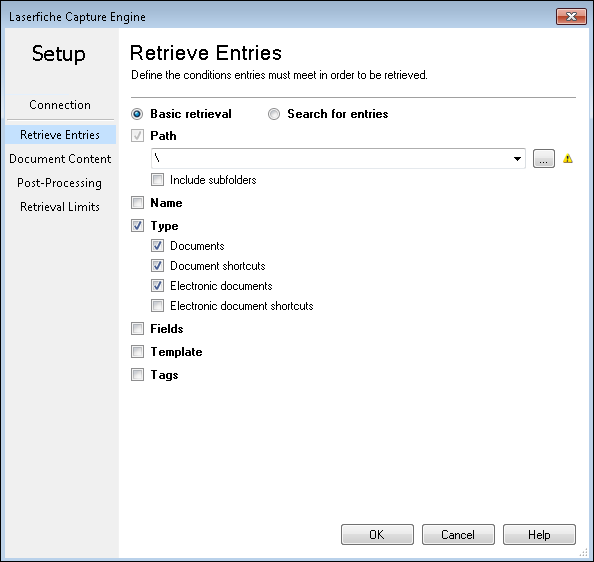
The Retrieve Entries section of the Laserfiche Capture Engine dialog box allows you to define how you want documents retrieved from the Laserfiche repository. You can retrieve documents that meet specified criteria (Basic retrieval) or search for documents to retrieve using Laserfiche advanced search syntax (Search for entries).
Basic Retrieval
The Basic retrieval section under Retrieve Entries in the Laserfiche Capture Engine dialog box allows you to retrieve documents that meet specified criteria. If you specify a folder and a field value, the documents will need to be in that folder AND have a matching field value to be retrieved.

Folder Path
To retrieve entries in a specific folder
- The Path checkbox is selected by default and it cannot be cleared. Entering a path is required. Click the Browse button
 to navigate to a folder in the Laserfiche repository.
 Note: Retrieving all documents in the root of your repository is not recommended, as that could potentially retrieve the contents of your entire repository (especially if you include the contents of subfolders).
Note: Ensure the name of the repository is at the beginning of the path you define.
- Once you have selected a folder and clicked OK, it will appear in the drop-down menu so you can easily return to it later.
- Optional: Select Include subfolders to retrieve items that are in subfolders of the selected folder.
Name
To retrieve entries by specific name
- Select the Name checkbox and specify a name or create a pattern to retrieve matching names. Tokens can be used in the name.

- Once you have specified a particular name or pattern and clicked OK, it will appear in the drop-down menu so you can easily return to it later.
Type
To retrieve entries by type
- Select the Type checkbox and choose whether to retrieve imaged documents, document shortcuts, electronic documents, and/or electronic document shortcuts.

Example: If you choose to retrieve entries inside a specific folder, and that folder contains shortcuts to specific documents not located in that folder, selecting Document shortcuts or Electronic document shortcuts will include those referenced documents.
Note: By default, Laserfiche Capture Engine will not retrieve shortcuts.
To retrieve entries associated with specific fields
You may want your entries retrieved only if specific field conditions are met.
- Select the Fields checkbox, then select Choose fields to open the Choose Fields dialog box.
- Select the checkboxes next to the fields you want associated with the retrieved entries. For more information see Assign Fields.
- Click OK.
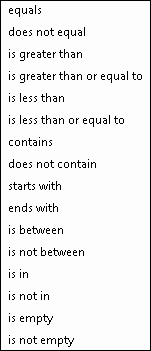
- Click the underlined operator to change the field's logic. Depending on the operator you select in the operator text, you may see a default field value, a default token, <Not configured>, a text box, a text box and <Not configured>, or no text box at all. Click <Not configured> (if necessary) and type a value in the text box. Click the token button (right arrow)
 to use tokens. You can also use wildcards when using certain logic operators. For example, if you are using the "contains" logic operator, you will not be able to use a wildcard.
- Click the trash can
 to remove a field.
Template
To retrieve entries by template
- Select the Template checkbox and choose a template from the drop-down menu. All templates available to you in the Laserfiche repository connected to the Laserfiche Capture Engine can be selected from the drop-down menu.

Tags
To retrieve entries assigned specific tags
- Select the Tags checkbox, then select Choose tags.

- In the Choose Tags dialog box, select the checkboxes next to the tag(s) you want associated with the retrieved entries. Depending on how your administrator has configured tags, you may be able to select information or security tags. You can search for tags by tag name using the Search tags text box.
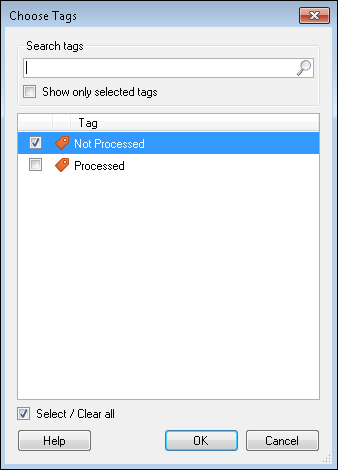
- Click OK.
- By default, the tag you choose will be defined as is set. To retrieve entries that do not have that specific tag assigned, click is to change it to is not set.
- Click the trash can
 to remove the tag.
Tip: You can select Show only selected tags to display only the tags you have selected. You can also select the checkbox next to Select/Clear all to select or clear all tag selections at one time.
Search for Entries
The Search for entries section under Retrieve Entries in the Laserfiche Capture Engine allows you to retrieve documents from a Laserfiche repository using any criteria you can use to search from a Laserfiche client.
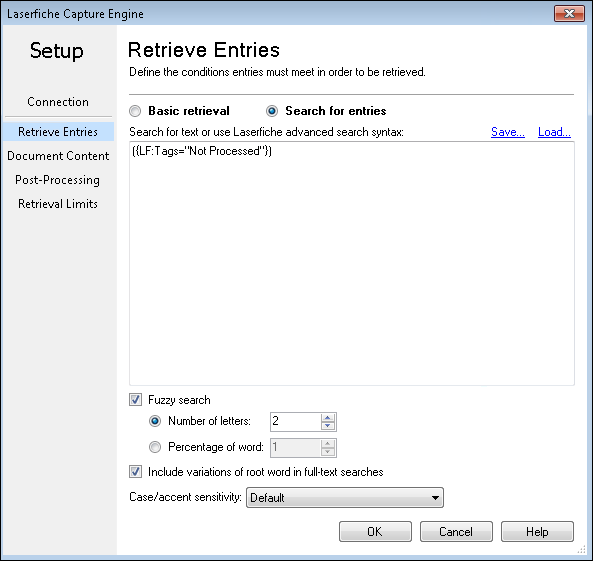
To search for entries using Laserfiche search syntax:
- In the Search for text or use Laserfiche advanced search syntax search box, type Laserfiche advanced search syntax.Tip: If you are not certain of the Laserfiche search syntax to use, you can generate it in a Laserfiche client. Perform the desired search, open the search filters, then click Show search syntax. You can copy the search syntax that is displayed to use with Laserfiche Capture Engine.
To save the search
- Click Save.
- Specify a name for the saved search and click OK.
To open a saved search
- Click Load.
- Select the name of the search you want to open under Saved searches and click OK.
To delete a saved search
- Click Load.
- Select the search you want to delete and click Delete.
Fuzzy search
All basic text searches support the Fuzzy search option, which allows you to find all words or phrases that are similar to the word or phrase you typed, even if they contain misspellings or OCR errors. When the fuzzy search feature is used, the degree of accuracy is determined by the number of letters or by the percentage of each word in the phrase.
If you select Number of letters, specify the maximum number of letters that each word in the phrase can differ from the specified criteria and still be considered a good result
If you select Percentage of word, specify the percentage of each word in the phrase that can differ from the search criteria and still be considered a good result.
Fuzzy searches take significantly more time. To perform faster searches, use a regular full-text search. If you are not sure of the exact content in the desired document(s) or the image quality of your scanned documents is poor, use the fuzzy search, so your list of search results is as complete as possible.
Include variations of root word in full-text searches
If you select this option, full-text searches will return words that come from the same root word as the search term. For example, if you select this option (also called “search stemming”) a search for the word “swim” will return documents with the word “swim,” “swims,” “swam,” “swum,” or “swimming” in them. Search stemming only applies to full-text searches.
Case/accent sensitivity:
This option allows you to choose the combination of case and/or accent sensitivity you want for non-full-text searches. The default combination is set in the Laserfiche Administration Console. For example, a case sensitive field search for "Tom" will return entries with field values of "Tom," but not "tom," "TOM," or "TOm" etc. Accent sensitive searches require search results to match the accent of every letter in your search criteria to be considered a valid result. For example, an accent sensitive field search for "Laserfiche" will return entries with field values of "Laserfiche," but not "Láserfiche," "Låserfiche," or "Lasërfiche." etc. Accent sensitive searches are especially useful when searching for entries in a particular language. You can also make searches both case and accent sensitive.
To configure case and accent sensitivity, select one of the following from the list:
- Default (Case insensitive/Accent sensitive)
- Case sensitive/Accent sensitive
- Case insensitive/Accent insensitive
- Case insensitive/Accent sensitive
Note: This setting will not apply to full-text searches, but will apply to all other search types.
Document Content
The Document Content section in the Laserfiche Capture Engine dialog box allows you to define the content you want retrieved from your documents.
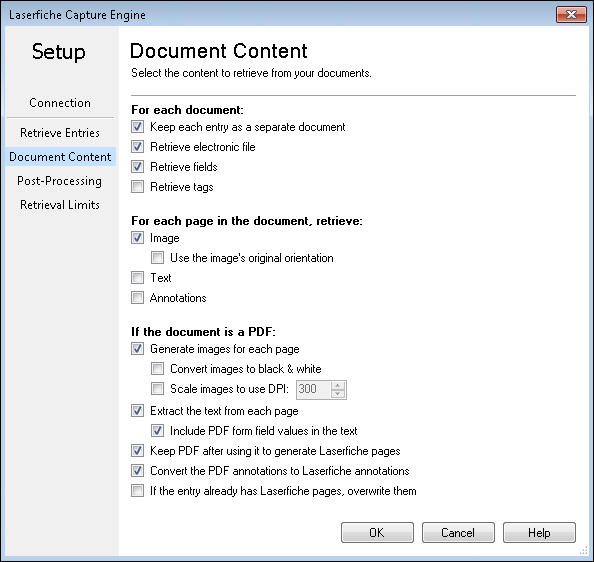
For each document:
- Keep each entry as a separate document: Select if you want to keep each entry as its own separate document. When selected, imaged documents will enter Quick Fields organized into documents as they were in the Laserfiche repository. When cleared, all the image pages will enter Quick Fields as a single set, and will only be sorted into documents according to the settings in Quick Fields. This is useful if you have pages that have not already been defined into documents, or if you want to change the document structure.
Note: This selection is one factor in how pages will be grouped into documents by Quick Fields. The others are the First Page Identification conditions, the Last Page Identification conditions, and the Document Length settings. For more information, see How Documents are Identified.
Note: If Keep each entry as a separate document is not selected and you do not have Generate images for each page or Extract the text from each page selected, you will not be able to select Keep PDF after using it to generate Laserfiche Pages. If the Laserfiche pages in the repository are going to be separated and made into new documents of different lengths, the PDF will not be kept because it cannot be attached to new arbitrary Laserfiche documents. A combination of different file types (doc, pdf, etc) retrieved can be used to create new Laserfiche documents, but the electronic files cannot be kept because of the mixed file types.
- Retrieve electronic file: If the entry you are retrieving is an electronic file (e.g., PDF), selecting this option will retrieve that electronic file, giving you the ability to generate pages from PDFs or extract text from Word documents, etc.
Note: If you do not have Retrieve electronic file selected, you will not be able to select any options under If the document is a PDF. There is no need to select any PDF options if you are not retrieving electronic files.
- Retrieve fields: Select this option to retrieve the document fields.
- Retrieve tags: Select this option to retrieve the document tags.
For each page in the document, retrieve:
To specify the page data to retrieve, select any or all of the following:
- Image: Retrieves each page's image.
- Use the image's original orientation: When selected, this will retrieve the document at the original orientation at which it was scanned. When cleared, it will use the orientation you have set in the image display
- Text: Retrieves each page's text.
- Annotations: Retrieves each page's annotations.
If the document is a PDF:
- Generate images for each page: Generate Laserfiche images for each page of the retrieved PDF.
- Convert images to black & white: Convert the generated image pages to black and white.
- Scale images to use DPI: Customize the generated image's dots per inch (DPI).
- Extract the text from each page: Extract text from the retrieved PDF documents.
- Include PDF form field values in the text: If you are extracting text from a PDF form, the values in the form's fields will be included in the extracted text. It will be located at the bottom of the Text Pane.
- Keep PDF after using it to generate Laserfiche pages: The PDF can be used to generate Laserfiche images, extract text, or both. Selecting this option will keep the PDF file after it has been used to create Laserfiche pages.
- If Keep each entry as a separate document is selected above but you do not have Generate images for each page or Extract the text from each page selected, Keep PDF after using it to generate Laserfiche pages will be required and automatically selected. Since the new document being created will not have Laserfiche pages, it will require the PDF be attached as the electronic file component.
- If Keep each entry as a separate document is not selected above, you will not be able to select Keep PDF after using it to generate Laserfiche pages. If the Laserfiche pages in the repository are going to be separated and made into new documents of different lengths, the PDF cannot be kept because it cannot be attached to new arbitrary Laserfiche documents.
- Convert the PDF annotations to Laserfiche annotations: Any PDF annotations on the retrieved PDFs will be converted into Laserfiche annotations.
- If the entry already has Laserfiche pages, overwrite them: PDFs retrieved may already have Laserfiche pages associated with them. Select this option if you want the newly processed Laserfiche pages (generated from the PDFs) to overwrite the existing Laserfiche pages in your repository.
Note: Keep PDF after using it to generate Laserfiche pages needs to be selected in order to use Retrieve PDF Form Content.
Post-Processing
The Post-Processing section in the Laserfiche Capture Engine dialog box allows you to define what will happen to the original documents and shortcuts once they are scanned into Quick Fields. To do this, group the entry types by the actions you want performed on them.
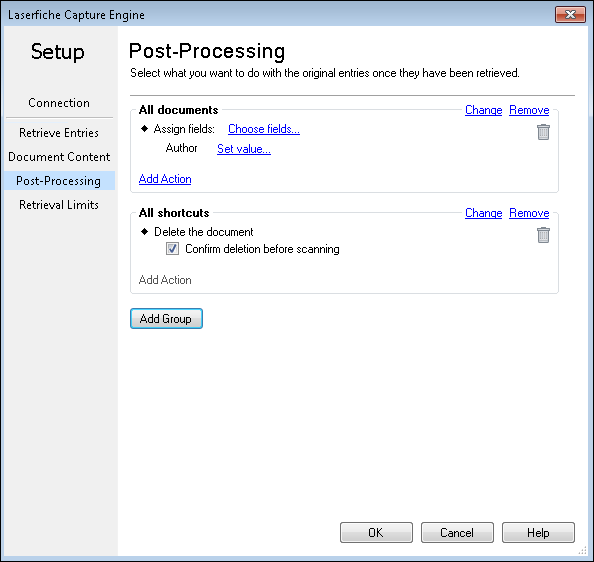
Example: If all the original documents and the document shortcuts should be archived, define the group's entry types as Documents and document shortcuts and add the Move action to it. Click the Browse button  to navigate to where the documents should be moved. You can also use tokens to define a folder path. To archive the original document shortcuts and not the actual documents, change the group's entry types to Document shortcuts.
To define a group of documents and/or shortcuts to be processed
- Click Add Group. By default, the first group added contains all documents. You can change these entry types by clicking Change and selecting the types of entries you want to process: Documents, Document shortcuts, Electronic documents, and/or Electronic document shortcuts).
- Once you have defined the types of entries for the group, click Add Action to add processing actions to these entries.
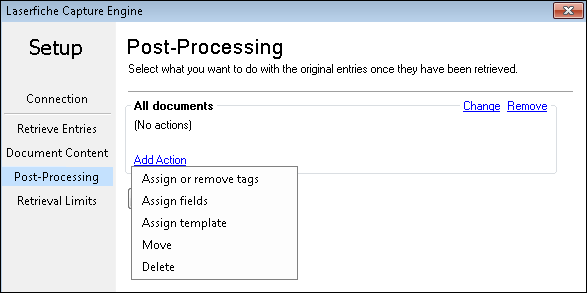
- Assign or remove tags: Selecting this option opens the Select Tags dialog box where you can assign or remove tags.
- Assign fields: Selecting this option opens the Select Fields to Assign dialog box where you can search for and select fields to assign to the entries. Once fields are selected, click OK. Click Set value next to each field you selected to assign field values. You can select Choose fields to modify the selected fields.
Note: If Allow editing of list fields is selected in the Options dialog box, you will be able to select a value from the drop-down menu or enter your own value into the text box when configuring a value for a list field. If this option is not selected, you will only be able to select a value from the drop-down menu. However, when the list field is behaving as only a drop-down menu, typing characters will scroll to the values that begin with the group of characters you enter.
- Assign template: Selecting this option displays a drop-down menu where you can select the template you want assigned to the entries. If the original entries have a template already assigned to them, the fields in that template that have field values will be retained and appended to the new template you choose. The ones without values will be removed. If you want to remove the original template and all its fields (whether they have values or not) select Remove all fields associated with the original entry's template. This will completely replace the original template and fields with the new template and fields.
- Move: Selecting this option allows you to click the Browse button and define a location to move the original entries to. You can use tokens in the folder path.
- Delete: Selecting this option will delete the original entries. Select Confirm deletion before scanning to display a deletion confirmation message before scanning.
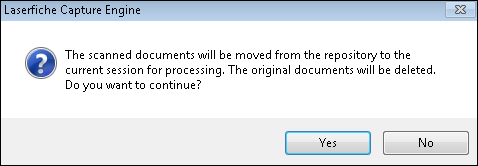
- To remove a group, click Remove. To remove an action, click the trash can
 next to it.
Assign or Remove Tags
In Laserfiche Capture Engine, under Post-Processing, you can assign or remove tags to and from the original documents and shortcuts once they have been scanned into Quick Fields.
To assign or remove tags
- Under Post-Processing in the Laserfiche Capture Engine dialog box, click Add Group. By default, the first group added contain all documents. You can change these entry types by clicking Change and selecting the types of entries you want to process: Documents, Document shortcuts, Electronic documents, and/or Electronic document shortcuts).
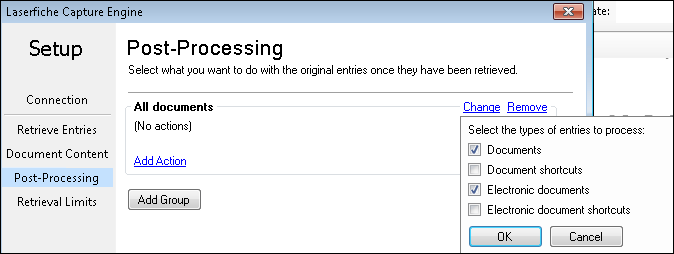
- Once you have defined the types of entries for the group, click Add Action.

- Select Assign or remove tags to open the Select Tags dialog box.
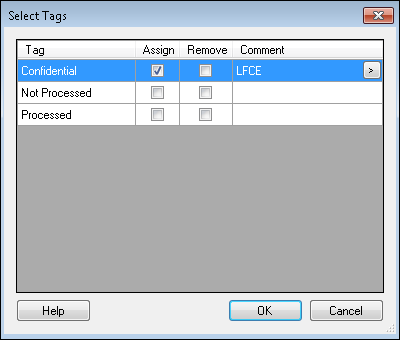
- Select the checkbox under Assign for the tag(s) you want to assign. Select the checkbox under Remove for the tag(s) you want to remove. Once you select a checkbox next to a tag, you will be able to add a tag comment. "LFCE" will be populated as the tag comment by default. This indicates where this tag was assigned. You can change the comment to anything you want. You can also use tokens in the tag comments.
- When finished, click OK.
- To remove this action, click the trash can
 next to it in the Post-Processing section.
Assign Fields
The Choose Fields dialog box will appear in the following situations:
- When you are retrieving files from a repository, based on certain fields, using Laserfiche Capture Engine.
- When you are specifying what to do with original entries once they have been retrieved using Laserfiche Capture Engine
- When you are defining fields to be added to documents that are a part of a specific document class
To assign fields
- In the Choose Fields dialog box, do one of the following:
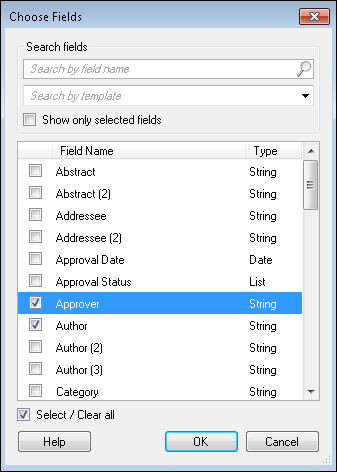
- Search for a specific field in the text box under Search fields.
- Search for fields by the template they are associated with by selecting a template in the Search by template drop-down menu.
- Manually scroll through the fields to find the desired fields.
- Select the checkboxes next to the fields you want assigned.
- Optional: To display only the fields that are selected, select Show only selected fields. This removes fields that are not selected.
- Optional: To select/clear all fields being viewed, select the Select/Clear all option.
- When finished, click OK.
- To remove this action, click the trash can
 next to it in the Post-Processing section.
Retrieval Limits
The Retrieval Limits section in the Laserfiche Capture Engine dialog box allows you to define any limits you want to place on entries retrieved.
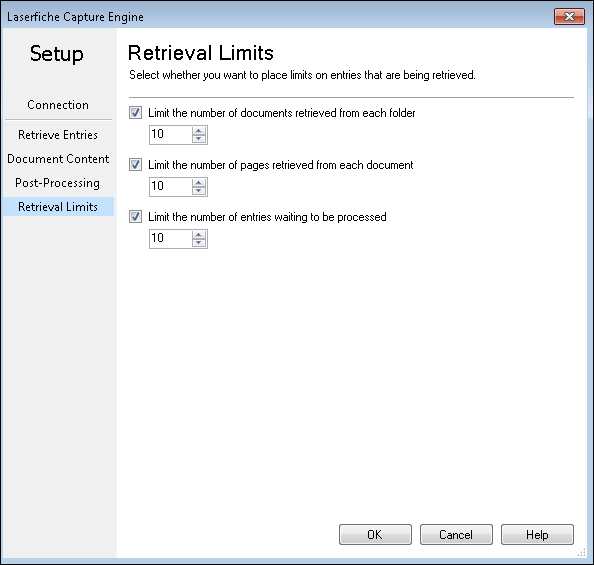
Limit the number of documents retrieved from each folder:
- Select this option to limit the maximum number of documents you want retrieved from each folder. Type a number in the number box or use the up and down arrows to navigate to the limit you want. This option can help with load balancing.
Example: The Education and Marketing departments are both scanning documents into the same repository folder for Laserfiche Capture Engine to pick up and process in Quick Fields. The Marketing department scans 1,000 documents into the shared folder while the Education department only scans 50. If the number of documents retrieved per folder is not limited, the Education department will have to wait until all 1,000 Marketing documents are processed before the Education department's documents can even begin to be processed.
Limit the number of pages retrieved from each document:
- Select this option to limit the number of pages you want retrieved from each document. Type a number in the number box or use the up and down arrows to navigate to the limit you want.
Example: The Marketing department has 20 page documents in their repository. They only need the first two pages of each document processed, so they limit the number of pages retrieved to two.
Limit the number of entries waiting to be processed:
- Select this option to limit the number of documents processed at one time. Type a number in the number box or use the up and down arrows to navigate to the limit you want.
Example: If you have a scheduled Laserfiche Capture Engine session that is supposed to OCR documents in a folder in your repository, you can configure Quick Fields to limit the processing queue to 100 and Quick Fields will OCR 100 documents at a time to help save disk space.
Note: The Limit the number of entries waiting to be processed option is not available in Quick Fields Scanning.
Note: This option was in the Options dialog box in version 8.3 of Quick Fields. If you are migrating to 10 from 8.3, you will need to reconfigure this option as it is not automatically migrated for you.
Wildcard Characters
A wildcard character is a symbol that represents a single or multiple characters. Wildcard characters can be used to create flexible retrieval requests with Laserfiche Capture Engine.
| Symbol | Example | Description |
|---|---|---|
| ? | R?n | A question mark represents a single unknown character. Valid matches for the example would include: ran, ron, and run. |
| * | Dat* | An asterisk represents multiple characters. Valid matches for the example would include: data, dating, and date. |
| [ ] |
[f-h]ood b[aeiou]d |
Brackets represent a range of characters or a collection of characters. Valid matches for the first example would include: food, good, and hood. Valid matches for the second example would include: bad, bed, bid, and bud. |