Modifying Processed Documents
In the Revision stage of a Quick Fields session, you see how the scanned pages have been sorted into documents and where they will be stored in Laserfiche. As part of your quality assurance review, you can modify the documents after they have been processed. With the appropriate permissions, you can split a document into several documents, combine documents, or delete documents. You can change a document's template and fields, modify the contents of fields, or change where the document will be stored in the Laserfiche repository.
Creating a New Document from a Page
While reviewing processed documents, you can remove selected pages and move them to a new, separate document.
To create a new document from a page
- Select a document in the Document Revision Pane.
- Navigate to a page using the arrow buttons on the Navigation toolbar.
- Click the Create Document button
 . The new document will appear in the Document Revision Pane.
To create a new document from selected pages
- Select a document in the Document Revision Pane.
- Select the desired pages in the Thumbnails Pane using CTRL+Click.
- Click the Create Document button
 . The new document will appear in the Document Revision Pane.
Splitting a Document
While reviewing processed documents, you can split a document by removing the page you are viewing and all the pages that follow it and moving them to a new, separate document.
To split a document
- Select a document in the Document Revision Pane.
- Navigate to a page.
- Click the Split Document button
 . The new document will appear in the Document Revision Pane.
Combining Documents
While reviewing scanned imaged documents, you can combine two documents into one.
Note: This feature is not available for electronic documents.
To combine documents
- In the Document Revision Pane, locate the two documents you want to combine.
- Drag one document on top of the other.
Deleting Documents and Pages
Warning: Documents and pages deleted in Quick Fields cannot be restored. Be very cautious when deleting documents and pages.
Note: To delete documents and pages, you must have the appropriate permissions.
To delete a page
- Select a document in the Document Revision Pane.
- Navigate to a page.
- Click the Delete button
 .
.
To delete a document
- Right-click a document in the Document Revision Pane.
- Select Delete.
Modifying the Destination of a Document
The Move to New Folder feature changes a single, currently selected document's destination to a new folder that will be created in the Laserfiche repository when the documents in the Quick Fields session are stored. By default, the new folder will be named New Folder. If a folder by this name already exists, it will be appended with (number); for example, New Folder (2). Once the folder has been created and the document moved, you can modify the folder's destination and rename the document.
To use Move to New Folder
- Select a document in the Document Revision Pane.
- Select Move to New Folder
 . A new folder containing the document will appear in the Document Revision Pane.
Modifying the Destination of a Folder
To change the destination of one or more scanned documents, change the path of the folder containing them.
To modify the destination of a folder
- Select a folder in the Document Revision Pane.
- In the Tasks Pane, modify the folder path. There are several different ways to modify the folder path, which can be used individually or in combination:
- Click the Browsebutton
 to select an existing folder in a Laserfiche repository.
 - Specify the name or path of a new folder. The folder will be created when the documents are stored in Laserfiche.
- Use a token to have a path or a component of the path dynamically generated upon storage.
- Click the Browsebutton
Scanning into a Processed Document
After a document is processed, you can scan additional pages into it.
To scan images into a document
- Right-click a processed document in the Document Revision Pane.
- Select Scan Into Document. Pages will be appended to the document.
Example: Lewis has scanned a 20-page document. He right-clicks the document in the Document Revision Pane and selects Scan Into Document to scan 10 additional pages. The 10 new pages will make-up pages 21-30 of the document.
Note: When applicable, image enhancements and processes will be performed on images scanned into an existing document.
Note: This feature is not available for document classes configured to immediately send documents to the repository.
Note: This feature is not available for Universal Capture or Laserfiche Capture Engine.
Rescanning
During Revision, you can rescan a document or page, replacing the existing image with a newly scanned image.
Warning: If you are using Universal Capture or Laserfiche Capture Engine and have configured the scan source to delete the original documents after they have been processed, you will not be able to rescan because the original documents will already be gone.
Warning: Document properties and field information will not be automatically updated to reflect data extracted from a rescanned document.
Warning: Once an image has been rescanned, the previous image is permanently lost.
To rescan a document or page
- In the Document Revision Pane, select the document. If you only want to rescan particular pages of a document, select the pages in the Thumbnails Pane.
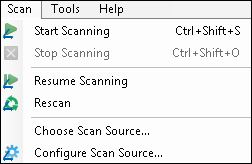
- From the Scan menu, select Rescan.

Reassigning a Processed Document
If you have multiple document classes, a document that has been assigned to one class can be reassigned to another after processing.
Note: To assign documents, you must have the appropriate permissions.
To reassign a document from one class to another
- Select the document in the Document Revision Pane.
- Right-click and select Assign Document.
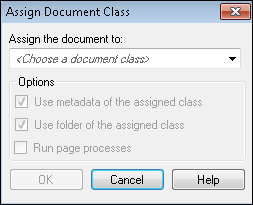
- The Assign Document Class dialog box will open.

- Select a document class from the menu.
- Select any options:
- Use metadata of the assigned class: When this option is selected, the template and fields of the new class will be used. If it is cleared, the document will retain the template and fields of the previously assigned class.
- Use folder of the assigned class: When this option is selected, the document will be stored in the Laserfiche folder determined by the properties for the new document class. When it is cleared, the folder for the previous document class will be used.
- Run page processes: When this is selected, processes configured in Page Processing for the new document class will be run on the document when it moves to the new class.
Managing Metadata During Revision
During Revision, you can change the template and fields associated with a document.
Note: Changing the template will remove any template and field customizations associated with the document class. For example, if the template you remove had a field for Social Security Numbers with a constraint created in Quick Fields to limit them to the format xxx-xx-xxxx, that constraint will disappear along with the template.
To change the template and fields of a document during Revision
- Select the document in the Document Revision Pane.
- Select Configure fields from the Action menu or the bottom of the Tasks Pane.
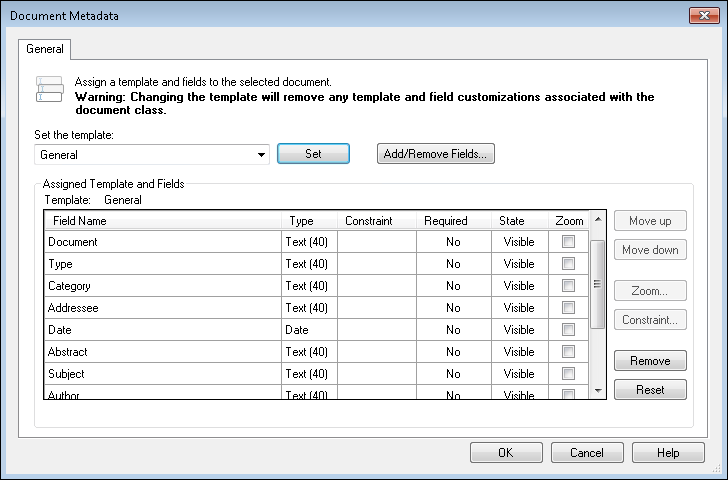
- The Document Metadata dialog box will open, and you can assign a new template and fields to the selected document.

Changing the Template
Under Set the template is a drop-down list of all the templates available to you in the Laserfiche repository associated with the document class.
To change the template
- Select a template from the list.
- Click Set. If a different template was previously assigned to that document, a dialog box may appear asking you to choose which of the existing fields you'd like to keep after reassigning the template.
- Make a selection and click OK. If you choose a particular setting and select Do not show me again, that will become the default setting and the dialog box will no longer appear.
Adding Fields
Under Add/Remove Fields is a drop-down list of all the fields available to you in the Laserfiche repository associated with that document class.
To add a field
- Select Add/Remove Fields.
- In the Choose Fields dialog box, select the fields you want to add and click OK.
Note: Multi-value field groups are supported in Quick Fields 10.1 and later. Multi-value field group names are supported in Quick Fields 10.3 and later.
Tip: If a document image has text associated with it, you can draw a rectangle around the desired text on the image in the Display Pane and copy and paste it elsewhere to help define the document (field value, document name, etc.).
Editing the Contents of Fields and Other Metadata
During the Revision phase, you can review and modify the contents of fields and other metadata before sending the documents to Laserfiche.
To review and modify document metadata
- Select the document in the Document Revision Pane.
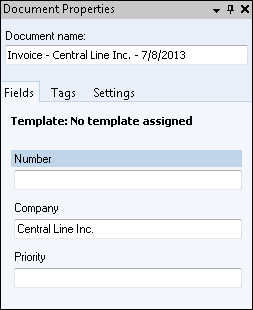
- Review the document properties in the Tasks Pane. You can review document name, fields, tags, and volume.

- Make any desired changes.
Note: Multi-value field groups are supported in Quick Fields 10.1 and later.
Tip: If a document image has text associated with it, you can draw a rectangle around the desired text on the image in the Display Pane and copy and paste it elsewhere to help define the document (field value, document name, etc.).
Bookmarks
When reviewing processed documents, you can use bookmarks to indicate pages that need further review or revision. This is useful when you want to quickly examine documents and return later to those that need additional modification, or when different people are performing the initial review and additional modification. Bookmarks can be added or modified via menus, toolbar buttons, or keyboard shortcuts. Bookmarks can be added to the first page of a document when the document is selected in the Document Revision Pane, or to any page of a document when that page is selected in the Thumbnails Pane. When a page is bookmarked, an asterisk will appear next to the name of the page in the Thumbnails Pane. When a document contains a bookmark, a blue border will appear around that document in the Document Revision Pane.

Note: The blue border will not appear if the document already has another icon, such as the error icon. However, the document will still be bookmarked and can be reached by the bookmark navigation options described below.
To add a bookmark
Select the document you want to bookmark the first page of, or the specific page you want to bookmark, and do one of the following:
- From the View menu, select Bookmarks and Add Bookmark.
- Press CTRL+B on the keyboard.
- Right-click and select Add Bookmark.
- Select the Add/Remove Bookmark button if it has been added to the Navigation Toolbar.
To remove a single bookmark
Select a bookmarked page and do one of the following:
- From the View menu, select Bookmarks and Remove Bookmark.
- Press CTRL+B on the keyboard.
- Right-click and select Remove Bookmark.
- Select the Add/Remove Bookmark button if it has been added to the Navigation Toolbar.
To view the next bookmarked page
Do one of the following:
- From the View menu, select Bookmarks and Next Bookmark.
- Press CTRL+Right on the keyboard.
- Select the Next Bookmark button if it has been added to the Navigation Toolbar.
To view the previous bookmarked page
Do one of the following:
- From the View menu, select Bookmarks and Previous Bookmark.
- Press CTRL+Left on the keyboard.
- Select the Previous Bookmark button if it has been added to the Navigation Toolbar.
To clear all bookmarks in the session
Do one of the following:
- From the View menu, select Bookmarks and Clear Bookmarks.
- Select the Clear Bookmarks button if it has been added to the Navigation Toolbar.
To add bookmark toolbar buttons to the Navigation Toolbar
- Click the arrow at the far right of the Navigation Toolbar.
- Click Add or Remove Buttons.
- Select the bookmark buttons you want to add.