Other Document Class Options
Additional options, besides the default document class properties, can be configured in the Options tab when click on the name of the Document Class
When the name of a document class is selected in the Session Configuration Pane, you can click on the Options tab and configure the following additional options.
General
The General tab in the Document Class Options dialog box enables you to configure the document class name, the connection to the repository the documents will be sent to, and the initial value of the count token.
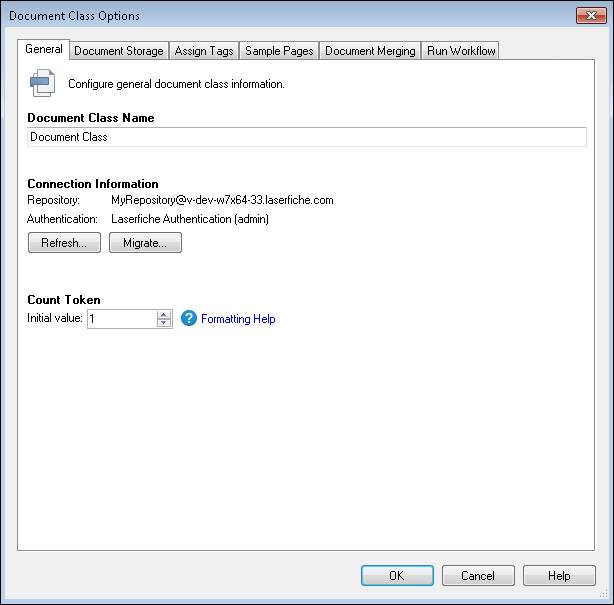
Document Class Name: Type the name for the document class.
Connection Information: You can update or change the settings for the Laserfiche repository where documents assigned to that document class will be sent. Your repository, server, and type of authentication are displayed under Connection Information. Here, you can also update the latest information from the Laserfiche repository or associate the document class with a different repository.
- Refresh: When you click Refresh, the latest settings for the Laserfiche Repository will be reflected in the document class settings in Quick Fields.
Example: Leslie has a document class already configured in Quick Fields. As an administrator, she opens the Administration Console and logs into the repository Quick Fields is connected to. She adds a field to the template associated with the document class, creates two new tags, and changes the default volume associated with that folder. When she clicks Refresh, all these settings will be reflected in Quick Fields for that document class.
- Migrate: Click Migrate to send the documents in a document class to a different repository from the one originally associated with that document class, or to change the user logged into the repository associated with the document class. If the migration to a new repository produces conflicts, you will be prompted to resolve them. For example, if templates or fields associated with the document class are not found in the new repository, you will be prompted to choose a new template or decide which fields to keep as independent fields.
Note: You can migrate multiple document classes at one time. Laserfiche Cloud connections are supported.
Count Token: The Count is the total number of documents scanned in a particular document class. It does not reset when you close the Quick Fields session. The Count is stored in a token, so you can use it to populate metadata and other information, such as naming the document, filling out a field, or identifying the document as belonging to a particular document class. The default starting value is 1. To change it, specify a different starting value next to Initial value.
Note: You can format the count by adding leading zeroes to the starting value. For example, if you select a starting value of 0007, the next documents will be assigned values of 0008, 0009, 0010, etc. Using this formatting can make it easier to sort documents numerically when they are in the repository.
Example: Brian configures a default document name with the word Invoice and the Count token, and sets the starting value to 0020. The default document name looks like Invoice %(Count). When the documents are scanned, the Count token will be replaced with numbers indicating the document's place among all documents scanned: Invoice 0020, Invoice 0021, and so on.
Document Storage
The Document Storage tab enables you to configure how documents processed by the specific document class will be stored in Laserfiche.
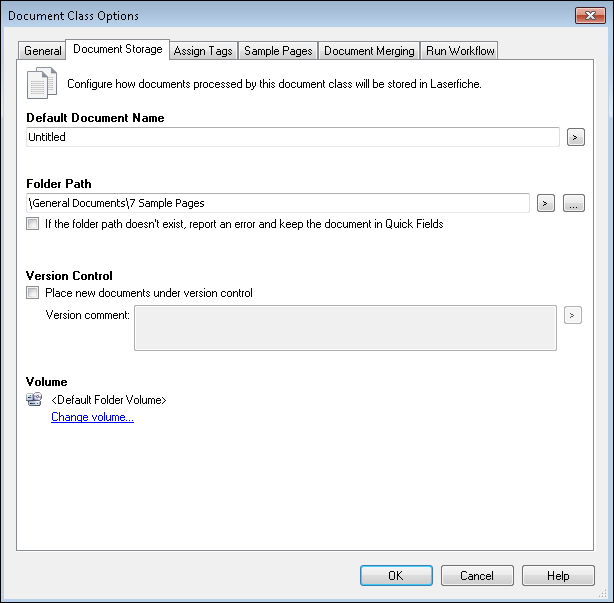
- Default Document Name: Define the default document name for all documents processed by this document class. You can use tokens.
- Folder Path: Click the Browse button
 to specify the location for documents processed by this document class. You can type \newfoldername (where newfoldername is the name of the new folder you want created) at the end of the location path to create a new folder in the repository to store documents in. You can also select If the folder path doesn't exist, report an error and keep the document in Quick Fields to display an error informing you that a folder does not exist. This error will be displayed when you store your documents in the repository.
 - Version Control: When new documents are created and sent from Quick Fields to a Laserfiche repository, you can define if these new documents should be placed under version control. Select Place new documents under version control to place the new documents under version control. Type any version comments you want in the Version comment text box. You can use tokens in the comments.
- Volume: Click Change volume to change the volume in your repository where documents in this document class will be stored. A list of available volumes will appear. The volumes available are determined by the rights of the Laserfiche user whose credentials are used to connect to the repository where the documents will be stored.
Note: Tokens created from processes configured in Last Page Identification are not available for default document name, folder path, or version comments.
Assign Tags
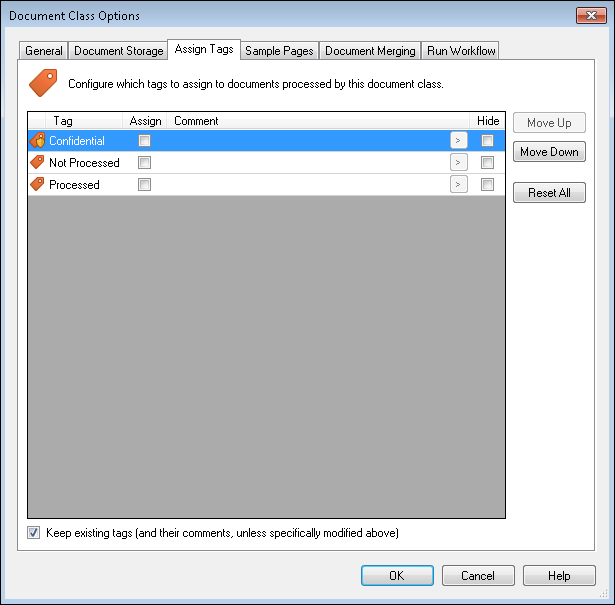
You can customize how tags are presented to scanner operators in Quick Fields. You can make tags available for scanner operators to choose from or you can hide certain tags. You can have them selected by default and also place them in a certain order.
To customize and assign tags
- Under the Assign Tags tab, select the information
 or security tag's
  checkbox in the Assign column to assign the tag to the document by default. Not selecting the Assign checkbox leaves the choice up to the scanner operator to select the tags he/she wants assigned.
 - Select the tag's checkbox under Hide to hide the tag from the scanner operator.
- To reorder the tags, select the tag you want to move and click Move Up or Move Down.
- By default, Keep existing tags (and their comments, unless specifically modified above) will be selected. This means that tags already assigned to documents scanned with Laserfiche Capture Engine or tags determined by a process in Quick Fields will be automatically applied. Clear the checkbox to keep these settings from being automatically applied.
- Click Reset All to return to the original settings.
Using Tags
When the name of a document class is selected, you can click the Options tab in the Tasks Pane to access the Assign Tags option. This option enables you to configure the tags assigned to the documents in that particular document class. The tags available in a Quick Fields session are those available to the specified user logged in to the repository that Quick Fields is connected to in order to store the documents. The selected tags will be applied to all documents assigned to that document class. You can also add a comment to the tag.
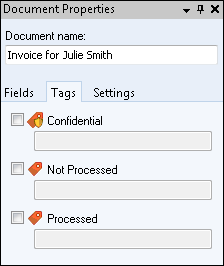
To see the tags assigned, click on the document under Document Revision and look in the Tasks Pane.
Sample Pages
Sample pages can consist of images and/or text assigned to a particular document class or the Pre-Classification Processing stage. They are primarily used to preview and fine-tune the configuration of processes and image enhancements.
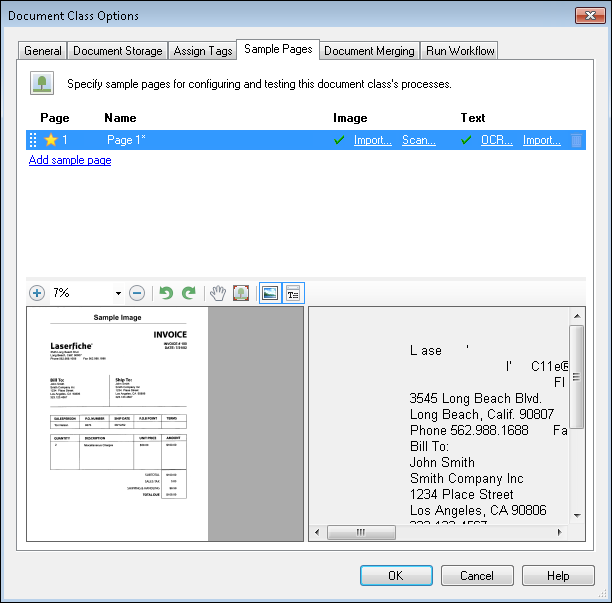
If using a sample image, it should represent the average image that will be processed in the document class, particularly for image properties such as resolution, paper size, and color depth. Sample images that are too different from the documents scanned can result in errors: for example, if the sample image has a different resolution from the documents scanned in the session, the incorrect portion of the scanned images may be processed.
Different sample images can be assigned to different pages within the document class. Processes under Page Processing and Post-Processing can be performed on any or all pages of the document. The sample image displayed during process configuration depends on the page range defined in the process. For example, if you configure a sample image for page 2 and configure a process to be performed on page 2, that sample image will be displayed when selecting that process. If you configure a process for page 3, and you have not configured a sample image for page 3, the default sample image will be displayed
Sample text can also be assigned to a particular document class for testing processes. You can import your own sample text or OCR text from a sample image you import or scan. For example, you import a sample form and OCR its text. You can then configure pattern matching and test it on that sample text to make sure it finds the correct patterns in the actual text.
Quick Fields comes with a default sample page (image and text): a Laserfiche invoice. You can use this to test processes and image enhancements, but for best results, it is better to add and modify custom sample pages that represent the documents you plan to scan.
Note: It is not necessary to customize sample pages, but they can help you optimize your session without having to scan a large number of test pages.
Document Merging
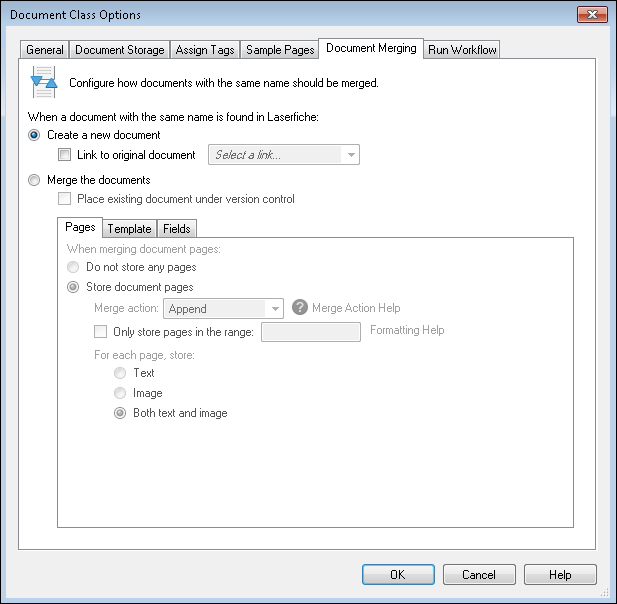
When a document sent from Quick Fields to a Laserfiche repository encounters an existing document with the same name, Quick Fields can create a new document in Laserfiche or merge the two documents together. This feature, under the Document Merging tab, can be used with all scan sources, but is particularly relevant for the Laserfiche Capture Engine, which is designed to process documents that have already been stored in a Laserfiche repository.
Create a New Document
By default, Create a new document will be selected. When a document stored from Quick Fields has the same name as an existing document, the document from Quick Fields will be stored as a new, separate document. The new document will be named according to the Laserfiche naming convention for duplicate items in a folder, which is the name of the document with a sequential number in parentheses; e.g., Invoice (2). You can also save the new document as a new version or link it to the original document. For more information on versions and links in Laserfiche, see the Laserfiche Client help files.
Merge the Documents
You can also select Merge the documents to automatically merge the documents, and can configure settings to specify which information from which document will be kept with the final merged document. Select Place existing document under version control to place the original document under version control before the new one is merged with it.
Note: This option will result in a slower storage time. Use it only if you actually need it; otherwise the default settings will be more efficient.
Pages
In the Pages tab, you can determine which pages from the document processed in Quick Fields will be stored in Laserfiche, and how they will be stored in relation to the previously existing pages.
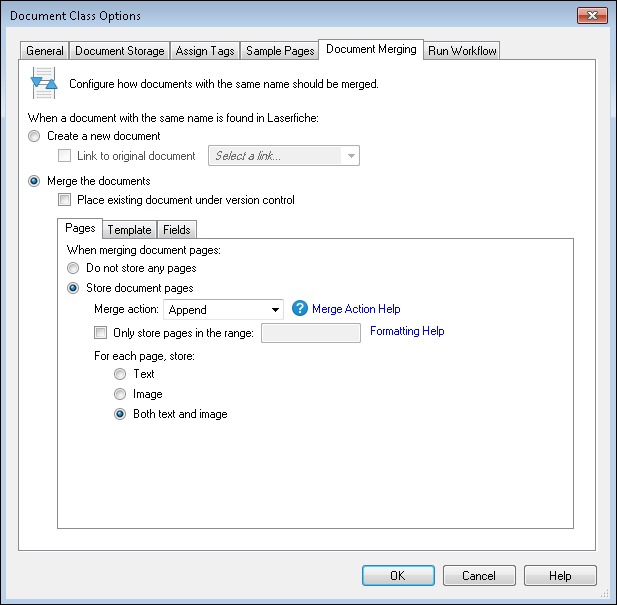
- Do not store any pages does not change the pages of the document stored in Laserfiche. You might select this option to make changes to the template or fields without altering the document itself.
- Store document pages saves pages from the document processed in Quick Fields to the merged document. Use the Merge action: drop-down menu to determine where the stored pages will be saved in relation to the existing pages:
- Append places the new pages at the end of the document in the order in which they were listed in Quick Fields.
- Prepend places the new pages at the beginning of the document in the order in which they were listed in Quick Fields.
- Replace removes the pages from the existing document and replaces them with the new ones. For example, storing a 5 page document will replace pages 1-5 of a 20 page document.
You can also specify which pages or components of pages to store.
- Only store pages in the range: Saves only pages in a specified page range.
- For each page, store:
- Text: Saves extracted text to Laserfiche. When it is cleared, only the pages or metadata will be stored without the extracted text.
- Image: Save page images to Laserfiche. When it is cleared, only the text or metadata will be stored without the pages.
- Both text and image: Saves extracted text and image pages to Laserfiche. When selected, text, metadata, and pages will all be stored.
Template
The Template tab allows you to specify what should happen when the documents to be merged have different templates assigned to them.
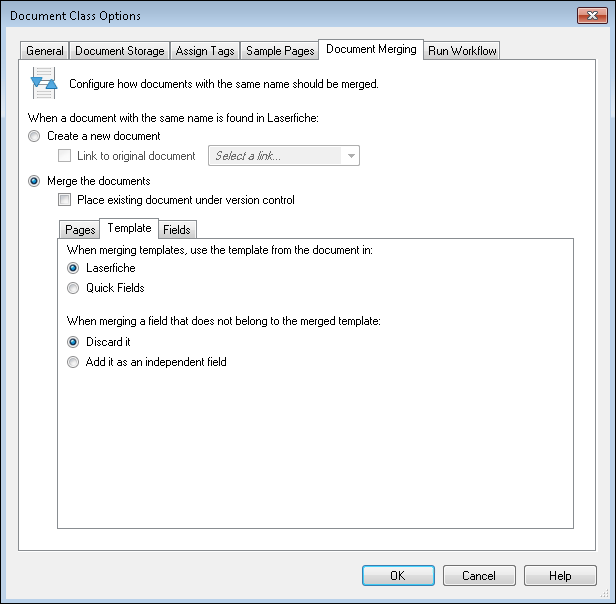
Specify whether to use the template assigned to the document in:
- Laserfiche
- Quick Fields
Specify how to handle fields from the template that will not be used:
- Discard it
- Add it as an independent field
Fields
In the Fields tab, you can configure settings for what will happen to the values in fields when you merge documents.
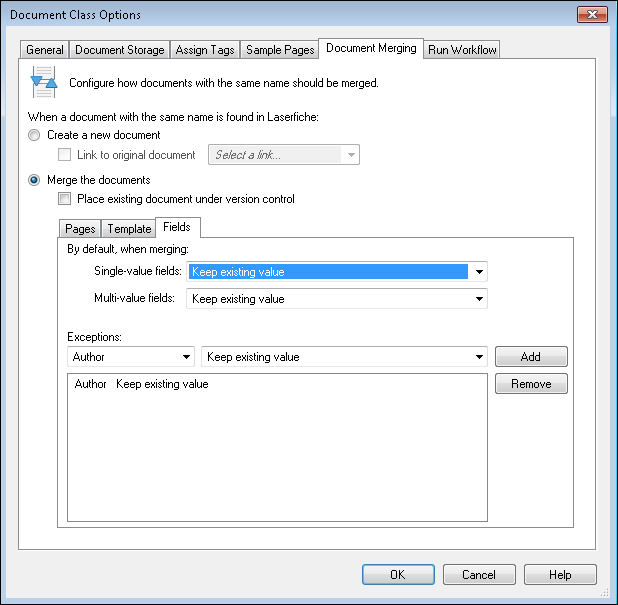
Single-value fields
Specify default settings for what should happen to the data in single-value fields when you merge documents.
- Overwrite with new value: Use the value from Quick Fields.
- Overwrite only if the new value is not empty: Use the value from Quick Fields unless there is no data from Quick Fields. In this case, keep the existing data from Laserfiche.
- Keep existing value: Use the value from the Laserfiche repository.
- Keep existing value if not empty: Use the value from the Laserfiche repository unless there is no data already in that field, in which case use the data from Quick Fields.
Multi-value fields
For multi-value fields, you have the same default options as for single-valued fields, plus one more.
- Append new values: Adds the values from Quick Fields as additional data in the multi-value fields.
Exceptions
You can create settings other than the default for specified fields.
To create merge settings for a particular field
- Under Exceptions, select the name of the field.
- Select the action that should be performed when merging that field.
- Click Add.
To remove merge settings for a particular field
- Select that field and setting from the list.
- Click Remove.
Run Workflow
The Run Workflow tab enables you to specify whether or not to start a workflow on processed documents after they are sent to the repository.
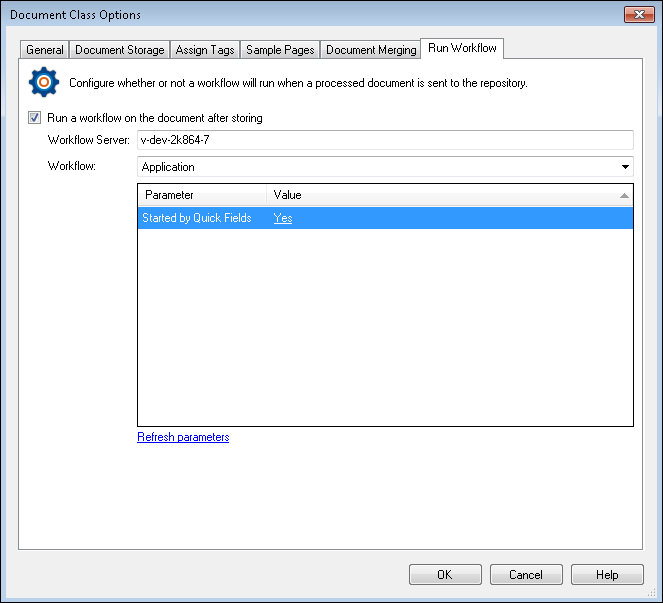
To enable this option, select Run a workflow on the document after storing.
- Workflow Server: Enter the name of the Workflow Server that is hosting the workflow you want to start. The Workflow Server must have the Workflow Web Service running and accessible by Quick Fields in order for workflows to be started.
- Workflow: Once you have defined the Workflow Server, a list of workflows published to that Workflow Server will be displayed in the drop-down menu. Select the workflow you want to start.
If the workflow selected has input parameters, these parameters will be displayed below the selected workflow. If a default value was configured in Workflow for a parameter, that value will automatically be set next to the parameter in this tab. If there is no default value, the value will say <Blank>. In either case, you can edit the value using static text or tokens.
Note: Tokens created from processes configured in Last Page Identification are not available.
Example: Bluth University has an application approval workflow that contains a Started by Quick Fields parameter. The workflow uses this value to help troubleshoot any application errors. If the application reports an error, and the workflow knows it was started by Quick Fields, it can email the Workflow administrator as well as the Quick Fields administrator so they can both troubleshoot the problem. If it was not started by Quick Fields, then the error did not originate in Quick Fields and workflow will only email the Workflow administrator
If you have re-published a workflow and want Quick Fields to update its list of parameters for that workflow, click Refresh parameters below the parameters.