Sample Documents
There are two types of documents that can be used as samples for testing your processes:
- Sample Pages
- Sample Electronic Documents
Sample Pages
Sample pages can consist of images and/or text assigned to a particular document class or the Pre-Classification Processing stage. They are primarily used to preview and fine-tune the configuration of processes and image enhancements.

If using a sample image, it should represent the average image that will be processed in the document class, particularly for image properties such as resolution, paper size, and color depth. Sample images that are too different from the documents scanned can result in errors: for example, if the sample image has a different resolution from the documents scanned in the session, the incorrect portion of the scanned images may be processed.
Different sample images can be assigned to different pages within the document class. Processes under Page Processing and Post-Processing can be performed on any or all pages of the document. The sample image displayed during process configuration depends on the page range defined in the process. For example, if you configure a sample image for page 2 and configure a process to be performed on page 2, that sample image will be displayed when selecting that process. If you configure a process for page 3, and you have not configured a sample image for page 3, the default sample image will be displayed
Sample text can also be assigned to a particular document class for testing processes. You can import your own sample text or OCR text from a sample image you import or scan. For example, you import a sample form and OCR its text. You can then configure pattern matching and test it on that sample text to make sure it finds the correct patterns in the actual text.
Quick Fields comes with a default sample page (image and text): a Laserfiche invoice. You can use this to test processes and image enhancements, but for best results, it is better to add and modify custom sample pages that represent the documents you plan to scan.
Note: It is not necessary to customize sample pages, but they can help you optimize your session without having to scan a large number of test pages.
Adding a Custom Sample Page
You can add a custom sample page (image and/or text) to a document class or the Pre-Classification Processing stage of processing so you can test processes and image enhancements on a representative image or text before scanning a large group of documents. Custom sample pages can be added by importing from a network drive or scanning with the scan source you are using for the session. The sample text portion of a sample page can be OCRed from a scanned or imported image or directly imported.
To create a new sample page
Note: If you are configuring sample pages in the Pre-Classification Processing stage, the Samples menu will look a little different. This is because you can configure electronic documents as sample pages in the Pre-Classification Processing stage.
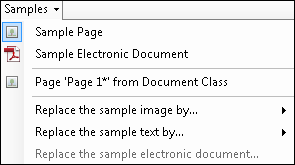
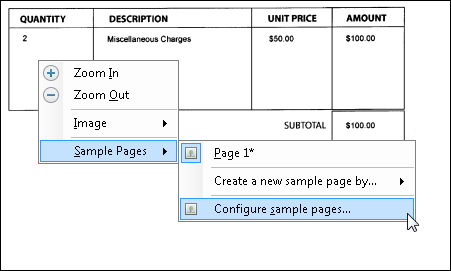
- From the Image Toolbar, select Samples. You can also right-click on the sample image or text displayed and hover over Sample Pages.

- Hover over Create a new sample page by and select one of the following options:

- Scanning an image: Select this option if you want to scan images with the scan source you are using for the session. Place a document on the scanner or select a retrieval directory for Universal Capture or Laserfiche Capture Engine. The first available image from the scan source will replace the default sample image. This option will scan in an image only.
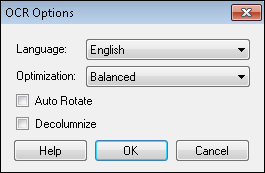
- Scanning an image and performing OCR on it: Select this option if you want to scan an image with the scan source you are using for the session and OCR the image to create sample text from it. Place a document on the scanner or select a retrieval directory for Universal Capture or Laserfiche Capture Engine. The OCR Options dialog box will open.

- Select a language from the Language drop-down menu to help optimize the character recognition.
- Select an optimization style for your image from the Optimization drop-down menu.
- Select Auto Rotate to temporarily rotate the image to an orientation suitable for OCR. After the OCR process is performed, the image will return to its original orientation.
- Select Decolumnize to convert multiple columns of generated text into a single column. Clearing the checkbox will preserve column formatting in the OCRed text, even if that separates words and sentences.
- Importing a sample image: Select this option if you want to import images from a network location. Browse to the location of the image and click Open.
- Importing an image and performing OCR on it: Select this option if you want to import images from a network location and OCR the images to create sample text. Browse to the location of the image and click Open.
- Importing text: Select this option if you want to import text only and no image. Browse to the location of the text file you want to import.
Note: Only .txt files can be imported as sample text files.
Note: You can also configure sample pages from the Document Class Options dialog box under Sample Pages. See Viewing and Modifying Sample Page Options to further modify your sample pages.
Displaying a Sample Page
If you have added additional sample pages, you can show them in the Display Pane in order to configure and test processes and image enhancements. The last sample page you selected to work with will be automatically displayed. You can change the displayed page by selecting it from a menu or by changing the page range of a process.
Note: In Pre-Classification Processing, you can configure your own sample page or designate the first page of any document class as a sample page.
To select a different sample page from a menu
- Click the Samples menu.
- Select the page number of the page you want to display. If you have renamed your sample page, select its new name.

Note: You can also right-click on the sample page in the Display Pane to access the Samples Pages menu.
To view a different sample image by changing the page range of a process or image enhancement
- Select the process or image enhancement.
- Specify a page range.
- The first sample image in that page range will be displayed, if any.
Viewing and Modifying Sample Page Options
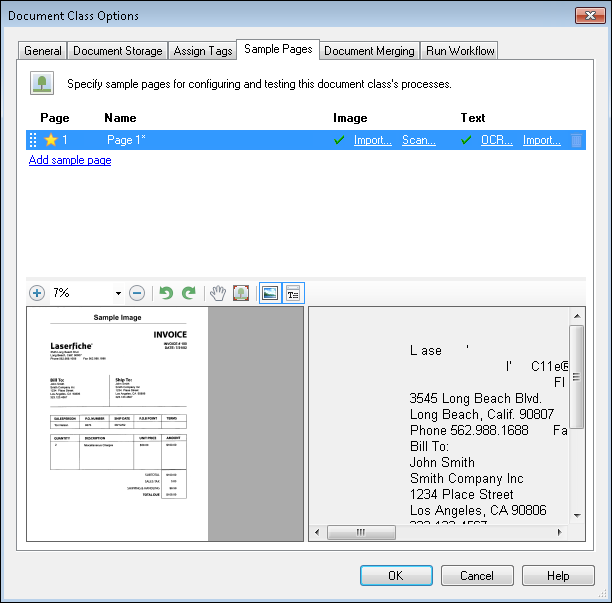
In the Sample Pages tab of the Document Class Options dialog box, you can view the sample page settings for a document class and modify the sample pages to suit your needs.

To view and modify Sample Page Settings
- Select the name of the document class and do one of the following:
- From the Samples menu, select Configure sample pages.

- Right-click on the sample image or text currently displayed, hover over Sample Pages, and select Configure samples pages
.
- Right-click on a document class, select Document Options, and select the Sample Pages tab.
- From the Samples menu, select Configure sample pages.
- The Document Class Options dialog box will open to the Sample Pages tab.

To rearrange sample pages
- Drag the grip icon
 to the left of the page number to the desired location.
To rename sample pages
- Double-click the page's name under the Name column, type the new name, and press Enter.
To set a sample page as the default
- Select the star
 next to the sample page you want to set as the default page. A yellow star indicates that page as the default page.
Note: The default sample page will be used when you specify a page or page range that does not have a corresponding sample page when configuring a process. For example, if you have sample pages for pages 1 and 2 only, but you configure a process to run on page 3, the default sample page will be used for page 3.
To delete a sample page
- Click the trash can
 to the right of the page's row.
To add/create another sample page
- Click Add sample page below the last sample page listed. You will then be able to select Import image, Scan image, Import text, or OCR the sample image at the bottom of the dialog box in the preview area. Scan, import, and OCR as desired.
To replace a sample page with another sample page
- If replacing an image, select the page associated with the image you want replaced and click Importor Scanunder the Image column.

- If replacing text, select the page associated with the text you want replaced and click OCRor Importunder the Text column.

- You will see a preview of the selected sample page (image and text) at the bottom of the dialog box. If you are viewing an image with no OCRed text, you can click Import text or OCR the sample image to generate it. You can zoom in on the image, rotate it 90 degrees to the left or right, and view it in a full-screen window. If you are viewing text with no associated image, you can click Import image or Scan image.
You can assign a sample page to a particular page number. This is useful when you are configuring processes or image enhancements to work on only specific pages of each document.
To assign a sample page a page number
- Double-click the page number in the Page column. Type the new page number and press Enter.
You can also view or modify sample pages using the Preview Toolbar. This toolbar appears above the displayed sample page.
| Item | Function |
|---|---|

|
Zooms in. |

|
Displays an image at a preset zoom setting. Select Fit to match the current size of the Laserfiche Scanning window. |

|
Zooms out. |

|
Rotates an image 90 degrees (left). |

|
Rotates an image 90 degrees (right). |

|
Pans an image. Drag in the direction you want to review. |

|
Displays the selected sample image in a maximized window. |

|
Displays the sample page's image. |

|
Displays the sample page's text. |
Sample Electronic Documents
Quick Fields is primarily used for working with imaged documents and their text. However, within the Pre-Classification Processing stage, Quick Fields offers some processes that can be configured for electronic documents. For example, you can configure a Retrieve PDF Form Contents process to retrieve PDF form values from a PDF form. Using a sample electronic document to test these electronic document processes helps ensure the accuracy of your configuration for these types of documents.
Other types of electronic documents can also be processed in Quick Fields even if they cannot be viewed in the Display Pane. For example, you can use Text Extraction to extract text from a Word document. The results of a Text Extraction process will be displayed in the Text Pane, and the extracted text can later be used in the Page Processing stage of a document class.
Displaying a Sample PDF Document
The only electronic file type that can be viewed in the Quick Fields Display Pane is a PDF file. These can be viewed if you have Adobe Reader installed on the same machine where Quick Fields is installed. Quick Fields comes with a sample PDF as a default sample electronic document.
To display a PDF in the Quick Fields Display Pane
- Click on Pre-Classification Processing.
- Right-click on the default sample image displayed in the Image Pane, hover over Sample Pages, and select Sample Electronic Document. The default PDF included with Quick Fields will be loaded.
- Double-click the Adobe Acrobat icon to open the PDF in the Image Pane.
Note: Adding a Text Extraction or Retrieve PDF Form Content process will automatically display the PDF.
Adding a Sample Electronic Document
Quick Fields comes with a sample PDF as a default sample electronic document. You can replace this PDF with a sample electronic document of your own.
To replace the default sample PDF with another sample electronic document
- Click on Pre-Classification Processing.
- Click Samples in the Image Toolbar and select Sample Electronic Document (this is the default sample that comes with Quick Fields).
- Once it's selected, click Samples in the Image Toolbar again and select Replace the sample electronic document.
Note: If an electronic document has already been configured, you must select it from the context menu in order for Replace the sample electronic document to be available.
- Navigate to the electronic document you want to add and click Open.