Folder Collections
Folder collections let you specify a set of alternate folders (folder pairs) for users and groups. You can configure the Route Entry to User and Route Entry to Group activities to route to these folders instead of to users and groups' default folders.

You can create, modify, and delete folder collections from the Folder Collection Manager.
To open the Folder Collection Manager
- In the Destination tab of the Route Entry To User or Route Entry to Group, activities, select Route to the user's/group's folder in this folder collection and click Manage folder collections.
- In the Folder Token Settings property box for the Find User, Find Group, and Find Manager activities, select Use this folder collection and click Manage folder collections. (The Folder Token Settings property box is in the Advanced section of the Properties Pane because it is optional and rarely used. If you would like to see this property box, click the Advanced button
 at the top of the Properties Pane.)
 - If you have already configured one or more folder collections with one of the above activities, you can configure additional folder collections from the workflow's Referenced Objects property box. (To see this property box, select a blank area in the Designer Pane. Click the Advanced button
 at the top of the Properties Pane.) Select Folder Collections from the drop-down menu, and click Manage referenced properties. The Referenced Object Manager will open. This manager behaves the same as the Folder Collection Manager.
To create a new folder collection
- In the Folder Collection Manager, click Add.
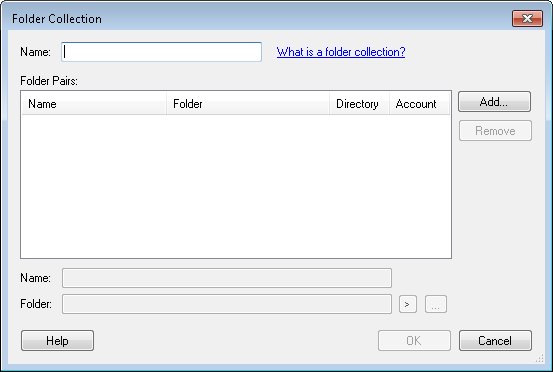
- In the Folder Collection dialog box give the folder collection a name.
- Click Add to add a folder pair.
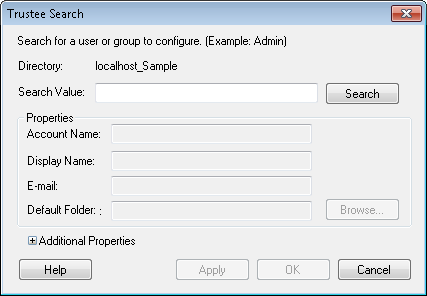
- In the Trustee Search dialog box, enter a search term (e.g., a user's name). Click Search. If a match is found, the user or group will appear under Properties. Once a user or group is found, click OK.
- At the bottom of the Folder Collection dialog box, click the Browse button next to Folder and navigate to the folder that will be paired with the user or group listed next to Name. Click the token button (right arrow)
 to use tokens. You can create as many folder pairs as you want.
 - When finished, click OK.
- The new folder collection will be listed in the Folder Collection Manager.

Note: The user or group's current default folder will be listed next to Default Folder when returned from the search. You will define the new alternate folder in the next step.
To modify an existing folder collection
- In the Folder Collection Manager, click Edit.
- In the Folder Collection dialog box, you can
- Add folder pairs by clicking Add and following steps 3-6 in the section above.
- Change a user or group's folder by selecting a folder pair and browsing for a new folder next to Folder.
- Remove folder pairs by selecting them and clicking Remove.
- When finished, click OK.
Tip: You can organize your folder pairs by Name, Folder, Directory, or Account by clicking on the column headers.
To delete a folder collection
- In the Folder Collection Manager, select the collection you want to delete and click Delete.
- In the Referenced Object Manager, select the collection you want to delete and click Delete.
To use a folder collection with a routing activity
- Add the Route Entry to User or Route Entry to Group activity to your workflow definition by dragging it from the Toolbox Pane and dropping it in the Designer Pane.
- Double-click the activity in the Designer Pane and select the Destination tab.
- Select Route to the user's/group's folder in this folder collection and select a folder collection from the drop-down menu.
- Optional: If you are configuring the Route Entry to Group activity, you can choose to route to Users' folders in the folder collection--if the group is not in the folder collection. (If the group is in the folder collection, the entry will be automatically routed to the group's folder.) Select to route to users' folder pairs in Round Robin style (one at a time) or to All Users at once. If the user is not in the folder collection, the entry will go to his or her default folder instead.
To use a folder collection with a Find User, Find Group, or Find Manager activity
- Add the Find User, Find Group, or Find Manager activity to your workflow definition by dragging it from the Toolbox Pane and dropping it in the Designer Pane.
- Select the activity in the Designer Pane.
- In the Folder Token Settings property box, you can specify that the user's or group's Working Folder token value will be based on their folder pair by selecting Use a folder collection. Select a folder collection from the drop-down menu.
Note: This property box is in the Advanced section of the Properties Pane because it is optional and rarely used. If you would like to see this property box, click the Advanced button  at the top of the Properties Pane.
