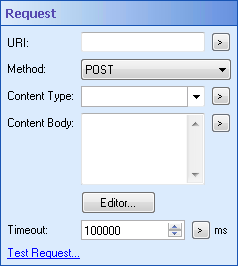
Request (HTTP Web Request)
This property box lets you specify what instructions you want the HTTP Web Request activity to give to the Web service. Use the Web service's API to specify your requests.
To configure a request
- Add the HTTP Web Request activity to your workflow definition by dragging it from the Toolbox Pane and dropping it in the Designer Pane.
- Select the activity.
- In the
 Request property box, configure the information you want to request.
 - Next to URI, provide the URI component of the web request's URL. The URI is used in combination with the host name and port to create a complete URL. Click the Token button (right arrow)
 to use tokens.
 - Choose a method from the drop-down menu:
- The GET method lets you retrieve, from the Web service, the information specified by the URI. When a web browser retrieves a web page, it normally does so with a GET request.
- The POST method lets you send data to the Web service so that your workflow can perform tasks, such as posting messages at the specified URI.
- The PUT method lets you store data on a Web service, such as uploading or replacing an entity.
- The DELETE method requests that the Web service deletes the resource specified by the URI.
- The PATCH method allows you to partially update or replace an entity.
- If you choose POST or PUT:
- Use the drop-down menu next to Content Type to specify what type of data you are sending to the Web service, e.g., text, image, video, etc. Click the Token button (right arrow)
 to use tokens.
 - In the Content Body text box, specify the data that will be sent to the Web service. Click the Token button (right arrow)
 to use tokens.
 - If you need extra space to specify the data that will be sent to the Web service, click the Editor button. The Content Body Editor dialog box gives you more space to insert and edit the data.
- Next to Timeout, specify how long the activity will wait for a response from the Web service. If the time period is exceeded, the workflow will report a warning for this activity. It will then continue, without waiting any longer for a response. Click the Token button (right arrow)
 to use tokens.
 - Click the Test Request link to ensure your request works. More info.
Example: If you specify http://www.google.com as the host and you want to request information from a Google calendar, /calendar is the URI.
Note: The forward slash character "/" is treated as an escape character in token syntax. If you include a token as part of the URI and you want the token to follow a "/", ensure that two slashes precede the token. For example, if you wanted to insert a token after the URI "/api/app/", and you use URI "/api/app/%(RetrieveFieldValues_Policy Number)", the percent sign "%" would be escaped. Instead, you must include two slashes as in "http://mywebsite/api/app//%(RetrieveFieldValues_Policy Number)". Learn more about token syntax
