Best Practices
Creating a Form
- Use drop-down fields, checkboxes, or auto-suggestions when possible. If you're going to search, sort, or work with the data collected in a form, it's important that the data is consistent and accurate as possible.Drop-down fields and checkboxes limit users choices to a predefined set of data that is easily searchable, is straightforward to organize into reports, and is consistent enough to route the form or pass as parameters to a workflow. Auto-suggesting values, while not as constraining as a drop-down list, gives users an idea of the information you're expecting.
- Automatically fill out information for users when possible. If you have information stored in a database or information that has been provided in a different form in the same process, you can use lookup rules and variables to automatically display that information. This practice reduces unnecessary and error-prone manual data entry.
- Organize your form into sections. Section headings make it easy for users to figure out what information they'll need to provide in the form. It also makes it easier for people reviewing the form to zero in on the information they need. Sections can also be collapsed to de-emphasize content.
- Hide irrelevant sections or fields. If you have fields that only need to be filled out if a specific value is provided in a previous field, use field rules to hide those fields until that value is entered. By hiding irrelevant fields, users are not distracted by sections of the form that do not need their attention.
- Use required fields to get necessary information. If field values are needed for the form to be processes or routed, then making those fields required will ensure you get the information you need. Users will not be able to submit a form unless they fill out those fields. You can make a field required by selecting the Required option under Field Options.
- Add instructions where needed. If special instructions are needed for a user to fill out a field, make use of the text above field and text below field options to give them pointers, examples, or other information. If longer instructions or images are needed, the Custom HTML field includes a rich text editor that lets you input formatted text and images.
- Use field constraints and field masks dictate the format of the information that can be entered in a field. With fields constraints you can ensure that all phone numbers, social security numbers, or other important numbers are formatted consistently.
- Name your field variables well. When you add a new field to your form, a variable for that field is automatically created. This variable lets you use the values entered in the field in another form or as part of your process. Additionally, you can see aggregate data for variables in reports. Taking the time to name your variables descriptively will help you identify the type of information they're storing and make them easy to reference in the future.
- Create custom themes to uniformly style your forms. If your organization has a set logo and color scheme, you can create a custom style template to match the organizations branding. As you create more forms, this custom template can be applied with a single click.
Example: Each project proposal needs a manager who will oversee the project. If employees are given a single line field to type in a manager's name, they might provide these variations on a single name, such as Bob Smith, Simth, and Robert S. If you provide a drop-down of the manager's name, users can consistently chose Robert Smith each time.
Example: A form requires an employee's full legal name, address, and phone number -- information you already have stored in the company database. When an employee enters their employee ID number in the form, a lookup rule can grab their name, address, and phone number from the database and automatically populate the relevant fields.
Example: An employee fills out a travel request form. Later in the travel request process, they have to fill out an expense report from the trip. Instead of asking them to re-enter the same trip information they provided on the first form, you can add the variables from the first form to the expense report form -- effectively pre-populating the data for them.
Example: On a Human Resources form, a section about the employee’s children only needs to be filled out if the employee selects "Yes" in the "Do you have children?" field. Using field rules, you can hide the section about children unless "Yes" is selected.
Example: If a form will be routed for approval based on the department indicated in a field, make the department field required so that the routing is successful.
Example: Employees can fill out a form to describe their qualifications for an internal position. When the form just included a multi-line field labeled "Qualifications," managers received a wide variety of responses. After adding text above the field that said, "Please list relevant certifications, similar projects you've worked on, and the attitude will bring to the position," the managers gathered much more useful information from the applicants.
Example: A field constraint can require that a user adds dashes to a phone number or Social Security number.
Creating a Process
- Define and diagram your process. The key to building a successful process is to think through each stage in the process and discuss it with the people involved. Often you will find unnecessary, redundant, and inefficient steps in the process that you can eliminate or streamline when automating the process. Taking the time to map out the process before building it in Laserfiche will also help you consider edge cases and exceptions from the very beginning instead of after the process has been rolled out. The white paper Defining and Diagramming Business Processes offers a lot of helpful information on this topic.
- Name your process instances and tasks well. It's important that your process instance name and task names are as informative as possible, since the instance name and task names will appear in user's list of tasks. Instances and tasks that are named well will let them see at a glance what their tasks are and will allow them to easily search for tasks and processes. Additionally, it's easier to create reports for and troubleshoot processes that have clearly named instances and tasks.
- Comment your process and organize so it's easy for you and others to understand. When building a process in the process designer, be sure to add annotations to the process and organize your process flows logically and with as little overlap as possible. You may need to revisit a process that has been running for years or work on a process that another co-worker started, and these notes can be invaluable in reminding yourself what happens at each stage the process.
Example: When a new project request comes it gets reviewed simultaneously by the department head, accounting (to determine a budget for the project), and the office manager. The project requests are often stalled at this stage because one of the three parties doesn't review the requests in a timely manner. Additionally, accounting is frustrated when they spend time putting together a budget only to have the department head reject the project.
After interviewing all the participants in the process and reviewing the steps, it's determined that the process can be streamlined. Project requests are now routed to the department head first. Only if the department head approves the request is it sent on to accounting. After a budget is decided on, only those projects that indicated office space was required are forwarded onto the office manager.
While the original process could have been automated in Laserfiche Forms, it wouldn't be as efficient as the streamlined process which drastically reduces accounting and the office manager's workload and which avoids the bottleneck that occurred when the process was sent to all three parties simultaneously.
Example: In an Expense Report process, there are two approval tasks which have been named Task1 and Task2. The instance name was never updated from the default, so instances are named Expense Report InstanceID: Submitter (e.g., Expense Report 3252: Robert Smith). Besides noting the submitters name, none of these names are particularly helpful to the participants in the process or to the supervisors who analyze the process's efficiency.
Renaming the user tasks to Manager Approval and Accounting Review, and renaming the instance to Expense Report for Submitter: Destination (e.g., Expense Report for Robert Smith: Toronto), gives process participants more helpful information when they are skimming through their list of tasks. Additionally, when supervisors are reviewing reporting details for the process, it's for them easy to see how long the manager's approval takes on average since they no longer have to remember if the manager is involved in the Task1 or Task2.
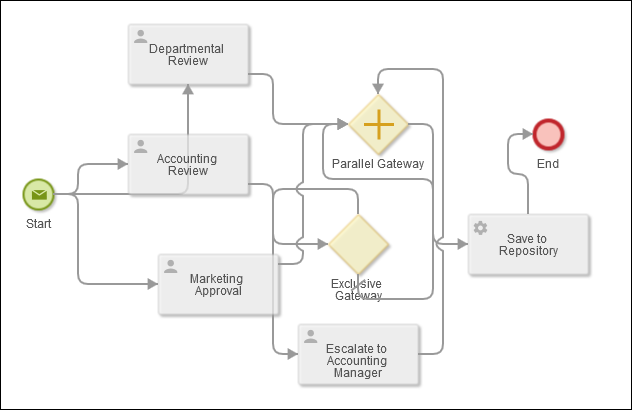
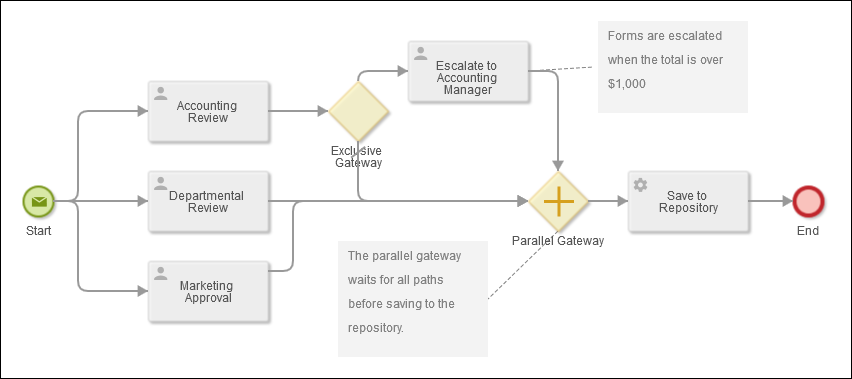
Example: These two processes contain the same tasks and automate the same process, but the second one is much easier to work with.
The disorganized process:
The organized process: