Customizing Templates and Fields
You can customize the template and fields associated with documents in a document class. Fields can be added or removed from a template, hidden, or constrained so that information may only be entered into them in a particular format.
To customize templates and fields for a document class
- Select the name of the document class in the Session Configuration Pane.
- Select Configure fields from the Action menu or the bottom of the Tasks Pane on the right.
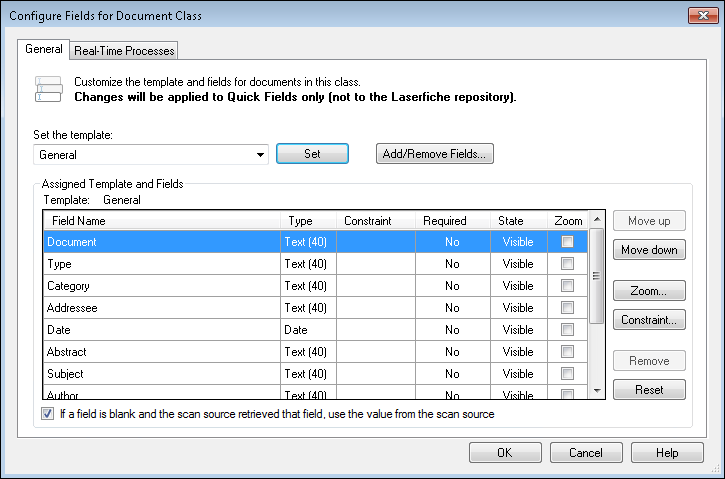
- The Configure Fields dialog box will open.
- In the
 General tab, you can customize the template and fields for the selected document class.
Changing the Template
Under Set the template is a drop-down list of all the templates available to you in the Laserfiche repository associated with that document class.
To change the template
- Select a template from the list.
- Click Set. If a different template was previously assigned to that document class, a dialog box may appear asking you to choose which of the existing fields you'd like to keep after reassigning the template.
- Make a selection and click OK. If you choose a particular setting and select Do not show me again, that will become the default setting and the dialog box will no longer appear.
Adding Fields
Click Add/Remove Fields to open the Choose Fields dialog box. This dialog box will display all the fields available to you in the Laserfiche repository associated with that document class.
Modifying the Template and Fields
Under Assigned Template and Fields you will see the fields associated with the template and the properties of each field.
To modify a field, select the field and click
- Move up until the field is in the desired location.
- Move down until the field is in the desired location.
- Zoom to create a Zoom Field to help with reviewing and editing that field during Revision.
- Constraint to enforce a format on the field value using pattern matching expressions.
- Remove to remove the field from the template in Quick Fields (only applies to fields that were added independently to the template).
- Reset to return all settings to their original values.
You can also review or change the properties of the fields.
- Required: If a field is required in Laserfiche, Yes will be displayed under the Required column. If it is not, and you want to make it required, double-click No under the Required column to change it to Yes.
- State: Double-click the text under State to toggle the different possible options.
- Visible: Visible to operators and administrators.
- Read-only: Read-only for both operators and administrators.
- Hidden: Hidden from operators. Visible to administrators unless the Tasks Pane options are set to also hide fields from administrators.
- Zoom: If a Zoom Field is configured for the field, this checkbox will be selected. If it is not selected, and you want to make the field a zoom field, select the checkbox under Zoom. To configure more Zoom Field options, click the Zoom button.
All these options are also available by right-clicking a field, along with one additional option:
- Default: Designating a field as a default field will always place the cursor in this field when clicking through documents during revision if the Edit the document's default field option is selected under Revision Pane in the Quick Fields options. The default field will be in bold text.
If a field is blank and the scan source retrieved that field, use the value from the scan source: This option is only relevant if you are using Laserfiche Capture Engine (with Retrieve fields selected) as your scan source. If a field in Quick Fields is blank, and this same field has a value in the repository, selecting this option will replace the blank field value in Quick Fields with the value being retrieved from the Laserfiche repository. If this option is not selected, the blank field in Quick Fields will remain blank. For more information, see Laserfiche Capture Engine Tokens.
Note: This option only applies to blank fields in Quick Fields. If Quick Fields specifies a value for a field, the field will use the specified value and not the value retrieved from the Laserfiche repository. If an "Author" field in Quick Fields has a value of Misty, and the same "Author" field in the Laserfiche repository has a value of Jacob, Misty will be the resulting field value for that Author field when the document is processed and stored.
When you are satisfied with all your modifications, click OK.
