Assign Geographical Location
The Assign Geographical Location activity lets you set or remove a repository entry's location.
Important: The Assign Geographical Location activity is available in Workflow 10.4.1 or later and requires Laserfiche Server 10.4 or later.

To add this activity to a workflow definition
- Drag it from the Toolbox Pane and drop it in the Designer Pane.
See the following options:
-
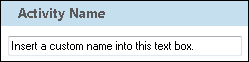
Activity Name
Once added to a workflow definition, the default name of an activity can be changed. Providing a custom name for an activity helps you remember the role it plays.
To name an activity
- Add an activity to your workflow by dragging it from the Toolbox Pane and dropping it in the Designer Pane.
- Select the activity in the Designer Pane.
- Under Activity Name in the Properties Pane, replace the default name.
Note: Activity names cannot be the same as any other activity name in the workflow, they cannot be the same as the workflow's name, they must be less than 100 characters, they must contain at least one alphanumeric character, they cannot be "Name," and they cannot be the same as the activity's runtime type (which is usually only an issue with custom activities).
-
Activity Description
Use the Activity Description to provide descriptive text to help you remember the role that the activity plays in the workflow. All activities contain a default description that you can modify while constructing your workflow.
To modify an activity description
- Add an activity to your workflow by dragging it from the Toolbox Pane and dropping it in the Designer Pane.
- Select the activity in the Designer Pane.
- Under
 Activity Description in the Properties Pane, replace the default description.
-
Geographical Location
This menu lets you specify whether you're assigning or removing a geographical location. If you're assigning a location, you can also specify the values you're assigning for the location and location description.
To assign or remove a geographical location
- Add the activity to your workflow by dragging it from the Toolbox Pane and dropping it in the Designer Pane.
- Select the activity in the Designer Pane.
- In the Properties Pane, select one of the following actions to take on the entry.
- Clear existing location data: Select this to remove the entry's geographical location properties. This will remove both the location and the location description.
- Assign new location data:
- Point: Specify the latitude and longitude coordinates for a point.
- Custom: Select Click here to enter a custom value for the Geography token to open a window where you can construct a JSON object that represents the geographical information you want to assign to the entry. You can use the token picker to select a token. Click OK when you're done. The JSON format for a single point representing by longitude and latitude is as follows (replace the sample longitude and latitude your own):
{
    "Data": {
    "Type": "Point",
    "Subtype": "XY",
    "Point": [-118.1883175, 33.8200657]
    }
}
Note: While you can include a variety of geography information in the custom JSON object, Laserfiche client applications may only display single points on the default map integrations included in the document viewer.
- Under Location description, enter a human-readable description of the geographical location you're assigning. For example, you can enter a street address.
- Select Ignore empty inputs if you want existing location descriptions to be unchanged if the Location description field in this activity is empty. If Ignore empty inputs is cleared, Workflow will assign an empty location description if the Location description field in this activity is empty.
-
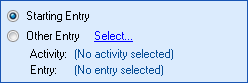
Assign Geographical Location To
To select which entry or entries an activity will act on
- Add the activity to your workflow by dragging it from the Toolbox Pane and dropping it in the Designer Pane.
- Select the activity in the Designer Pane.
- In the Properties Pane, in the appropriate property box, choose which entry the activity will act on.
- Starting Entry: The entry the workflow began with.
- Other Entry: To choose an entry that was returned or created in a previous step in the current workflow, click the Select link and choose an entry from the Select Entry dialog box.
Note: Some activities do not have the starting entry selected by default. If you are configuring one of these activities, click the Select link to choose an entry for the activity to act on.