Assign Token Values
This activity creates new tokens and updates the values of existing tokens to be used by other activities in your workflow definition.
For tips on how to use this activity, see Best Practices for Iterating Through Items in Workflow.
![]() How does this activity look in the Designer Pane?
How does this activity look in the Designer Pane?

To add this activity to a workflow definition
- Drag it from the Toolbox Pane and drop it in the Designer Pane.
To configure this activity
Select the activity in the Designer Pane to configure the following property boxes in the Properties Pane.
See the following options:
-
 Activity Name
Once added to a workflow definition, the default name of an activity can be changed. Providing a custom name for an activity helps you remember the role it plays.
To name an activity
- Add an activity to your workflow by dragging it from the Toolbox Pane and dropping it in the Designer Pane.
- Select the activity in the Designer Pane.
- Under Activity Name in the Properties Pane, replace the default name.
Note: Activity names cannot be the same as any other activity name in the workflow, they cannot be the same as the workflow's name, they must be less than 100 characters, they must contain at least one alphanumeric character, they cannot be "Name," and they cannot be the same as the activity's runtime type (which is usually only an issue with custom activities).
-
Activity Description
Use the Activity Description to provide descriptive text to help you remember the role that the activity plays in the workflow. All activities contain a default description that you can modify while constructing your workflow.
To modify an activity description
- Add an activity to your workflow by dragging it from the Toolbox Pane and dropping it in the Designer Pane.
- Select the activity in the Designer Pane.
- Under Activity Description in the Properties Pane, replace the default description.
-
Tokens
This property box allows you to create and modify tokens with the Assign Token Values activity.
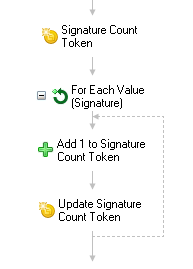
Example: For an upcoming meeting you want to know how many people added their signature to a multi-value Approver field on the agenda. You use the Assign Token Values activity to create a custom token, Signature Count, with a value of zero. You then add a For Each Value activity that goes over each signature in the Approver field. Inside the For Each Value activity, you place a Token Calculator activity configured to add 1 to the Signature Count token for each value found in the Approver field. Also inside the For Each Value activity is an Assign Token Values activity that updates the Signature Count token with the value of the Token Calculator token. The resulting Signature Count token tells you how many people signed the agenda.
See what this example looks like.To configure Tokens
- Add the Assign Token Values activity to your workflow definition by dragging it from the Toolbox Pane and dropping it in the Designer Pane.
- Select the activity in the Designer Pane.
- Under Tokens in the Properties Pane, click Create to create a new token, or click Modify to update an existing token.
- Click Create in the Tokens property box.
- Type in a name for the new token in the top text box.
- Optional: Select the checkbox next to Allow token to have multiple values to create a multi-value token.
- Type in a token value, or click the token button (right arrow)
 to use tokens.
 - Optional: Click the plus button
 to expand the Token Tags section, and check the categories relevant to your new token. More information.
 - Click OK.
- Click Modify in the Tokens property box.
- Select an activity that produced a token from the Activity drop-down menu. Alternatively, click the Browse button (ellipsis)
 to browse for an activity in the Select Activity dialog box.
 - Select a token from the Token drop-down menu.
- Type in a new value for the token, or click the token button (right arrow) to use tokens.
- Click OK.
- Optional: You can add to and organize your custom tokens in the Tokens property box in the Properties Pane.
- Hide the expression details in the Tokens property box by clicking Hide Details.
- Modify a custom token by clicking on the custom token's name or expression.
- Create additional tokens by clicking New Token.
- Delete a token by clicking the red X
 .
. - Reorder custom tokens in the Tokens property box by clicking the blue arrows
 to move the tokens up or down on the list.
To Create a New Token
To Modify an Existing Token
Tip: You can easily modify a token created by an Assign Token Value activity within the same workflow. Copy the Assign Token Value activity and paste it at the point you want to modify the created token. Right-click the token you want to modify in the Tokens property box for the pasted activity, and select Change action to 'Modify'. The pasted activity now modifies the original token instead of creating a new token that is a duplicate of the one created by the original activity.
Note: You can use tokens created with this activity to create more tokens within the same activity. To reference a token created in this activity, the referenced token must be listed before the token that refers to it in the Tokens property box.

-property-pane-8.2.png)