Form Extraction
The ![]() Form Extraction
Form Extraction ![]() image enhancement removes the form outline and form text from an image so that only the user input remains on the image. This can make other processes such as OmniPage Zone OCR more accurate, since the lines and other form data will not interfere. For a Form Extraction process to function properly, the image being processed must match the form designated for the Form Extraction process. In order to use Form Extraction for a particular process such as OmniPage Zone OCR while keeping the form on the stored image, use Form Extraction as a local enhancement within the other process. In this way, you will still be able to take advantage of it without affecting the final image.
image enhancement removes the form outline and form text from an image so that only the user input remains on the image. This can make other processes such as OmniPage Zone OCR more accurate, since the lines and other form data will not interfere. For a Form Extraction process to function properly, the image being processed must match the form designated for the Form Extraction process. In order to use Form Extraction for a particular process such as OmniPage Zone OCR while keeping the form on the stored image, use Form Extraction as a local enhancement within the other process. In this way, you will still be able to take advantage of it without affecting the final image. ![]() See an example.
See an example.
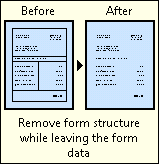
Example: The City of Wonderland Department of Planning scans in building permit applications from their old files, many of which are typed on the forms in such a way that the letters occasionally overlap the lines of the form. They use Form Extraction to remove the lines and words of the form so they can capture the information that was typed into it.
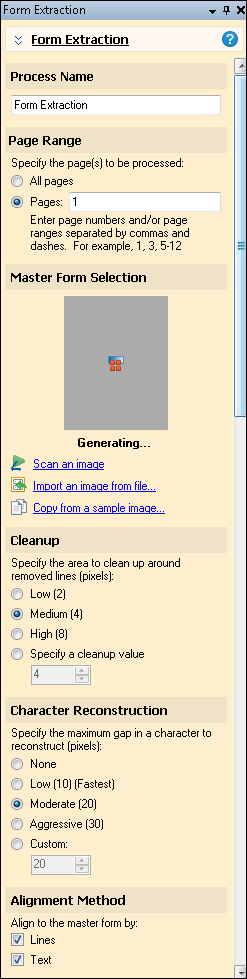
To configure Form Extraction
- In the Session Configuration Pane, select the stage of processing where you want to use Form Extraction.
- In the Tasks Pane, select Form Extraction.
- You can optionally enter a name for the process under Process Name.
- Move through each step of the wizard at the bottom of the pane. You can also click Skip Wizard to display and configure the properties all at once.
- Master Form Selection: The master form is an image of a blank form that matches the forms you will be processing. In Form Extraction, the lines and text of the blank master form will be removed from the forms that are filled in, leaving only the data entered on the form. There are three ways to add a master form:
- Scan an image: Scan in the master form using the currently configured scan source.
- Import an image from file: Import an image that is currently stored in a network drive.
- Copy from a sample image: If you have already added a custom sample image that is the same image you want to use as the master form, you can copy it.
- Page Range: When configuring an image enhancement in Page Processing or Post-Processing, you will be prompted to specify a page range. In other stages, default settings will automatically be applied.
-
Example: Selecting Medium (4) removes all stray marks located within two pixels from a line.
- Character Reconstruction: Characters that intersect lines may be damaged during line removal. The Character Reconstruction option repairs any damaged characters. Specify the scope of character reconstruction. The numbers represent the maximum gap, in pixels, of a character disruption to be reconstructed.
- Alignment Method: Choose which components of an image will be used to match it to the Master Form.
- Lines: Use lines to match the image to the Master Form.
- Text: Use text to match the image to the Master Form (horizontal text only).
- Lines & Text: When both Lines and Text are selected, lines will be used first. If the lines to not clearly identify a match, the text will be used to match the image to the Master Form.
- Optional: To preview how this enhancement will affect scanned images and OCRed or extracted text, test processes. For the best results, add a custom sample page before testing. Adjust and test until you are satisfied with the results.
Tip: If damaged characters are not sufficiently repaired during processing or testing, select a higher value. If characters are improperly repaired, select a lower value.
Optional: To preview how this enhancement will affect scanned images and OCRed or extracted text, test processes. For the best results, add a custom sample page before testing. Adjust and test until you are satisfied with the results.
Note: Some processes come with the basic Quick Fields installation, and some must be purchased as add-ons. Contact your reseller for more information.