Quick Search
![]() Quick Search box in the location bar. If you are working in the Laserfiche Windows client and more than one repository is attached, click Choose Repository to the left of the Quick Search box to choose which repository to search (by default, the currently open repository will be selected). Quick Search is similar to the Basic Search located in the Search Pane.
Quick Search box in the location bar. If you are working in the Laserfiche Windows client and more than one repository is attached, click Choose Repository to the left of the Quick Search box to choose which repository to search (by default, the currently open repository will be selected). Quick Search is similar to the Basic Search located in the Search Pane.
Using Quick Search, you can perform text, entry name, field, and annotation text searches or you can create custom quick searches.
Performing Quick Searches
The various types of searches will be combined with the OR operator, meaning one or the other or both of the selected criteria must be met. For example, if you performed a Quick Search within text and fields, any document that had the selected search term in either its text or its fields would be returned.
Example: If you choose to perform a quick search on text and fields for the word Shakespeare, all entries that have the word Shakespeare in the text, or in a field, or both will be returned.
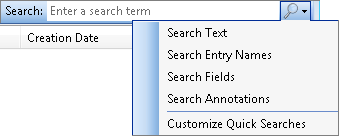
- Click the magnifying glass button
 next to the Quick Search box. This will open a list of available quick searches.
 - Select the search types to include. The default options are Text, Entry Name, Fields, and Annotations. Clear the search types you do not want to include.
Creating Custom Quick Searches
You can modify the searches listed in the Quick Search drop-down, located in the toolbar, to meet your organization's needs. For example, if your organization uses the Created By search often, it can be added to the Quick Search drop-down menu for easier and quicker searching. Any search type that can be configured using advanced search syntax can be created as a custom quick search.
When performing a quick search, documents will be returned if the search term is found in any of the search types. For instance, if you search for the word "confidential," and your Quick Search includes an Entry Name search and a custom tag search, the search will return all entries that have "confidential" in the name or any entries that are tagged with a tag named "confidential", or entries with both.
If you want to add a search type that is not included in the default list, you can do so by creating the advanced search syntax to use for the search and saving it in the Customize Quick Searches dialog box.
To create a custom Quick Search in the Windows client
- Click the magnifying glass button
 next to the Quick Search box.
 - Select Customize Quick Searches. This will open the Customize Quick Searches dialog box.
- Click the Create button to create a new search type.
- In the Custom Search text box, type the name for your new search type.
- In the Search Query box, type the advanced search syntax for your new search type. The token "%(SearchTerm)" will be replaced with a user's actual search term when the search is performed. See Advanced Searches for more information.
- Click OK to save your search type. Be sure to add your new search to the searches included by Quick Search using the procedure above.
Example: To search for tags using Quick Search, you would type the syntax for a tag search, with the Search Term token in place of the name of the tag. The syntax would therefore be: {LF:Tags="%(SearchTerm)"}
To create a custom Quick Search in the web client
- Click the drop down menu located to the right of the magnifying glass next to the Quick Search box in the toolbar.
- Select Manage custom quick search.
- Select Add in the top right corner to open the Create Custom Quick Search dialog box.
- In the Name option, specify a name for your custom quick search.
- In the Search query option, type the advanced search syntax for your new search type. The token "%(SearchTerm)" will be replaced with the user's actual search term when the search is performed.
Example: The advanced search syntax for a Created By search is: {LF:Creator="username"}. To search for documents created by a specific user, you would type the syntax for a Created By search, with the Search Term token in place of the creator's name. The syntax would therefore be: {LF:Creator="%(SearchTerm)"}.
- Select either Apply to myself to save the custom quick search only for yourself, or Apply to the following group to share the custom quick search with a particular group. You can select the Everyone group to share the search with all users.
Note: You must have the Manage Repository Configuration privilege to share custom quick searches with a group.
- Select Save to save the custom quick search.
Searches performed via quick search will respect the search settings configured in Options, such as search stemming, fuzzy search, context hits, and case and accent sensitivity. See Configuring Search Settings for more information.
Note: Partial matching does not apply to text searches performed through Quick Search. It always applies to entry names, regardless of settings.
Example: With partial matching, you do not have to know the exact name of the entry to search for it. For instance, performing a document name search for the document named “laser” will return documents named “laser,” “laserfiche,” “lasers,” etc. You can turn this option off by opening the Options dialog box, expanding Search, and selecting General. Clear the Find partial matches when performing a basic search option to disable partial matching.
Tip: If you want to allow partial matches in your custom quick searches, you can use wildcards. For instance, you might create a custom quick search to search for documents tagged with a particular tag. You could use the string ({LF:Tags="%(SearchTerm)"}). Then, if a user selected that custom quick search and searched for "confidential", they would match any document tagged with the tag "confidential". They would not, however, match documents tagged with the tag "highly confidential". To allow this type of partial match, you could include the asterisk wildcard (*) around the Search Term token, so that the final string is: ({LF:Tags="*%(SearchTerm)*"})
Deleting Custom Quick Searches
Custom quick searches can be permanently deleted.
To delete a custom Quick Search in the Windows client
- Click the magnifying glass button next to the Quick Search box.
- Select Customize Quick Searches.
- In the Customize Quick Searches dialog box, select the custom quick search you want to delete and click Remove.
- Click OK to return to the folder browser.
To delete a custom Quick Search in the web client
- Click the drop down menu located to the right of the magnifying glass next to the Quick Search box in the toolbar.
- Select Manage custom quick search.
- Select the Delete icon (
 ) to delete the search.
 Note: You can delete any personal saved search, but you can only delete searches shared with groups if you have the Manage Repository Configuration privilege.