Creating a Document Class Using the Standard Wizard
The standard document class wizard is designed to help you configure all the basic, necessary settings for a document class.
To create a new document class using the Standard Wizard
- Select the Classification node in the Session Configuration Pane.
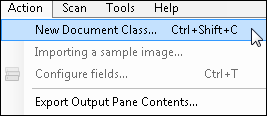
- From the Action menu, select New Document Class.
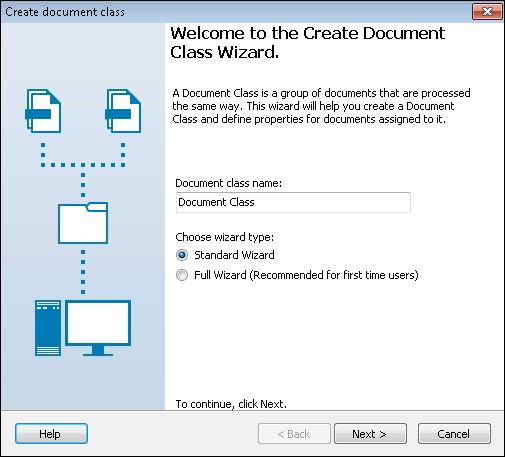
- Specify a name for the document class.
- Choose Standard Wizard, then click Next.
-
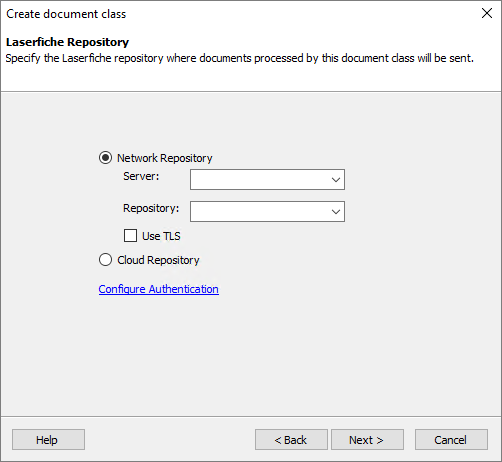
In the Laserfiche Repository step, select the repository where documents in this document class will be stored and the login information that will be used to connect to the repository.
-
To configure the Laserfiche network repository connection for the document class
- Select the Network Repository option.
- For Server, enter the name of your Laserfiche Server.
- For Repository, select the repository where you want documents from the class to be stored.
- To configure Quick Fields to use secure network communications when connecting to Laserfiche, select the Use TLS checkbox.
- Click Configure Authentication to specify the sign-in credentials the document class will use to connect to Laserfiche.
- Select Windows authentication to log in using the Windows credentials associated with the user running the session.
- Select Laserfiche authentication to enter credentials associated with a Laserfiche account.
- Optionally, select the Laserfiche Directory Server tab to sign in using Laserfiche Directory Server.
- Enter your Laserfiche Directory Server username and password.
- Click Windows Authentication and sign in using your Windows account.
- Sign in using SAML authentication.
Note: Laserfiche Webtools Agent lets Quick Fields and Quick Fields Scanning connect to a Laserfiche repository with Laserfiche Directory Server authentication using a longer session so you will not have to enter credentials continuously to stay connected.
- To ensure the sign-in credentials you have provided are valid, click Validate. If the information is valid, click OK, then click Next proceed to the next step.
Note: The user specified must have rights to perform all the actions the session calls for. For example, if the user cannot create documents in the repository, the session will not be able to store processed documents.
-
To configure the Cloud Repository connection for the document class
- Select the Cloud Repository option.
- Click Configure Authentication to specify the sign-in credentials the document class will use to connect to Laserfiche.
- If your Laserfiche Cloud account ID and click Next. You can find the ID in Account Administration under the Plan tab (if you are signed in as an administrator) or in Repository Administration under Summary (if signed in as a user with appropriate access).
- If single sign-on (SSO) has been configured, you can sign in using your identify provider or enter your Laserfiche Cloud username and password and click OK.
Note: Windows authentication cannot be used to connect to Laserfiche Cloud.
Note: The Laserfiche Cloud session connection will only be connected for a certain amount time. After this time period, users will have to authenticate the session connection again.
- Click OK.
- Click Next to proceed to the next step.
- In the Document Metadata step, specify the template and volume that will be associated with documents assigned to the class.
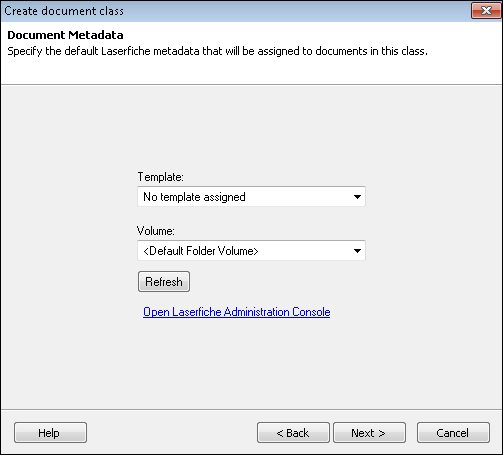
- For Template, select a template to be added to processed documents. If you do not want to assign a template, select No template assigned from the drop-down list.
- For Volume, select a volume for processed documents. Optionally, select Default Folder Volume to configure the session to store documents in the default volume assigned to the folder where the document will be stored (the folder can be assigned on the following screen).
Note: If you select Default Folder Volume, the folder in question must have a default volume or the session will be unable to store documents.
Tip: If the template or volume you want to use is not available, click Refresh to update the items in the drop-down boxes.
- Click Next .
In the Document Location step, specify the name and destination for documents in that class.
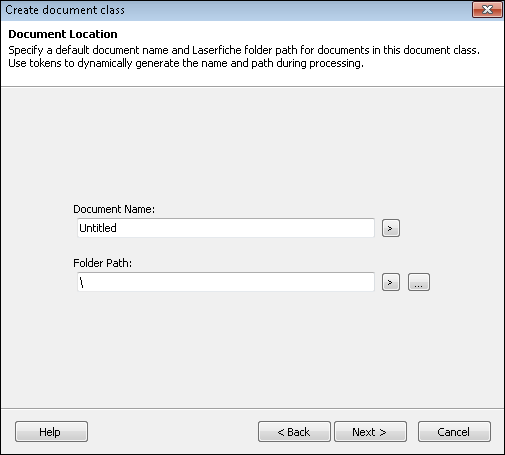
- For Document Name, specify a default name for processed documents. Enter static text, click the token button (right arrow)
 to use tokens, or use a combination of the two.
Tip: Documents that share the same name will be automatically renamed when they are stored (e.g., MyDocument, MyDocument(2), MyDocument(3)). To avoid this issue, use tokens to create unique names.
- For Folder Path, specify where processed documents should be stored. Click
 to select a location in your repository. You can also enter static text, click the token button (right arrow)
  to use tokens, or use a combination of the two.
- For Document Name, specify a default name for processed documents. Enter static text, click the token button (right arrow)
- Click Next to review all settings for the document class and finish the wizard.
After using the wizard to create a document class, you can configure additional properties, such as document length settings, real-time processes, field values, and more.