Apply Text Annotation
This activity hides, partially hides, or emphasizes text on a document. The activity includes various annotation types, such as redaction, highlight, strikethrough, and underline. You can use one activity for each annotation you want to apply.
You can use this activity to automatically redact sensitive information from documents, such as social security numbers.
See the tokens this activity produces.
![]() How does this activity look in the Designer Pane?
How does this activity look in the Designer Pane?

- Drag it from the Toolbox Pane and drop it in the Designer Pane.
To configure this activity
Select the activity in the Designer Pane to configure the following property boxes in the Properties Pane.
-
 Activity Name
Once added to a workflow definition, the default name of an activity can be changed. Providing a custom name for an activity helps you remember the role it plays.
To name an activity
- Add an activity to your workflow by dragging it from the Toolbox Pane and dropping it in the Designer Pane.
- Select the activity in the Designer Pane.
- Under Activity Name in the Properties Pane,
replace the default name.
Note: Activity names cannot be the same as any other activity name in the workflow, they cannot be the same as the workflow's name, they must be less than 100 characters, they must contain at least one alphanumeric character, they cannot be "Name," and they cannot be the same as the activity's runtime type (which is usually only an issue with custom activities).
-
Activity Description
Use the Activity Description to provide descriptive text to help you remember the role that the activity plays in the workflow. All activities contain a default description that you can modify while constructing your workflow.
To modify an activity description
- Add an activity to your workflow by dragging it from the Toolbox Pane and dropping it in the Designer Pane.
- Select the activity in the Designer Pane.
- Under Activity Description in the Properties Pane, replace the default description.
-
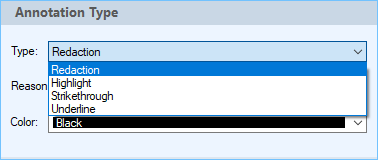
Annotation Type
This property box allows you to set the type of annotation you want to apply to the Laserfiche document. You can annotate using a redaction, highlight, strikethrough, or underline. Once the annotation type is selected, configure the settings for the type.
To set the annotation type
- Add the activity to your workflow by dragging it from the Toolbox Pane and dropping it in the Designer Pane.
- Select the activity in the Designer Pane.
- In the Properties Pane, in the appropriate property box, choose the type of annotation you want to apply to the Laserfiche document.
- Set the properties for the type of annotation you are applying. For example, when you apply a Highlight annotation, select the color of the highlight. When you apply a Redaction annotation, select the reason and color for the redaction.
Note: To create a redaction, your Laserfiche Server version has to be 10.3 or later.
-
Text to Annotate
This property box is where you can specify the text you want to annotate using regular expressions. The patterns available mirror those available in the Pattern Matching activity. You can set the text annotation pattern by selecting the Add New... button.
- In the New Text Annotation Pattern dialog, specify a name for the pattern and use the Pattern section to specify the regular expressions. Click the regular expression button
 to choose from a list of regular expressions.
 - Select Allow tokens in the pattern if you want to use tokens in the annotation. Click on the token picker
 to select a token.
- In the New Text Annotation Pattern dialog, specify a name for the pattern and use the Pattern section to specify the regular expressions. Click the regular expression button
-
Annotation Size
This property box has a single checkbox that allows you to set the height of the annotation around text. The Expand the annotation regions to cover the entire text checkbox allows you to expand the annotation regions so that the regions cover more of the text. If you are highlighting the text, this ensures that the letters are covered more completely.
-
Annotation Protection
This property box allows you to configure the protection level for the annotation added to a document.
The
Protection property box for this activity has the following options:- Public: Public annotations can be viewed and modified by anyone who has access to the document the annotation is placed on in Laserfiche.
- Protected: Protected annotations can be viewed by anyone but can only be modified by the user that created the annotation (in this case the Workflow User) or by the document owner.
- Private: Private annotations can only be viewed and modified by their creator. When the Text Annotation activity adds an annotation, the creator is the Workflow User. The private setting ensures that only Workflow User (or someone logged in as the Workflow User) can see and interact with the annotation.
Example: You want to create an annotation that is hidden from all users in Laserfiche, such as highlighting a specific line in a document. However, you want that annotation to appear when you e-mail your team. By configuring the Text Annotation activity to add a private highlight, Laserfiche users cannot see the annotation (unless they are logged in as the Workflow User) but, when Workflow e-mails the annotated document as a PDF to the team, the annotation is shown.
-
Entry to Annotate
To select which entry or entries an activity will act on
- Add the activity to your workflow by dragging it from the Toolbox Pane and dropping it in the Designer Pane.
- Select the activity in the Designer Pane.
- In the Properties Pane, in the appropriate property box, choose which entry the activity will act on.
- Starting Entry: The entry the workflow began with.
- Other Entry: To choose an entry that was returned or created in a previous step in the current workflow, click the Select link and choose an entry from the Select Entry dialog box.
Note: Some activities do not have the starting entry selected by default. If you are configuring one of these activities, click the Select link to choose an entry for the activity to act on.
Note: If you have more than one connection profile for your workflow definition, the Connection Profile property box lets you specify which connection profile this activity will use.
Tokens for Apply Text Annotation Activity
The Apply Text Annotation activity produces the following tokens.
| Name | Description | Sample Syntax* |
|---|---|---|
| Match_Found | (Boolean) Returns "true" if at least one match is found based on the pattern. Otherwise, returns "false". | %(ApplyTextAnnotation_Match_Found) |
| Num_Matches | (Integer) Returns the number of items that match the pattern. | %(ApplyTextAnnotation_Num_Matches) |
| Annotated_Pages | (List) Returns a list containing each page that is annotated with this activity. | %(ApplyTextAnnotation_Annotated_Pages) |
*The "ApplyTextAnnotation" portion of the syntax changes to match the activity's name as specified in the Activity Name property box. Note that all non-alphanumeric characters, except underscores, are removed from the name. For example, if you rename the activity to "Update--HR_Fields", the syntax for the Match_Found token will be %(UpdateHR_Fields_Template_Id).