Update Data
This activity updates the column values of a set of rows in the data source.
- Drag it from the Toolbox Pane and drop it in the Designer Pane.
To configure this activity
-
Activity Name
Once added to a workflow definition, the default name of an activity can be changed. Providing a custom name for an activity helps you remember the role it plays.
To name an activity
- Add an activity to your workflow by dragging it from the Toolbox Pane and dropping it in the Designer Pane.
- Select the activity in the Designer Pane.
- Under Activity Name in the Properties Pane, replace the default name.

Note: Activity names cannot be the same as any other activity name in the workflow, they cannot be the same as the workflow's name, they must be less than 100 characters, they must contain at least one alphanumeric character, they cannot be "Name," and they cannot be the same as the activity's runtime type (which is usually only an issue with custom activities).
-
Activity Description
Use the Activity Description to provide descriptive text to help you remember the role that the activity plays in the workflow. All activities contain a default description that you can modify while constructing your workflow.
To modify an activity description
- Add an activity to your workflow by dragging it from the Toolbox Pane and dropping it in the Designer Pane.
- Select the activity in the Designer Pane.
- Under
 Activity Description in the Properties Pane, replace the default description.
-
Data Source
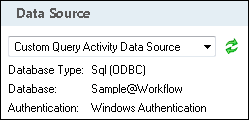
This property box determines which data source the activity will use.
To select a data source
- Add a Custom Query, Insert Data, Query Data, or Update Data activity to your workflow definition by dragging it from the Toolbox Pane and dropping it in the Designer Pane.
- Select the activity in the Designer Pane.
- Under
 Data Source in the Properties Pane, select a data source from the drop-down menu.
 - Optional: To add, configure, remove, or test a connection to an external data source, select Manage Data Sources from the drop-down menu. More information.
- Optional: Click the refresh icon
 to update the list of data sources available in the drop-down menu.
Note: Because the Workflow Server performs the data-source queries, you must create all data sources on the Workflow Server. Services cannot access mapped drives when you are setting up the data source.
-
Rows to Update
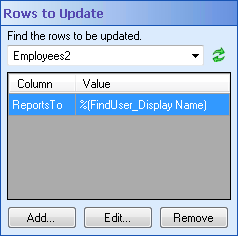
This property box determines which rows the Update Data activity will update.
Note: You must configure the Data Source property box before configuring this property box.
To configure Rows to Update
- Add the Update Data activity to your workflow definition by dragging it from the Toolbox Pane and dropping it in the Designer Pane.
- Select the activity in the Designer Pane.
- Under Rows to Update in the Properties Pane, select the table you want to update from the drop-down menu.
- Click Add in the Rows to Update property box to find the row(s) you want to update.
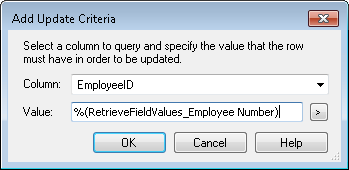
- In the Add Update Criteria dialog box, select the column you want use to find the rows you want to update from the drop-down menu.
- Type in the value a row must have in order to update that row, or click the Token button (right arrow)
 to use tokens.
 Tip: To replace a token that has a blank value with "DB.NULL," apply the NULL token formatting expression.To always set a column's value to "DB.NULL", insert "%(DB.NULL)".
- Click OK.
- To change the query value for a column, click an existing query.
- Click Edit.
- In the Edit Update Criteria dialog box, modify in the value a row must have in order to update that row. Click the Token button (right arrow)
 to use tokens.
 - Click OK.
- Click an existing query.
- Click Remove.
To update a row

To edit an added row
To remove an added row
-
 New Values
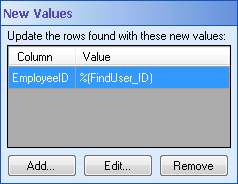
This property box determines the updated values for the Update Data activity.
Note: You must configure the Data Source and the Rows to Update property boxes before configuring this property box.
To configure New Values
- Add the Update Data activity to your workflow definition by dragging it from the Toolbox Pane and dropping it in the Designer Pane.
- Select the activity in the Designer Pane.
- Under New Values in the Properties Pane, click Add to open the Add Column Value dialog box.
- Select a column to update from the drop-down menu.
- Type in the value that will replace values in the rows found with the Rows to Update query. Click the Token button (right arrow)
 to use tokens.
 - Click OK.
- Optional: You can add additional columns and values, modify values, or remove columns and values in the New Values property box.
- To add additional updates, click Add. Repeat steps 4 through 6.
- To change the updated value for a column, click an existing column and value, and click Edit. Repeat steps 5 and 6.
- To remove an updated value, click a column and value, and click Remove.
Tip: If you want a token to be replaced by the null value in the case that the token's value is blank (the empty string), apply the NULL token formatting expression. If you want to set a column's value to the null value regardless, insert the NULL token: %(DB.NULL).
-
Query Options
This property box allows you to specify a custom timeout for data query activities.
To specify a custom timeout
- Add a Custom Query, Insert Data, Query Data, or Update Data activity to your workflow definition by dragging it from the Toolbox Pane and dropping it in the Designer Pane.
- Select the activity in the Designer Pane.
- Under
 Query Options in the Properties Pane, select the Specify a custom timeout check box and specify the desired timeout value in seconds.
Note: The default timeout value is 30 seconds.


