Rule Manager Pane
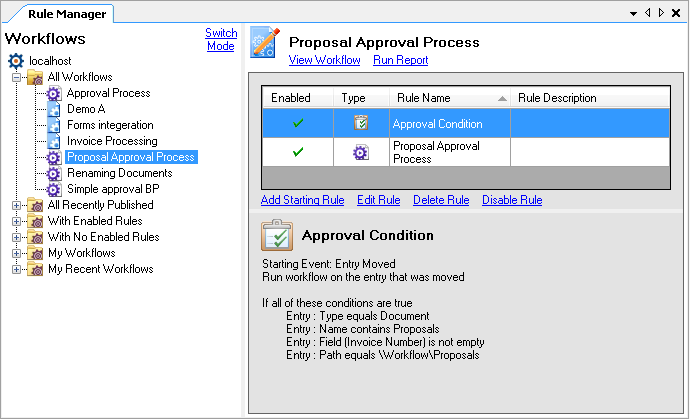
This pane lets you:
- View and organize all published workflows and business processes.
- Add, modify, delete, enable, and/or disable starting rules or business process rules.
- Search rules.
To open this pane
- Select the Rule Manager button
 from the toolbar or under View in the main menu. Alternatively, use the keyboard shortcut CTRL+7.
To organize workflows
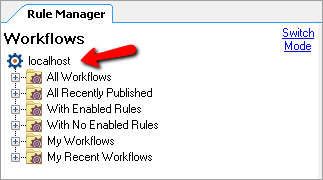
- The Rule Manager has a series of special folders that automatically organize your workflows into categories. You can choose which folders to display or hide from the Rule Manager node of the Options dialog box.
- To create your own folders
- Right-click anywhere in the left Workflows section (except on a workflow), and select Add New Folder.
- Replace the text "New Category" with the name of your folder.
- Optional: You can create folders within a folder by right-clicking on a folder and selecting Add New Folder. You can only create folders within folders you have previously created, not within special folders.
- Add workflows to your folder using one of the following methods:
- Select a workflow in an existing folder and drag it into your new folder.
- Right-click the new folder, and select Add Workflows. In the Select Workflows dialog box, select a workflow and click Add to add it to your new folder. You can select more than one workflow at once by holding down the CTRL key and clicking on workflows.
- Right-click a workflow and select Copy. Click your new folder and select Paste to add a copy of the workflow to your folder.
- To delete a folder you created, right-click the folder and select Delete. Alternatively, select the folder and press DELETE on your keyboard.
- To copy a folder, right-click a folder and select Copy. Select where you want to paste the folder, right-click again, and select Paste.
- To rename a folder you created, right-click the folder and select Rename. Type a new name for your folder.
- To expand or collapse folders
- Right-click a folder and select to Collapse or Expand that folder. Alternatively, select to Collapse All or Expand All folders.
- Double-click the folder to collapse or expand it.
- Click the minus
 or plus
  button next to the folder name to collapse or expand the category.
 - Select a folder, and press the left arrow on your keyboard to collapse a folder and the right arrow to expand a folder.
- To refresh a folder so that it reflects newly created starting rules and workflows, right-click the folder and select Refresh. The folder will automatically expand as it is refreshed.
Example: The My Recent Workflows folder contains workflows the current user published within the last 72 hours.
Note: You cannot move workflows into or out of these special folders.
Note: If you drag the workflow from a special folder, a copy of the workflow will appear in both folders. If you drag and drop workflows between folders you created, the workflows will be moved without creating a copy. To keep a copy of a workflow in two folders you created, use one of the two methods below:
Optional: To remove a workflow from a folder you created, right-click the workflow and select Remove from folder. Alternatively, select the workflow and press DELETE on your keyboard.
Note: You can refresh all folders at once by clicking anywhere in the Rule Manager and select Refresh, or press F5 on your keyboard. Refreshing all the folders at once may take a few moments.
To search starting rules
- Click the Switch Mode link at the top of the Rule Manager Pane to search assigned rules.
To add or modify rules in this pane
- Select a workflow.
- Select a rule. Rules associated with the selected workflow will be displayed in the right portion of this pane.
- Click one of the following options to add a rule or to modify the selected rule:
Note: When modifying a business process, the Choose a Laserfiche Repository dialog box will prompt you to log in to a Laserfiche Server.
- Add Starting Rule: Click this option to create a new starting rule. You can also right-click the starting rules list and select Add Condition Rule or Add Schedule Rule. The Rule Wizard will open to let you configure the new condition or schedule rule, or create a business process rule.
- Edit Rule: Click this option to open either the Rule Wizard for workflows or the Business Process Ruledialog box for business processes. Modify the rule, as appropriate. You can also modify a rule by double-clicking it or right-clicking it and selecting Edit.
- Delete Rule: To delete a rule, select a rule and click Delete Rule. Alternatively, right-click a rule and select Delete, or you can select a rule and press DELETE on your keyboard. You will be prompted to confirm your choice.
Note:Business process rules cannot be deleted unless you delete the entire business process.
- Disable Rule: To disable an enabled rule, select a rule and click Disable Rule. Alternatively, double-click the green check
 next to an enabled starting rule to disable the rule, or right-click an enabled rule and select
 - Enable Rule: To enable a disabled rule, select a rule and click Enable Rule. Alternatively, double-click the red X
 next to a disabled rule or right-click a disabled rule and select Enable Rule.
 - To copy a rule, right-click the rule (not the workflow), and select Copy. Right-click again on the list of rules, and select Paste. The Rule Wizard will open to let you configure the copied rule.
Note: A business process rule cannot be copied; however, conditions can be copied and pasted within or between business process rule editors.
To run a workflow statistics report from this pane
- Select the workflow you want to run a report on, and click the Run Report link at the top of the Rule Manager Pane. Learn more about workflow statistic reports.
To open, export, and delete workflows from this pane
- Right-click a workflow.
- Select Open Workflow to open the workflow in the Designer Pane.
- Select Export Workflow to export the workflow as a .wfi file.
- Select Delete Workflow to delete the workflow. Alternatively, select a workflow in a special folder (not a folder you created) and press DELETE on your keyboard. You will be prompted to confirm your decision.
To change Workflow Servers from this pane
- Right-click the Workflow Server node in the Rule Manager.
- Select Connect to Workflow Server.
- Configure the Choose Workflow Server dialog box.

Note: This node is named after your Workflow Server.
