The ![]() Smooth
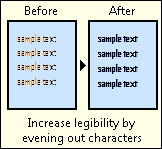
Smooth ![]() image enhancement can be used to enlarge, shrink, or smooth shapes by pixels. It is most useful when performed on an image containing text, because it can prepare text for extraction or make it more legible. Smooth only works on binary images. Binary images have two possible values for each pixel. Typically, the two colors used for a binary image are black and white, though a document can be any two colors. However, this enhancement works best with black text on a white background. Running Smooth after Despeckle will slightly improve the processing speed, since Despeckle will have already removed the extraneous marks around the text.
image enhancement can be used to enlarge, shrink, or smooth shapes by pixels. It is most useful when performed on an image containing text, because it can prepare text for extraction or make it more legible. Smooth only works on binary images. Binary images have two possible values for each pixel. Typically, the two colors used for a binary image are black and white, though a document can be any two colors. However, this enhancement works best with black text on a white background. Running Smooth after Despeckle will slightly improve the processing speed, since Despeckle will have already removed the extraneous marks around the text. ![]() See an example.
See an example.
Tip: If you receive a Smooth requires the image to be binary (e.g., black and white) error during processing, add a Color Removal process before the Smooth process.
To Use Smooth
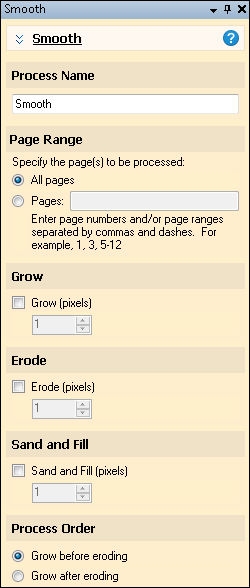
- In the Session Configuration Pane, select the stage of processing where you want to use Smooth.
- In the Tasks Pane, select Smooth.
- You can optionally enter a name for the process under Process Name.
- Move through each step of the wizard at the bottom of the pane. You can also click Skip Wizard to display and configure the properties all at once.
- Page Range: When configuring an image enhancement in Page Processing or Post-Processing, you will be prompted to specify a page range. In other stages, default settings will automatically be applied.
- Grow: Grow adds pixels around each black pixel. You can specify the number of pixels to add: for instance, a Grow setting of 3 will grow a 2 x 2 block of pixels to a 5 x 5 block of pixels.
- Erode: In the Erode setting, you can specify the number of surrounding pixels to remove from each group of black pixels.
- Sand and Fill: In the Sand & Fill property, you can determine the amount in pixels by which bumps can be removed and pits can be filled on a character. The maximum amount by which a character will be smoothed is determined by this setting. This feature performs best with values between one and five (with the exception of large type sizes).
- Process Order: You can also specify the order in which Grow and Erode should occur. Processing Grow before Erode will add pixels before removing some. It can help even out rough characters; for example, transform dot-matrix characters into laser printer quality characters. Processing Erode before Grow removes pixels before adding some. It can help sharpen indistinct characters; for example, it can allow the removal of thin lines that intersect one another.
- Optional: To preview how this enhancement will affect scanned images and OCRed or extracted text, test processes. For the best results, add a custom sample page before testing. Adjust and test until you are satisfied with the results.
Note: Specifying too large a value for the Grow property will cause some of your characters to become illegible. For example, the open spaces in the letters "a" and "e" may be filled when Grow is performed.
Note: Specifying too large a value for the Erode property may cause your characters to break up.
Tip: If you receive