Lookup
![]() Lookup
Lookup ![]() extracts information from an outside database. You can use one piece of information, such as an invoice number, to look up additional information in a database and populate fields or other document metadata with it. The information used for the lookup can be information associated with the document by another process in the Quick Fields session and stored in a token. For example, once information has been extracted from an image using Zone OCR or Barcode, Lookup can search for that information in a compatible outside data source and find information associated with it. Lookup can be used in First Page Identification, Page Processing, Last Page Identification, or Post-Processing.
extracts information from an outside database. You can use one piece of information, such as an invoice number, to look up additional information in a database and populate fields or other document metadata with it. The information used for the lookup can be information associated with the document by another process in the Quick Fields session and stored in a token. For example, once information has been extracted from an image using Zone OCR or Barcode, Lookup can search for that information in a compatible outside data source and find information associated with it. Lookup can be used in First Page Identification, Page Processing, Last Page Identification, or Post-Processing.
Example: The Bay City Ball Bearing Supply Company configures a session to process invoices. They configure Zone OCR to read the order number from the same place on each form. They then configure Lookup to look up the order number in a database and fill out the fields with the customer name, address, telephone number, and sales region.
Note: The Lookup process available in processing works similarly to the Real-Time Lookup process available in the document class settings, but has access to additional tokens generated by other processes and cannot run during Revision.
To use Lookup
- In the Session Configuration Pane, select the stage of processing where you want to use Lookup.
- In the Tasks Pane, select Lookup.
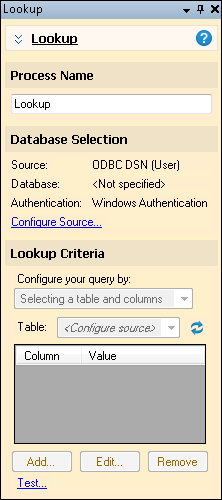
- You can optionally enter a name for the process under Process Name.
- Move through each step of the wizard at the bottom of the pane. You can also click Skip Wizard to display and configure the properties all at once.
- In the Database Selection step, specify the database to retrieve information from. You have three choices for the Configure Data Source Wizard: Windows ODBC, Advanced, and Expert.
- Once you have configured the database connection, in the Lookup Criteria step, you can specify data to look up in the database.
- Under Configure your query by, select if you want to configure it by selecting a table and columns or by writing your own custom query.
- If you selected to configure your query by selecting a table and columns, select the table from the Table list and click Add to choose the data to use in the lookup.
- In the Add Input dialog box, select a column from the database and the token from Quick Fields whose value you want to match and click OK.
- Click Add again to configure an additional item of data to use in the lookup. Using more than one query will look up all the specified values. This is useful when more than one item in the database may meet some of the specified criteria. You can continue adding queries until they will identify unique columns.
- To modify an input, select it and click Edit. Make your changes and click OK.
- To remove an input, select it and click Remove.
If you chose to configure your query by writing your own custom query in step 1, click inside the Query box to create a custom SQL query.
Tip: When writing your own query, the token format to use is %(LookupProcessName_ColumnName) where ColumnName is what your query specifies.
- Optional: You can click Test at the bottom of the Lookup Criteria step to see how many results were returned or if there were any errors in your query.
- The tokens generated by the Lookup process can be used to fill out document metadata such as document name, folder path, and fields.
Note: You can run the Lookup process on electronic documents in Pre-Classification Processing or Post-Processing.
Note: Some processes come with the basic Quick Fields installation, and some must be purchased as add-ons. Contact your reseller for more information.