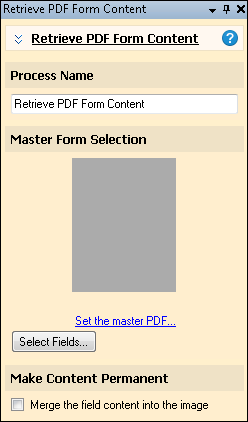
Retrieve PDF Form Content
![]() Retrieve PDF Form Content
Retrieve PDF Form Content ![]() retrieves values from a PDF form and stores those values as tokens. PDF forms are interactive PDF documents that enable you to type in information, select checkboxes, and choose values from lists. Retrieve PDF Form Content can only be used in the Pre-Classification Processing stage. The tokens produced from this process can be used in a Token Identification process in First Page Identification.
retrieves values from a PDF form and stores those values as tokens. PDF forms are interactive PDF documents that enable you to type in information, select checkboxes, and choose values from lists. Retrieve PDF Form Content can only be used in the Pre-Classification Processing stage. The tokens produced from this process can be used in a Token Identification process in First Page Identification.
Note: A PDF form is a PDF that allows you to add information to it via editable fields (which are usually tinted blue). ![]() Show me what this looks like. A PDF form is not a form that has been saved as a PDF. This process also does not work with dynamic xfa PDFs.
Show me what this looks like. A PDF form is not a form that has been saved as a PDF. This process also does not work with dynamic xfa PDFs.
Example: The City of Graceland scans in job applications for the marketing department, which are all PDF forms. They use the Retrieve PDF Form Content process to retrieve some of the PDF form values as tokens. These tokens can then be used to automatically populate the application's Laserfiche field values or to help name and store the application in the repository.
To use Retrieve PDF Form Content
- In the Session Configuration Pane, select Pre-Classification Processing.
- In the Tasks Pane, select Retrieve PDF Form Content.
- You can optionally enter a name for the process under Process Name.
- Move through each step of the wizard at the bottom of the pane. You can also click Skip Wizard to display and configure the properties all at once.
- Master Form Selection: The master form is a blank copy of the exact form being processed. This is needed to define which form fields to retrieve. Click Set the master PDF to select the master form.
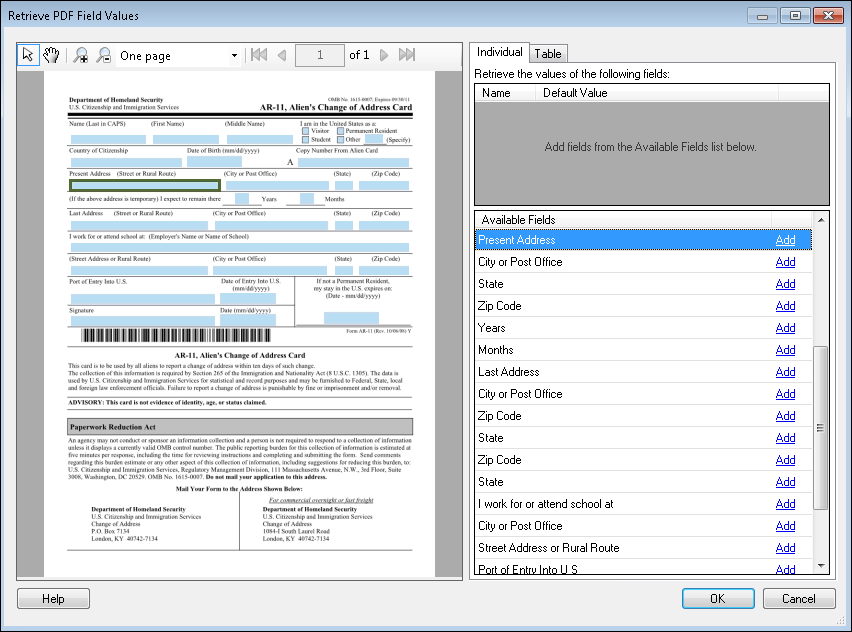
- Select Fields: Selecting fields allows you to choose the PDF form fields you want to retrieve values from. Click Select Fields to open the Retrieve PDF Field Values dialog.
- Navigate to the page you want to retrieve information from using the green arrows at the top of the left pane. Clicking a field in this pane will highlight the field in the right pane.
- Optional: You can select, grab, zoom, or navigate to pages in your PDF master form using the toolbar at the top of the left pane. Click the arrow button to use the selection tool, the hand button to grab and drag PDF pages, the plus and minus magnifying glass buttons or the drop-down menu to zoom, or the green arrows to navigate to different pages. Alternatively, you can zoom in by holding down the left mouse button and drawing a rectangle around the region you want to zoom in on. Double-click to zoom out.
- In the Available Fields pane, click Add next to the fields you want to retrieve values from. You can also choose fields to retrieve values from by double-clicking fields, dragging and dropping fields in to the upper-right pane, or selecting fields and pressing ENTER or the spacebar. (Hold down the CTRL key to select more than one field at once.) The fields will appear in the upper-right pane.
Note: The Retrieve PDF Field Values dialog only lists the fields shown on the PDF page in the left pane. To view the fields on additional pages of a PDF, navigate to the other pages using the toolbar at the top of the left pane.
- The text under Name in the upper-right pane will become the name of the token that stores the field's value. You can change this name by clicking the name and typing a new name.
- Optional: When you choose to retrieve values from a field, those values will be stored in a token. If the retrieved field is blank, you can specify a default value for it by typing a value it in the Default Value column next to the corresponding field in the upper-right pane. Alternatively, click the token button (right arrow)
 to use tokens in the default value.
Note: PDF Combo Box fields will display a drop-down list of possible default values that you can choose from. Depending on how the PDF Combo Box field was configured when the PDF form was created, you may be able to specify a default value that is not on the list.
- Optional: Remove an added field by clicking Remove next to the corresponding field in the upper-right pane.
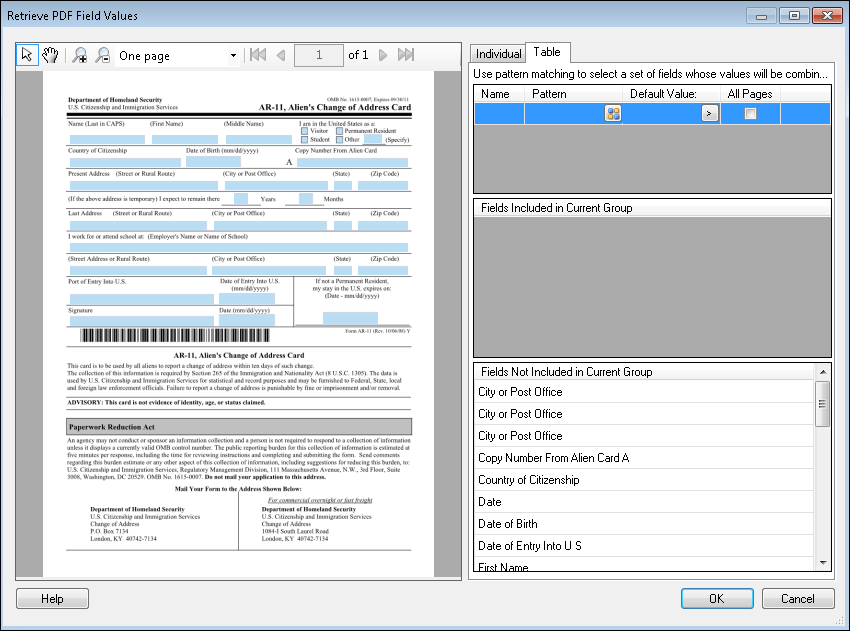
- Under Name, type a name for the multi-value token that reflects the fields you want to retrieve values from. As you type a name, the Pattern column will try to guess what fields you want to include in the multi-value token.
- Under Pattern, edit the pre-configured regular expression or type a new regular expression that specifies which fields will be retrieved and stored as a multi-value token's values. The pre-configured regular expression expects the fields in a column to have the same name and to be numbered sequentially (i.e., Field_1, Field_2, Field_3, etc.). Click the regular expression button
 to choose from a list of regular expressions.
 - The Fields Included in Current Group shows the fields that will have their values added to the multi-value token. The order of the fields in this section reflects the order in which they will add their values to the multi-value token. If the fields have numbers in their names, those numbers will be used to determine the order of the values (You can use sub-expressions in your pattern to specify which numbers in the field name will be used to order the field). Otherwise, the fields will be ordered based on where they appear in the PDF. More specifically, their order will be based on the tab order in the PDF.
- Optional: Set a default token value for any blank field by typing a value in the Default Value column next to the corresponding token in the upper-right pane. Alternatively, click the token button (right arrow) to use tokens in the default value.
- Optional: Select the checkbox under All Pages to retrieve fields that match the specific pattern from all pages of the document instead of only the page displayed on the left. Clear the checkbox to only retrieve fields from the current page.
- Optional: Remove a row by clicking Remove next to pattern.
- Click OK.
- Make Content Permanent: Select Merge the field content into the image if you want the field content merged into the image, converting the PDF form to a regular unalterable PDF.
To select individual fields, select the
Individual tab
To retrieve field values from tables and store those values in a multi-value token, select the
Example: Jim uses the Table tab to retrieve a table of prices and store those prices in a multi-value token.
Optional: In the Master Form Selection property box, you can remove fields and change how they are displayed. Click the plus or minus sign next to the field to view or hide its default value. Click the garbage can
next to a field to not retrieve values from that field and to remove it from the list.
Note: Specific options in your scan source need to be configured in order to use this process. If you are using Laserfiche Capture Engine, you must select Retrieve electronic file and Keep PDF after using it to generate pages under Document Content. If you are using Universal Capture, you must select Keep PDF after using it to generate pages under Document Content.
Note: You can right-click in the text pane to access the Sample Pages menu.
Note: Extracting text from a PDF form does not extract the information in the form fields. If you want to extract this information, generate images of the PDF forms and OCR the images.