Fill Out PDF Form
This activity assigns values to a PDF form's fields. See the token this activity produces.
![]() How does this activity look in the Designer Pane?
How does this activity look in the Designer Pane?
- Drag it from the Toolbox Pane and drop it in the Designer Pane.
To configure this activity
Select the activity in the Designer Pane to configure the following property boxes in the Properties Pane.
-
 Activity Name
Once added to a workflow definition, the default name of an activity can be changed. Providing a custom name for an activity helps you remember the role it plays.
To name an activity
- Add an activity to your workflow by dragging it from the Toolbox Pane and dropping it in the Designer Pane.
- Select the activity in the Designer Pane.
- Under Activity Name in the Properties Pane, replace the default name.

Note: Activity names cannot be the same as any other activity name in the workflow, they cannot be the same as the workflow's name, they must be less than 100 characters, they must contain at least one alphanumeric character, they cannot be "Name," and they cannot be the same as the activity's runtime type (which is usually only an issue with custom activities).
-
 Activity Description
Use the Activity Description to provide descriptive text to help you remember the role that the activity plays in the workflow. All activities contain a default description that you can modify while constructing your workflow.
To modify an activity description
- Add an activity to your workflow by dragging it from the Toolbox Pane and dropping it in the Designer Pane.
- Select the activity in the Designer Pane.
- Under
 Activity Description in the Properties Pane, replace the default description.
-
 Form Content
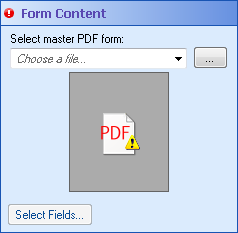
This property box specifies which PDF fields the Fill Out PDF Form activity will write values in and what those values will be.
To configure Form Contents
- Add the Fill Out Form activity to your workflow definition by dragging it from the Toolbox Pane and dropping it in the Designer Pane.
- Select the activity in the Designer Pane.
- Under
 Form Content in the Properties Pane, select a master PDF form from the Choose a file drop-down list. (A master PDF form is a blank PDF form that serves as a template for filling out PDF forms processed by the workflow.) The list contains the PDF documents attached to the Workflow Server.
 - Click Select Fields and the Fill Out PDF Fields dialog box will open.
- To select individual fields to fill out, make sure the Individual tab is selected.
- Navigate to the page you want to fill out using the green arrows at the top of the left pane. Clicking a field in this pane will highlight the field in the right pane.
- Optional: You can select, grab, zoom, or navigate to pages in your PDF master form using the
 toolbar at the top of the left pane. Click the arrow button to use the selection tool, the hand button to grab and drag PDF pages, the plus and minus magnifying glass buttons or the drop-down menu to zoom, or the green arrows to navigate to different pages. Alternatively, you can zoom in by holding down the left mouse button and drawing a rectangle around the region you want to zoom in on. Double-click to zoom out.
 - In the Available Fields Pane, click the Add link next to the fields you want to fill out. You can also choose fields to fill out by double-clicking fields, dragging and dropping fields in to the upper-right pane, or selecting fields and pressing ENTER or the spacebar. (Hold down the CTRL key to select more than one field at once.) The fields and a place to input the fields' values will appear in the upper-right pane.
- Assign values to fields by typing the desired value in the Value column next to the corresponding field in the upper-right pane. Alternatively, click the Token button (right arrow)
 to use tokens.
 - Optional: Remove an added field by clicking Remove next to the corresponding field in the upper-right pane.
- To fill out multiple fields in a PDF with corresponding values from a multi-value token, select the Table tab.
- Under Name, type a name for the group of fields you want to fill out. As you type a name, the Pattern column will try to guess what fields you want to be filled out with the multi-value token's values.
- Under Pattern, change the pre-configured regular expression or type a new regular expression that specifies which fields will be filled out with the multi-value token's values. The pre-configured regular expression expects the fields in a column to have the same name and to be numbered sequentially (i.e., Field_1, Field_2, Field_3, etc.). Click the Regular Expression button
 to choose from a list of regular expressions.
 - The Fields Included in Current Group section of this dialog box shows the fields that will receive values from the multi-value token in the order in which they will receive values. If the fields have numbers in their names, those numbers will be used to determine the order of the fields and will correspond to the order of the values in the multi-value token. (You can use sub-expressions in your pattern to specify which numbers in the field name will be used to order the fields.) Otherwise, the fields will be ordered based on where they appear in the PDF. More specifically, their order will be based on the tab order in the PDF.
- Under Value, type, or select with the Token button (right arrow)
 , a multi-value token. The values from this token will fill in PDF fields specified by the pattern.
 - Optional: Select the box under All Pages to retrieve fields that match the specified pattern from all pages instead of only the page displayed on the left. Clear this box to only retrieve fields from the current page.
- Optional: Remove a row by clicking Remove next to the pattern.
- Click OK.
- Optional: In the Form Content property box, you can remove fields and change how the fields are displayed in the property box.
- Click the red X
 next to a field to not fill out that field.
 - Click Hide Details to see a list of only the field names. Alternatively, if the details are hidden, click Show Details to show the values for the listed fields.
Note: If the master PDF form you want is not in the drop-down list, you will need to attach the PDF to the Workflow Server. After you attach the desired master PDF to the Workflow Server, the PDF will appear in the drop-down list.
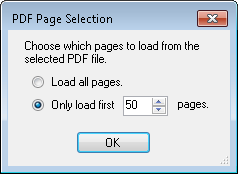
Note: If your master PDF is more than 50 pages long, the
 PDF Page Selection dialog box will appear. Select to load all of the PDF's pages or to only load the first ___ number of pages. If you choose to load only a specific number of pages, type in a number of pages or use the scroll box (up-and-down arrows)
  to specify a number. If you choose to load all pages, loading may take a long time or cause performance problems.
Note: If the master PDF is password protected, you must enter a password before you can view the PDF.
Note: The Fill Out PDF From dialog box only lists the fields shown on the PDF page in the left pane. To view the fields on additional pages of a PDF, navigate to these pages using the toolbar at the top of the left pane.
Note: PDF Combo Box fields will display a drop-down list of possible values that you can choose from. Depending on how the PDF Combo Box field was configured, you may be able to specify a value or token that is not on the list.
Note: To configure a checkbox field to be selected or cleared, you can choose from the options in the drop-down list for that field or you can click the Token button (right arrow)
 to use tokens. The checkbox will be selected if the inserted token is a string token with the value "Yes," "True," "Checked," or "On" (case insensitive), an integer token with any non-zero value, or a Boolean (true/false) token that resolves as true. Tokens with any other values will clear the checkbox.
 Example: Jane uses a Retrieve Field Values activity to get a multi-value token that lists all the advisors of a project. She configures the Table tab to insert that list of advisors into an "Advisor Approval" table in a PDF form. Advisors can approve the form by signing next to their name in the table.
-
 Make Content Permanent
This property box makes the content of a PDF form permanent. After modifying the content of a PDF form with the Fill Out PDF Form activity, you can choose to save the form's fields as part of the page's image so that they can no longer be changed.
To configure Make Content Permanent
- Add the Fill Out PDF Form activity to your workflow definition by dragging it from the Toolbox Pane and dropping it in the Designer Pane.
- Select the activity in the Designer Pane.
- Under
 Make Content Permanent in the Properties Pane, select Merge the field content into the image to make the added field values permanent. If you select this option, you will not be able to change any part of the form after the activity runs.
-
 PDF
PDF
To select which entry or entries an activity will act on
- Add the activity to your workflow by dragging it from the Toolbox Pane and dropping it in the Designer Pane.
- Select the activity in the Designer Pane.
- In the Properties Pane, in the appropriate property box, choose which entry the activity will act on.
- Starting Entry: The entry the workflow began with.
- Other Entry: To choose an entry that was returned or created in a previous step in the current workflow, click the Select link and choose an entry from the Select Entry dialog box.
Note: Some activities do not have the starting entry selected by default. If you are configuring one of these activities, click the Select link to choose an entry for the activity to act on.
-
 Advanced
Click the Advanced button
 at the top of the Properties Pane to view and configure these properties.
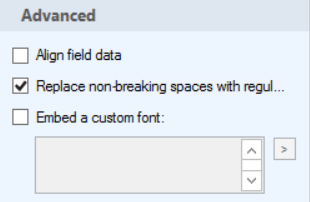
This property box lets you handle alignment issues caused by the Fill Out PDF Form activity. With certain types of PDF forms, form values set by Workflow may appear offset from the field in the PDF or may only be visible when you click on the field in the PDF. You can configure whether Workflow will explicitly set alignment values or use the PDF reader's alignment settings.
You can also choose to replace non-breaking spaces with regular spaces.
You may also use custom fonts. This advanced option may be necessary for Workflow to properly fill in PDF forms using certain languages with variable-width encoded characters.
Important: We do not recommend changing the default setting for this property box unless you are experiencing a problem with the appearance of your filled-out PDF fields.
To configure the Advanced property box
- Select the Fill Out PDF Form activity in the Designer Pane.
- Click the Advanced button
 at the top of the Properties Pane.
 - Under
 Advanced in the Properties Pane, select or clear the following options:
 - Align field data: If form field values are only visible when you select the field in the PDF, select this option to have Workflow align the PDF. Clear this option to use the PDF reader's alignment settings.
- Replace non-breaking spaces with regular spaces: If the tokens inserted in the PDF form use non-breaking spaces (Unicode character 00A0), the spaces may not be displayed when the PDF is viewed. Select this option if your tokens contain non-breaking spaces to convert them to regular spaces (Unicode character 0020).
- Embed a custom font: The text box expects a string with one or more semicolon-separated values in the following format: fontfile,fontindex,encoding,embed
- fontfile is the name of a font file in the Windows Font folder (like arialuni.ttf).
- fontindex is an optional value for handling TTC files that lets you specify the index of the font. This defaults to 0 if not specified.
- encoding is the encoding for the font. Valid values include (but are not limited to): H for Identity-H, V for Identity-V, cp1252 for Windows-1252.
- embed indicates whether to embed the font in the PDF (e.g., T for true and F for false). This defaults to T.
For example, to fill out a PDF with Chinese characters, you may want to use MS Gothic:
msgothic.ttc,1,H,T
To fill out a PDF with Thai characters, you may want to use Arial Unicode MS:
arialuni.ttf,,H
If Arial Unicode MS is not available, Tahoma also supports Thai characters.Note: The text box supports specifying multiple fonts by separating each font declaration with a semi-colon.
Note: If you have more than one connection profile for your workflow definition, the Connection Profile property box lets you specify which connection profile this activity will use.
Note: A PDF form is a PDF that allows you to add information to it via editable fields (which are usually tinted blue). ![]() Show me what this looks like. A PDF form is not a form that has just been saved as a PDF.
Show me what this looks like. A PDF form is not a form that has just been saved as a PDF.
The Fill Out PDF Form activity produces the following token:
| Name | Description | Sample Syntax* |
|---|---|---|
| PDF Matched | Whether the entry matched the master PDF form specified by the Fill Out PDF Form activity. This token can have one of two values: True or False. | %(FillOutPDFForm_PDF Matched) |
*The "FillOutPDFForm" portion of the syntax changes to match the activity's name as specified in the Activity Name property box. Note that all non-alphanumeric characters, except underscores, are removed from the name. For example, if you rename the activity Form^298.1, the syntax for the PDF Matched token will be %(Form2981_PDF Matched).


