Rename Entry
This activity renames a Laserfiche entry. See the tokens this activity produces.

- Drag it from the Toolbox Pane and drop it in the Designer Pane.
To configure this activity
- Select the activity in the Designer Pane to configure the following property boxes in the Properties Pane.
- Activity Name
- Activity Description
- New Entry Name
- Entry to Rename
Note: If you have more than one connection profile for your workflow definition, the Connection Profile property box lets you specify which connection profile this activity will use.
The Rename Entry activity produces the following tokens.
| Name | Description | Sample Syntax* |
|---|---|---|
| OutputEntry_Name | The new name of the renamed entry. | %(RenameEntry_OutputEntry_Name) |
| OutputEntry_Id | The Laserfiche ID number of the renamed entry. | %(RenameEntry_OutputEntry_Id) |
| OutputEntry_Path | The folder path of the renamed entry. | %(RenameEntry_OutputEntry_Path) |
| OutputEntry_FullPath | The folder path of the renamed entry, including the entry's new name. | %(RenameEntry_OutputEntry_FullPath) |
| OutputEntry_Repository | The repository the renamed entry is in. | %(RenameEntry_OutputEntry_Repository) |
| OutputEntry_Server | The Laserfiche Server that contains the renamed entry. | %(RenameEntry_OutputEntry_Server) |
| OutputEntry_Guid | The GUID (Globally Unique Identifier) of the renamed entry. | %(RenameEntry_OutputEntry_Guid) |
*The "RenameEntry" portion of the syntax changes to match the activity's name as specified in the Activity Name property box. Note that all non-alphanumeric characters, except underscores, are removed from the name. For example, if you rename the activity Standardize/Names, the syntax for the OutputEntry_Id token will be %(StandardizeNames_OutputEntry_Id).
Example - Renaming Entries Using Workflow
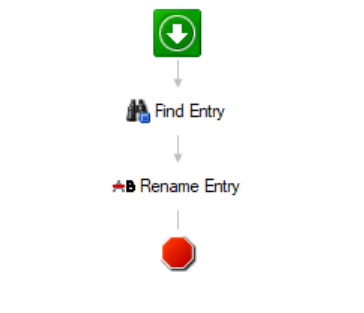
You need to rename documents in Laserfiche based on metadata values, standardized naming conventions, or business rules. To do this, you will first locate the document using the Find Entry activity and then apply the Rename Entry activity.
Prerequisites: Getting the Entry into the System
Before renaming a document, ensure:
- Documents are imported into Laserfiche: Users can manually upload documents or use automated import methods(e.g. Laserfiche Quick Fields, Email Archive, or direct scanning).
- Metadata is applied (if renaming based on metadata): Set metadata fields such as Invoice Number, Client Name, or Document Date.
- Folder structure is established: Organize documents in a structured folder system so they can be easily located.
Step 1: Find the Document Using the "Find Entry" activity
To rename a document, the workflow must first locate it in the repository.
- Open Laserfiche Workflow Designer.
- Drag and drop the Find Entry activity onto the Workflow canvas.
- Configure the Find Entry activity:
- Select the radio button for Find the Entry at and click the browse button
 to open the Browse Laserfiche Entries dialog window.
 - Select the entry you would like to rename and click Okay.
- Select the radio button for Find the Entry at and click the browse button
Step 2: Rename the Document Using the "Rename Entry" activity
Once the entry is found, rename it using the Rename Entry activity.
- Drag and drop the Rename Entry activity onto the Workflow canvas after the Find Entry activity.
- Configure the Rename Entry properties:
- Set the New Entry Name field using the Token Dialog button.

- Define the new name format.
For example: Use Token Tags (e.g. %(Entry Name)_%(Date)) to pull metadata dynamically.
- Set the New Entry Name field using the Token Dialog button.
- Click OK to save changes.

Step 3: Publish and Test the Workflow
- Save and publish the workflow.
- Run a test case by selecting an existing document and confirming the renaming behavior.
- Check the renamed document in the repository.
Best Practices for Renaming Entries Using Workflow
Renaming documents automatically in Laserfiche Workflow ensures consistency, improves searchability, and enhances document organization. Using the Rename Entry activity, users can set new names dynamically using tokens, such as invoice numbers, dates, or vendor names.
Use Meaningful and Consistent Naming Conventions
- Ensure your naming conventions align with organizational standards to make documents easily identifiable.
- Utilize standardized date formats (e.g., YYYY-MM-DD) to maintain chronological sorting.
- Incorporate relevant metadata, such as invoice numbers or client names, using workflow tokens.
Leverage Tokens to Automate Naming
- Use tokens to dynamically extract and insert relevant data into file names.
- Combine multiple tokens for detailed, structured names.
Example of Using Tokens to Standarize Document Naming:
[InvoiceNumber]_[ClientName]_[YYYY-MM-DD] → 123456_LongBeachCorp_2024-03-26.pdf
Test Before Deployment
- Run test cases with different document types to verify naming logic.
- Check that tokens resolve correctly, and file names remain consistent.
- Review a sample batch before rolling out the workflow to production.
Tip: Set up a temporary test folder to monitor renamed documents before applying changes to live documents.
Optimize Workflow Efficiency
- Avoid unnecessary loops—process entries only when changes are required.
- Use conditional starting rules to trigger renaming only when new documents are added or updated.
- If renaming a large number of documents, break the workload into smaller batches using Invoke Workflow for parallel processing.
Ensure Proper Version Control
- If renaming existing documents, ensure the new name does not overwrite essential audit data.
- Maintain logs of renamed documents for tracking and troubleshooting.
Monitor and Maintain Your Workflow
- Regularly review renaming patterns and update them as needed.
- Ensure that changes in document structure (e.g., new metadata fields) are reflected in the workflow.
- Set up alerts or reports to flag documents that fail to rename correctly.
Conclusion
Following these best practices ensures that document renaming in Laserfiche Workflow remains structured, reliable, and efficient. By leveraging tokens, implementing error handling, and testing rigorously, you can automate document management with confidence.