Updating a Microsoft Word Document with Workflow
Laserfiche Workflow's Update Word Document activity makes use of Word's find-and replace and field merging options to add information from a workflow to a Word document. This activity makes it easy to dynamically interact with Word documents, letting you generate line-item documents, update customer records, fill out agendas, collate data from Laserfiche Forms in a Word document, and much more.
Getting Started
If you’re interested only in the find-and-replace feature of this activity, you can skip ahead to Configuring the Update Word Document activity.
If you want to insert data in placeholder regions in a Word document, including regions within a table, make sure you first add merge fields to the Word document.
Configuring the Word Document
If you plan to use the Simple Field Merge or Table Field Merge features of the Update Word Document activity, you must first prepare your Word document with merge fields.
Merge fields in Word are similar to tokens in Workflow: They are placeholders in the Word document that will be updated with information from a database, table, or application. In our case, we want to update the merge fields with information from Workflow.
Note: These instructions assume Word 2007 or later.
Adding merge fields to a Word document
- Select the location in the Word document where you want to add the field.
- On the Insert tab, select Quick Parts, and then Field.
Tip: Instead of navigating through the toolbar, you can also add merge fields to your document by selecting a bit of text and pressing CTRL+F9. Then, right- click the text and select Edit Field.
- The Field dialog box will open. In the Categories list, select All.
- In the Field names list, select MergeField.
- In the Field properties column, type a name for the field in the Field name box.
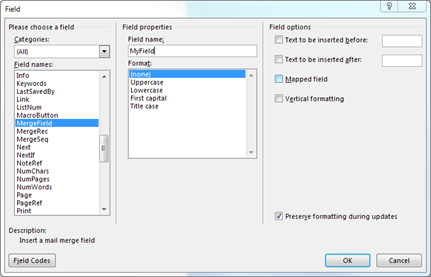
- Click OK.
- The field will be inserted into the document. Repeat this process until you've added all desired fields.
Note: The angle brackets Word automatically generates with the above steps are not equivalent to the angle brackets you can insert from your keyboard. If you want to manually add merge fields to your document without going through steps 2-5 above), use this syntax: {{ FIELDNAME If you chose to manually create merge fields with curly brackets, Workflow will display a prompt when importing fields. You will be asked if you want to load non-standard merge fields. Click Yes to proceed. Note that these manually created fields will be imported only if there are no standard merge fields in the document. You cannot mix standard merge fields with manually created merge fields.
Adding a field merge table to a Word document
Workflow can fill out tables in Word documents with information from a data source. To use this functionality, configure a field merge table in Word, using regions instead of using normal merge fields.
- Create a table in the Word document.
- In the first cell of the table, insert a merge field with the name TableStart: MyObject, where MyObject corresponds to the name of a your region. Learn how to add a merge field.
- In the last cell of the first row, insert a merge field with the name TableEnd: MyObject.
- Between the TableStart and TableEnd fields, insert the merge fields that correspond to the fields you want in your table's columns. These merge fields will be populated with data from the first row of the data source Workflow is retrieving data from, then the following rows will be populated with additional data from the data source.
Tip: You can nest regions by defining one region inside another. Nesting regions lets you replicate the parent-child relationship of imported data.
Tips for working with merge fields
The Microsoft Office documentation provides a lot of information about merge fields. At any point while configuring your Word document, click ALT+F9 to see all the field codes for the fields in your document. You can edit these field codes as needed. Learn more about field codes.
Additionally, see the Resources section of this paper for more information about working with merge fields.
Using conditions and formulas in merge fields
Workflow supports formulas and conditions in merge fields.
Formulas allow you to perform basic math and other formatting with field values. Workflow uses Open Office formulas, the same formulas as Microsoft Excel, Google Sheets, and Laserfiche Forms. See a list of available formulas.
Conditions allow you to show or hide text. They use the following syntax:
{ IF Expression1 Operator Expression2 “ TrueText” “ FalseText”}
Example: If a customer makes a purchase that totals over $500, you want to display a coupon code on their invoice for 10% off their next purchase. First, use a formula to total the amounts on the invoice. E.g., MERGEFIELD Amount1} + { MERGEFIELD Amount2}} where Amount1 and Amount2 are the fields' names. Then, use conditions to display the coupon code if the amount is over $500. If they don't spend over $500, then just thank them for their order. E.g., { IF {={MERGEFIELD Amount1} + MERGEFIELD Amount2}}>=500 "Use the coupon code A1234 for 10% off your next purchase." "Thank you for your order."}
Configuring the Update Word Document activity
The Update Word Document activity creates a copy of an existing document and updates it either by finding and replacing words or by performing a field merge.
Selecting the Word Document
To configure the Update Word Document activity, you must first specify where Workflow can find the master document.
- Add the Update Word Document activity to the Workflow canvas.
- Double- click on the added activity to open its Properties pane.
- In the Properties pane, use the Source drop-down menu to select the master document' s location: Workflow Server local disk, Server attachment, or another workflow activity.
- Click the Browse button to locate the document. Alternatively, if you had selected the Workflow Server local disk you can specify a path manually.
Defining the action
The second step in configuring the Update Word Document activity is to define the changes Workflow will make to the document. Workflow can perform a straightforward find and replace in the document or it can interact with Word's fields and tables.
- Double- click the Update Word Document activity on the Workflow canvas.
- In the Modifications section of the Properties pane, click New.
- In the New Modification dialog box, select Find and Replace, Simple Field Merge, or Table Field Merge from the drop-down.
Find and Replace
The Find and Replace option lets you automate the same find and replace functionality that' s available in Microsoft Word. This option does not require your document to contain merge fields or any special formatting.
Example: The Acme Insurance Company has anew client information packet that they’d like to customize with the client's and the account manager' s names. When a new client is brought in, their name and their account manager's name are added to the metadata on the client's folder. Once those two fields are filled out, a workflow starts that runs an Update Word Document activity. This activity automatically looks for ClientName" and "AccountManagerName" in each document in the folder and replaces those values with the client and account manager's actual names.
To configure Find and Replace
- Double-click the Update Word Document activity.
- In the Properties pane, locate the Modifications section and select New….
- In the New Modification dialog box, ensure Find and Replace is selected from the Type drop-down menu.
- Next to Find what, type the characters or words that you want Workflow to find in the document. Use the token buttons to find strings found in other parts of your workflow.
- Next to Replace with, type the characters or words that Workflow will replace the found values with. Use the token buttons to replace strings found in other parts of your workflow.
- If you select the Match case option, the activity will find only results with the same capitalization pattern as the value you type next to Find what. Clear this option to find matches regardless of capitalization.
- If you select the Match whole word option, the activity will look for whole words only, not partial words. For example, if you select this option and configure the activity to find the word " book," it will find all instances of the word book but not "bookmark," "bookkeeping," or "booking."
- If you select the Use regular expressions option, you can use regular expressions to extract specific information from a token you've added to your "Find" value. For example, if you put an address token in the Find what field, you can use regular expressions to find only the zip code from the address. Learn more about regular expressions.
Simple Field Merge
While the Find and Replace option offers basic updating functionality, if you have a document that is going to be updated by a database as well as a workflow, or if you have more complicated updating needs, then select the Simple Field Merge option.
To configure a simple field merge
- Double- click the Update Word Document activity.
- In the Properties pane, select New under Modifications.
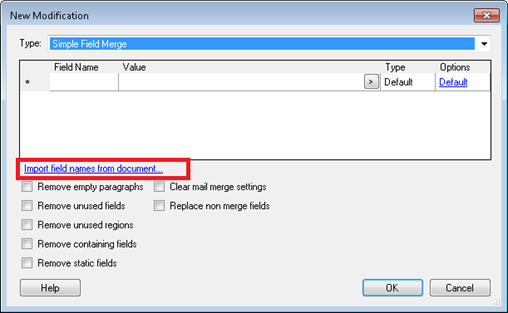
- In the New Modification dialog box, ensure Simple Field Merge is selected from the Type drop-down menu.
- While you can manually enter the names of the merge field columns from your Word table, it's more efficient to click the Import field names from document link below the table. Clicking this list will automatically populate the table with all the merge fields that Workflow can interact with.
- If Workflow doesn't find any merge fields, then it will prompt you to import other types of fields from the document. If you click Yes at this prompt, any items in the document that are wrapped in double curly brackets {{ }} will be returned.
- If a field you expected to use doesn't appear on the list, ensure you have configured your Word document correctly.
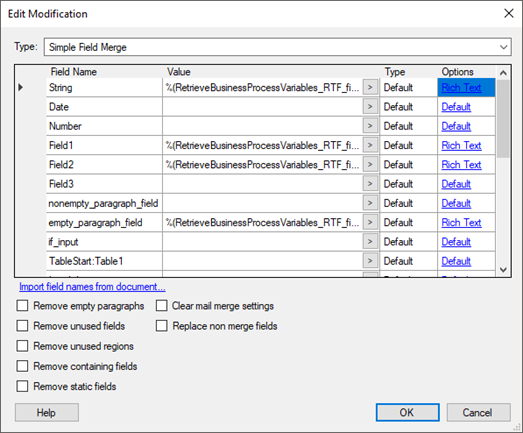
- In the Value column, type a value or insert a token. The field will be replaced with this value when the workflow runs.
- In the Type column, choose the type of data that will be entered into the field. Setting the type is important if you are inserting a token whose value could be one of multiple types ( e.g., it could be interpreted as a string or a number), and you want to ensure Word interprets the token correctly. In most cases, leaving Default in this column is sufficient.
- In the Options column, select a format for the field. You can use the default formatting, render the field as a True/False checkbox, render it as a barcode, or render it as rich text. You can also define custom properties for barcodes and checkboxes. Learn more about formatting options.
Example: Susan creates a label template in Word and uses the barcode option in the Update Word Document activity to print barcodes onto the labels. She then sticks these barcode labels onto incoming reports, applying different barcodes to different reports. When the reports are scanned, Quick Fields recognizes the barcodes and is able to process the documents accordingly. The Update Word Document activity supports these barcode symbologies. Learn more about using barcodes with Quick Fields.
- To add more fields to the table in the New Modification dialog box, start typing in the last row. To delete a field, click the gray space to the left of the field's row and press DELETE.
- Below the table of fields are several options for cleaning up the Word document after the merge runs.
- You can remove empty paragraphs, fields, and regions.
Note: The entire field will be removed from the document you are modifying with this activity, not just the empty space an empty field produces. To see all the fields in the document and their values, open the Word document and press ALT + F. - Select Remove containing fields if you want fields that contain other merge fields to be removed when the latter are removed. This helps you avoid having empty containers.
- Select Remove static fields if you want to remove fields that don’t change.
- Select Remove static fields if you want to remove fields that don’ t change when the document changes.
- You can also clear mail merge settings configured in the Mail Merge Wizard.
- Select the Replace non merge fields option if you have other types of fields in your document ( e.g., text wrapped in double curly brackets {{ }}) that you want this activity to replace.
Table Field Merge
The Table Field Merge option lets you populate a table in a Word document from a datasource. If you select this option, you must have a Custom Query or Query Data activity earlier in your workflow that retrieves the data you want to insert into the table.
Example: You have a database containing transaction history from different accounts in your company. Periodically, you need to send a transaction history for the last month to a client. You configure a Custom Query activity in Workflow to query the database, then use an Update Word Document activity with the Table Field Merge option to fill out a table with the transaction history. You then configure the activity to save the resulting document as a PDF and use an Email activity to send the document to the client.
To configure a table field merge
-
Double-click the Update Word Document activity.
-
In the Properties pane, select New under Modifications.
-
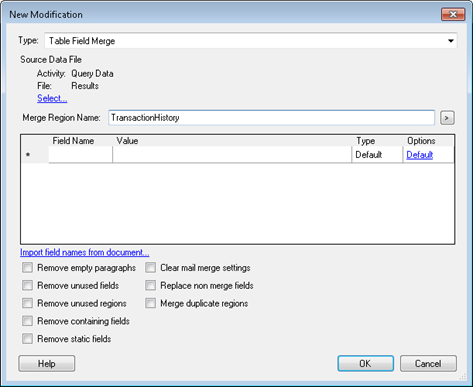
In the New Modification dialog box, ensure Table Field Merge is selected from the Type drop-down menu.
-
Under Source Data File, click the Select link. Choose Results from the Query Data or Custom Query activity that performs the database lookup for the values you want to insert.
-
Next to Merge Region Name, insert the name of the region that corresponds to the table in Word. The region is the value you specified after the TableStart and TableEnd fields in your table. Learn more about configuring this table.
-
While you can manually enter the names of the merge field columns from your Word table, it's more efficient to click the Import field names from document link below the table. Clicking this list will automatically populate the table with all the merge fields that Workflow can interact with.
-
If Workflow doesn't find any merge fields, then it will prompt you to import other types of fields from document. If you click Yes at this prompt, any items in the document that are wrapped in double curly brackets {{ }} will be returned.
-
If a field you expected to use doesn't appear on the list, ensure you have configured your Word document correctly.
-
-
In the Value column, type a value or insert a token. The field will be replace with this value when the workflow runs.
-
In the Type column, choose the type of data that will be entered into the field Setting the type is important if you are inserting a token whose value could be one of multiple types (e.g., it could be interpreted as a string or a number), and you want to ensure Word interprets the token correctly. In most cases, leaving Default in this column is sufficient.
-
In the Options column, select a format for the field. You can use the default formatting, render the field as a True/ False checkbox, render it as a barcode, or render it as rich text. You can also define custom properties for barcodes and checkboxes. Learn more about formatting options.
Example: Susan has created a label template in Word and uses the barcode option in the Update Word Document activity to print barcodes onto the labels. She then sticks these barcode labels onto incoming reports, applying different barcodes to different reports. When the reports are scanned, Quick Fields recognizes the barcodes and is able to process the documents accordingly. The Update Word Document activity supports these barcode symbologies. Learn more about using barcodes with Quick Fields.
-
To add more fields to the table in the New Modification dialog box, start typing in the last row. To delete a field, click the gray space to the left of the field's row and press DELETE.
-
Below the table of fields are several options for cleaning up the Word document after the merge runs.
- You can remove empty paragraphs, fields, and regions.
Note: The entire field will be removed from the document you are modifying with this activity, not just the empty space an empty field produces. To see all the fields in the document and their values, open the Word document and press ALT + F9. - Select Remove containing fields if you want fields that contain other merge fields to be removed when the latter are removed. This helps you avoid having empty containers.
- Select Remove static fields if you want to remove fields that don’t change when the document changes.
- You can also clear mail merge settings configured in the Mail Merge Wizard.
- Select the Replace non merge fields option if you have other types of fields in your document (e.g., text wrapped in double curly brackets {{ }}) that you want this activity to replace.
Formatting Inserted Values
When you insert values into a merge field, you can specify how the values will be formatted. Click on the field’s value under Options to modify its formatting options.
The options work as follows.
- Default: Choose this if you do not need to insert barcodes, retain formatted rich text from Forms, or convert values into Boolean data. If you are inserting a rich-text token from Forms and you select Default, the inserted text will include any HTML tags related to rich-text formatting, such as <b> and <i> tags.
- Checkbox: Choose this if you want to insert Boolean data based on the field value. Field values are case-insensitive.
- By default, all field values except no, 0, false, and off will be translated as the Boolean value of “True”. no, 0, false, and off are translated as "False”.
- To specify more field values to be translated as the Boolean value of False”, specify these values in the Custom Properties box. Multiple values should be separated by semicolons. For example, if you also want never and n to be translated as “ False”, enter the following in the box: never; n
- Barcode: Choose this if you want a barcode to be inserted. You can then further select a Barcode Type in the drop-down menu that appears. If your preferred barcode type is not listed in that menu, specify your preferred type under Custom Properties. View a full list of supported barcode types.
- Rich Text: Choose this if you want to insert a rich-text token. You can choose to insert the token as plain text, or to preserve its rich-text formatting. Read the documentation on Forms field tokens to learn how to convert a rich- text token into plain text.
Advanced Settings
The advanced settings for the activity let you define whether the activity will create a new document or just update the source document. These settings also allow you to convert the created document to PDF, rename the created document, create a token with the document' s content, and report warnings in the instance details.
- Click the Advanced button
 at the top of the Properties pane.
 - Under Advanced in the Properties pane, select or clear the following options:
- Create new document: Creates a new document that contains the changes made by the activity instead of updating the existing document.
- Convert to PDF: Converts the resulting document to PDF format.
- Rename Document: Changes the name of the document to the value you provide here.
Overwrite source document (activity source files only): Overwrites the source document. This option is available only if you configured the activity to update a document from another activity in the workflow. You cannot overwrite a document on the Workflow Server local disk or a server attachment.
Emit Email Token: Creates a token containing the resulting content of the Word document.
Report serialization warnings: Displays serialization warnings in the Messages tab of the workflow' s instance details. Serialization warnings occur when the data type of the values you’re inserting does not match the data type of the receiving field.
- Create new document: Creates a new document that contains the changes made by the activity instead of updating the existing document.
Using the Updated Word Document
When the Update Word Document activity runs, by default, it creates a new document from the source document it used as a template. To access this document, you will need to pair the Update Word Document activity with an Email or Attach Electronic Document activity.
Note: The Advanced Settings for the Update Word Document activity has an option to overwrite the source document instead of creating a new document. With this option, the source document will become available to the Email and Attach Electronic Document activities.
Emailing the resulting document
- Add the Email activity to your workflow below the Update Word Document activity.
- In the Email activity’s Properties pane, click the Attach button.
- In the New Attachment dialog box, select File from the drop-down menu next to Attachment type.
- Under Select a file to attach, select Result File under the Update Word Document activity.
- Click OK.
Adding the resulting document to your repository
- Add a Create Entry activity to your workflow, below the Update Word Document activity.
- In the Create Entry activity' s Properties pane, configure the entry' s name, type, destination, and volume. Ensure you specify Document for the entry type.
- Add an Attach Electronic Document activity to your workflow, below the Create Entry activity.
- In the Attach Electronic Document activity's Properties Pane, under File to Attach, select Activity from the drop- down menu.
- Click the Browse button, and select Result File under the Update Word Document activity.
- Under Attach File To, select Other Entry and click the Select link.
- Select OutputEntry under the Create Entry activity.
- Click OK.
Resources
The resources below provide more insight into the Update Word Document activity and Words merge feature:
- For instructions for how to create and fill out an invoice using the Update Word Document activity, see this Laserfiche Answers post: How to Create Dynamic Document Line Items Using Laserfiche 10.
- For information about Workflow in general, see the Workflow help files.
- For more information about merge fields in Microsoft Word, see the Microsoft Office documentation.
- For more information about how merge fields and regions are handled, see the Aspose documentation. The Update Word Document activity relies on the Aspose library for some of its functionality