Fixed Annotation
![]() Fixed Annotation
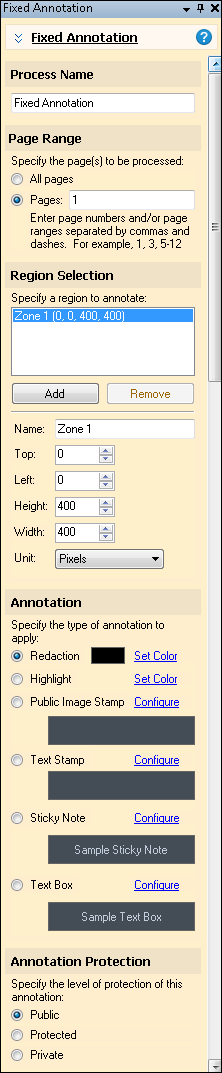
Fixed Annotation ![]() adds an annotation, such as a redaction, highlight, stamp, sticky note, or text box to a specified location on each document. Fixed Annotation can be used in Pre-Classification Processing, Page Processing, or Post-Processing.
adds an annotation, such as a redaction, highlight, stamp, sticky note, or text box to a specified location on each document. Fixed Annotation can be used in Pre-Classification Processing, Page Processing, or Post-Processing.
Example: The Human Resources department scans in tax withholding forms for all their employees. For each type of form, such as Internal Revenue Service Form W-2, the employees' social security numbers are located in the same place. They configure a Fixed Annotation to redact the same zone and its associated text (if any text exists) on each form.
To use Fixed Annotation
- In the Session Configuration Pane, select the stage of processing where you want to use Fixed Annotation.
- In the Tasks Pane, select Fixed Annotation.
- You can optionally enter a name for the process under Process Name.
- Move through each step of the wizard at the bottom of the pane. You can also click Skip Wizard to display and configure the properties all at once.
- Page Range: When configuring a process in Page Processing or Post-Processing, you will be prompted to specify a page range. In other stages, default settings will be automatically applied.
- Region Selection: Specify the region where the fixed annotation will be applied. To define a region, either drag and resize the zone on the Display Pane or specify coordinates in pixels or by percentage in the Tasks Pane. You can also copy and paste a zone from this process or from another process.
Tip: If you are zoomed in to a specific area of an image, adding a zone will place it in the top left corner of the zoomed in image for convenience.
Note: Zones can be copied and pasted within this and other processes that contain zones. When copying a zone within this process, pasting using CTRL + V will paste the zone directly on top of the zone you copied. Right-clicking on a different area of the image and selecting Paste Zone from the context menu will paste the copied zone where you right-clicked.
- Annotation: Select a type of annotation. The annotations are the same Laserfiche annotations that can be applied in the repository, and have the same properties. The annotation you choose is the one that will be applied to all zones you define. You cannot pick different annotations per zone.
- Redaction: Click Set Color to choose black or white redactions.
- Highlight: Click Set Color to choose a color or create a custom color.
Note: Redactions and highlights added to an image with associated text will be linked to that text.
- Public Image Stamp: Click Configure to choose a pre-created image to add to the document as a public stamp. You can choose from stamps that are available in the Laserfiche repository where the session will send the documents. You cannot use public image stamps in the Pre-Classification Processing Stage.
- Text Stamp: Click Configure to create a stamp out of any text string. You can also create a dynamic text stamp using tokens. For instance, if you create a stamp with the Date token, the stamp will use the date from when the session was run. When creating a text stamp, you can specify the font, color, rotation, and formatting of the stamp.
- Sticky Note: Click Configure to specify the color and text for the sticky note. You can use the token button (right arrow)
 to add a token to the sticky note text.
 - Text Box: Click Configure to specify the text that will go inside the text box as well as its color and font size. Tokens can be used inside the text box.
- Annotation Protection: Select if you want the annotation applied to be
- Public: The annotation will be visible to everyone.
- Protected: The annotation can only be modified by its creator or document owner.
- Private: The annotation will only be visible to its creator.
- Optional: To preview how this enhancement will affect scanned images and OCRed or extracted text, test processes. For the best results, add a custom sample page before testing. Adjust and test until you are satisfied with the results.
Note: When Fixed Annotations are used in Post-Processing, field tokens can be used to insert field values into these annotations.
Note: If you define a fixed annotation region using percentages for scanned pages of a certain size, the size and placement of the region will change if a page of a different dimension is scanned. For example, the region defined for a scanned page that is 8.5 x 11 in size will be a different size and in a different location on a scanned page that is 8.5 x 14.