Invoke Business Process
This activity starts a Laserfiche Forms business process instance with a set of initial process variables.
- Drag it from the Toolbox Pane and drop it in the Designer Pane.
To configure this activity
- Select the activity in the Designer Pane to configure the following property boxes.
-
Activity Name
Once added to a workflow definition, the default name of an activity can be changed. Providing a custom name for an activity helps you remember the role it plays.
To name an activity
- Add an activity to your workflow by dragging it from the Toolbox Pane and dropping it in the Designer Pane.
- Select the activity in the Designer Pane.
- Under Activity Name in the Properties Pane, replace the default name.

Note: Activity names cannot be the same as any other activity name in the workflow, they cannot be the same as the workflow's name, they must be less than 100 characters, they must contain at least one alphanumeric character, they cannot be "Name," and they cannot be the same as the activity's runtime type (which is usually only an issue with custom activities).
-
Activity Description
Use the Activity Description to provide descriptive text to help you remember the role that the activity plays in the workflow. All activities contain a default description that you can modify while constructing your workflow.
To modify an activity description
- Add an activity to your workflow by dragging it from the Toolbox Pane and dropping it in the Designer Pane.
- Select the activity in the Designer Pane.
- Under
 Activity Description in the Properties Pane, replace the default description.
-
Server
This property box lets you choose which Forms Server the Invoke Business Process activity will retrieve field values and business process information from.
- Add the Invoke Business Process activity to your workflow definition by dragging it from the Toolbox Pane and dropping it in the Designer Pane.
- Select the activity in the Designer Pane.
- Under Server in the Properties Pane, choose a server from the drop-down menu.
-
Optional: Click the refresh icon
 to update the list of available servers.
Note: If the Forms Server you want to connect to is not configured to work with Workflow, then select Manage servers. Follow the instructions to add a Web service.
Note: You must specify your Workflow Server on the Forms Server Configuration page.
-
Process Initiator
This property sets the process initiator for the Laserfiche Forms Business Process that is being started by this activity.
- Select the radio button next to Workflow system account to set the forms initiator to the workflow system account.
- Select the radio button next to The user from: to select a user from an activity in the workflow.
-
Fields
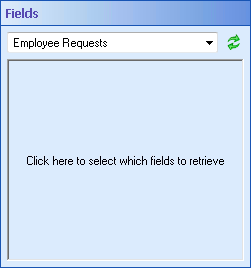
This property box determines which field values the Invoke Business Process activity will make available as process variables.
- Add the Invoke Business Process activity to your workflow definition by dragging it from the Toolbox Pane and dropping it in the Designer Pane.
- Select the activity in the Designer Pane.
- Under Fields in the Properties Pane, use the drop-down menu to choose the Forms process from which you want to retrieve values.
- Click in the box below the drop-down to select fields from that Forms process.
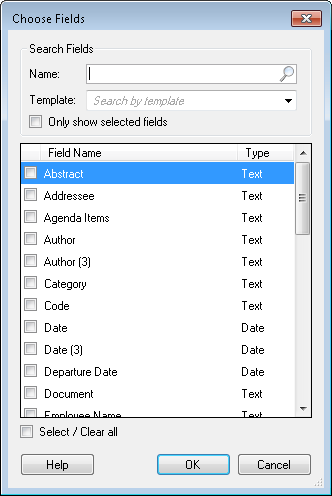
- The Choose Fields dialog box lists the fields, their type, the form they are associated with (if the process has more than one form), and the name of token that stores the field's value. Select the fields you want to retrieve values from.
- The text, drop-down, radio button, and checkbox field types are stored as strings and have the String token tag. Checkbox field types also produce a token for each option. These tokens can have one of two values: True or False. If the checkbox has an "Other" option, another string token is produced that contains the value entered for this option.
- The e-mail field type is stored as a string and has the String and Email token tags.
- The address field type is stored as a string and has the String and Address token tags.
- The date field type is stored as a date/time and has the Date token tag.
- The number and currency field types are stored as numbers and have the Numeric token tag. Currency also has the Currency token tag.
- The file upload field type does not produce a useful token. However, you can use a For Each File activity to perform activities on each uploaded file.
- The table and collection field types do not produce any tokens, but the columns in a table and the fields in a collection are available as multi-value tokens. You can also use the For Each Row activity to perform activities on each item in a table or collection field and to access all columns in a table for a specific row or all fields for a specific item in a collection.
- The rich text field type has the Rich Text token tag. You can send rich text tokens to rich text form fields. You also have the option of converting rich text tokens to plain text before sending them to a form field. See the documentation on form field tokens for more information.
- Optional: To find a particular field or fields, you can narrow the list of fields shown with the following options:
- Name: Begin typing a field name to look for field variables by name.
- Forms: If the forms instance has more than one form associated with it, use the drop-down menu to display fields associated with a specific form.
- Only show selected field variables: Select this option to see only the field variables you have selected.
- Show deleted fields: This option will appear if any fields were deleted from one of the forms associated with the instance, after the form was submitted. You can still retrieve values from deleted fields. Select this option to only see the deleted fields.
- Optional: Select or clear all fields by choosing Select/Clear all at the bottom of the dialog box.
- Optional: Sort the contents of this dialog box by clicking a column header.

Each field is of one of the following types and the token that stores the field's value has a token tag appropriate to its type:

-
Start Options
This property box determines which field values the Invoke Business Process activity will make available as process variables.
Run in Test Mode
Select the checkbox for Run In Test Mode to run the business process in test mode.
Note: Check 'Started by Laserfiche Forms' in 'View Properties‘ for the workflow, and use %(Is BP Instance In Test Mode) to determine the activity if running in test mode.
Example

-
Starting Variable Values
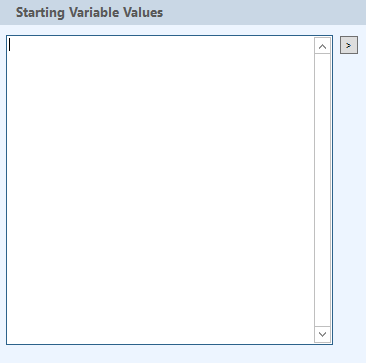
This property sets the values that will be used for the Laserfiche Forms Business Process variables that were retrieved from the Fields property.
To Set a Variable Value
- Under Starting Variable Values, click the form button
 to bring up the token menu and expand the variables item.
 - Choose a variable to place in the text box. If you are checking boxes in a checkbox field, enter the values and separate each value with a comma.
Example: Let's say you create a checkbox called "Checkbox" in a Forms process with three fields called "choice 1," "choice 2," and "choice 3." You only need to check "choice 1" and "choice 3." You would enter the following syntax in the Starting Variable Values box to check the first and third options and leave the second one unchecked:
Checkbox = choice 1,choice 3Note: Because Forms variable names are case sensitive, if the checkbox is called "Checkbox," you must enter "Checkbox = choice 1,choice 3." If it's called "checkbox," enter "checkbox = choice 1,choice 3."
- Type in a value or click the token button (right arrow) to use tokens.
Tip: To replace a token that has a blank value with "DB.NULL," apply the NULL token formatting expression.To always set a column's value to "DB.NULL", insert "%(DB.NULL)".

- Under Starting Variable Values, click the form button


.png)