Viewing and Modifying Fields and Templates
You can view and modify the field and template information applied to an entry in the Fields tab of the Metadata dialog box in the folder browser, or in the Fields tab of the Metadata Pane in the document viewer.
If an entry does not yet have fields assigned to it, you will need to assign them first. Fields can be assigned in a group by template, and/or individually. For information on assigning a template to a document or folder, see Assigning a Template. For information on assigning individual fields, see Choosing Individual Fields.
Administrators can set alternate languages for field and template names. For instance, if your organization includes both English and Spanish speakers, your administrator might provide both "Employee Name" and "Nombre del Empleado" as names for a field in your Employee Information template; if your organization primarily speaks French but has some English speakers, they might name a tag both "Confidentiel" and "Confidential." Which name you will see depends on your language settings in the client. For more information, see Localized Field, Template, and Tag Names in the Laserfiche Administration Guide.
Note: If you do not have the rights to view a particular template, it be displayed as No Template Assigned in the details pane.
To view or modify field and template information associated with an entry
 In the Laserfiche Windows client
- Open the Metadata dialog box or Metadata Pane for any entry.
Tip: You can view and modify metadata for more than one entry at once by selecting multiple entries before opening the Metadata dialog box in the folder browser. See Modifying Fields and Templates on Multiple Entries for more information.
- Select the Fields tab.
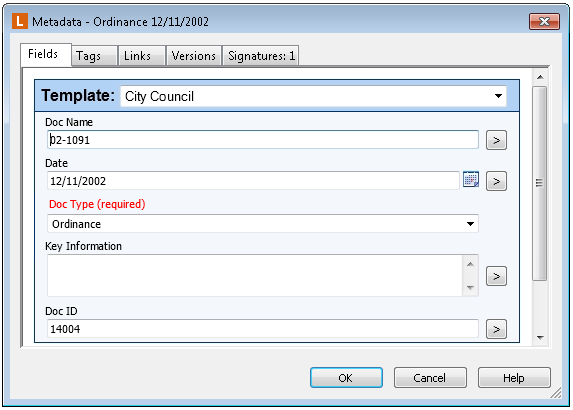
- The template assigned to your entry will be listed in the Template drop-down, at the top of the dialog box. The fields in that template will be displayed beneath it. Any fields that were applied to the entry independent of its template will be displayed beneath the template and its fields. Fields that you have the rights to view but not to modify will be grayed out.
- To modify the value of a field, click in the text box beneath the field name and type a value, or select the drop-down for a list or dynamic field and select a value from those provided. Depending on the type of field, there may be additional considerations to keep in mind:
- Field Types: You will only be able to input valid field values, based on the field's type. For instance, you would not be able to type letters in a number field, and only a date can be stored in a date field.
- Multi-Value Fields: Some fields allow multiple values. When a value is typed in a multiple-value field, another box will open beneath it to allow additional fields to be input.
- Multi-Value Field Groups: Some multi-value fields may be grouped together. In this case, once you have filled out the first group, select the Add (+) button to add additional groups. You can also reorder your groups using the arrow buttons, or remove them using the Remove Group button.
- Dynamic Fields: If your template has dynamic fields, some fields may depend on other fields. For instance, a template might have dynamic fields for "State" and "City" information. In that situation, you would need to choose a value for "State" before choosing a value for "City;" if you tried to choose "City" first, the list would be blank.
- Required Fields: If a field is marked as 'required,' you will not be able to save the document without inputting a value in that field. The field name for required fields displays in red text.
- Field Formatting: Your administrators may have configured a number of date field to display in a particular way. This formatting will automatically be applied to the value you type as soon as you click away from the field. For instance, if you type the value "7.5" in a number field with the Currency format, it will automatically be formatted as "$7.50".
- Field Constraints: If a field has a constraint set on it, only values that match that constraint will be accepted. For instance, if a field constraint requires a telephone number be typed in the format 123-456-7890, you would not be able to type that phone number in as (123) 456-7890.
- If you are working in the Metadata dialog box, click OK to save your changes. If you are working in the Metadata Pane of the document viewer, save the document to save your changes.
In the Laserfiche web client
- Select or open the document or folder whose fields you want to modify.
- In the Properties pane to the right, select the Fields tab.
- The template assigned to your entry will be listed in the Template drop-down, at the top of the dialog box. The fields in that template will be displayed beneath it. Any fields that were applied to the entry independent of its template will be displayed beneath the template and its fields. Fields that you have the rights to view but not to modify will be grayed out.
- To modify the value of a field, click in the text box beneath the field name and type a value, or select the drop-down for a list or dynamic field and select a value from those provided. Depending on the type of field, there may be additional considerations to keep in mind:
- Field Types: You will only be able to input valid field values, based on the field's type. For instance, you would not be able to type letters in a number field, and only a date can be stored in a date field.
- Multi-Value Fields: Some fields allow multiple values. When a value is typed in a multiple-value field, another box will open beneath it to allow additional fields to be input.
- Multi-Value Field Groups: Some multi-value fields may be grouped together. In this case, once you have filled out the first group, select the Add (+) button to add additional groups. You can also reorder your groups using the arrow buttons, or remove them using the Remove Group button.
- Dynamic Fields: If your template has dynamic fields, some fields may depend on other fields. For instance, a template might have dynamic fields for "State" and "City" information. In that situation, you would need to choose a value for "State" before choosing a value for "City;" if you tried to choose "City" first, the list would be blank.
- Required Fields: If a field is marked as 'required,' you will not be able to save the document without inputting a value in that field. The field name for required fields displays in red text.
- Field Formatting: Your administrators may have configured a number of date field to display in a particular way. This formatting will automatically be applied to the value you type as soon as you click away from the field. For instance, if you type the value "7.5" in a number field with the Currency format, it will automatically be formatted as "$7.50".
- Field Constraints: If a field has a constraint set on it, only values that match that constraint will be accepted. For instance, if a field constraint requires a telephone number be typed in the format 123-456-7890, you would not be able to type that phone number in as (123) 456-7890.
- Click Save to save your changes.
Tip: You can view an entry's fields by adding its fields as columns in the folder browser. Once a field has been added as a column, the value of that particular field is displayed in the column. If the field is a multi-value field, only the first value will be displayed in the column; however, if you place your mouse over the first value, a tooltip displaying up to 20 of the field's values will appear. See Assigning Columns for instructions on displaying columns in the folder browser.
Related Topics