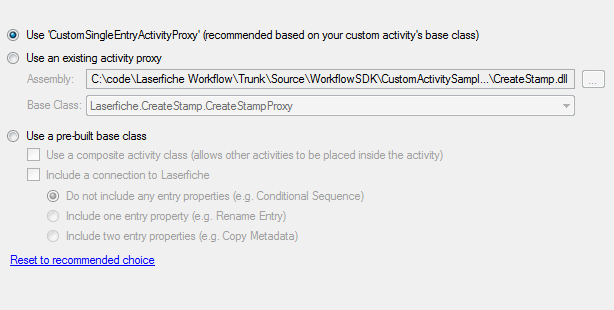
The ![]() Activity Proxy Base Class step of the Activity Proxy Generator allows you to specify a base class for your design-time component.
Activity Proxy Base Class step of the Activity Proxy Generator allows you to specify a base class for your design-time component.
- Use the recommended base class: This option is usually selected by default and is appropriate in most cases.
- Use an existing activity proxy: Select an existing activity proxy as the base class for your new activity proxy. This option can be useful if you are creating an activity that extends an existing custom activity, or if you have a base activity proxy that provides common functionality to multiple derived activity proxies.
- Select Use an existing activity proxy.
- Next to Assembly, click the browse button
 .
. - Browse to the location of the existing activity proxy’s assembly file.
- Select the assembly file, and click Open.
- Next to Base Class, select the activity proxy that you want to use from the drop-down menu.
- Use a pre-built base class: Select from several custom options to use a specific activity proxy base class.
- Use a composite activity class: Select this option if you want to create an activity that allows other activities to be placed inside it.
- Include a connection to Laserfiche: Select this option to allow this activity to connect to Laserfiche. If you select this option, a Connection Profile property will appear in the Properties Pane for the activity. If you select this option and do not select Use a composite activity class, you can also choose one of the following options:
- Do not include any entry properties: Select this option if your activity does not need to interact with a Laserfiche entry. If you select this option, the activity will not have an option to select an entry in its Property Pane.
- Include one entry property: Select this option if your activity acts on a single entry. If you select this option, a property box will appear in the Properties Pane that allows the user to select an entry for the activity to modify, move, copy, or extract information from.
- Include two entry properties: Select this option if your activity interacts with two entries, such as by copying information from one entry to another. If you select this option, two property boxes will appear in the Properties Pane allowing the user to select one entry in each property box.
To select an existing activity proxy:
Example: The Conditional Decision and For Each Row activities are composite activities.
Examples: The Conditional Sequence and Create Entry activities require a connection to Laserfiche but do not act on an existing entry.
Example: The Add Sticky Note and Rename Entry activities modify the entry selected in the Properties Pane.
Example: The Copy Metadata and Move Pages activities both interact with two entries. This option is useful for activities that transfer data from one entry to another.
Hint: You can click the Reset to recommended choice link at the bottom of the page to let the Activity Proxy Generator choose a recommended base class for you.
After choosing a base class, click Next to continue to Step 4: Activity Proxy Properties.
