Web Services
To add a Web service
- Open the Add Web Service dialog box from one of the following places:
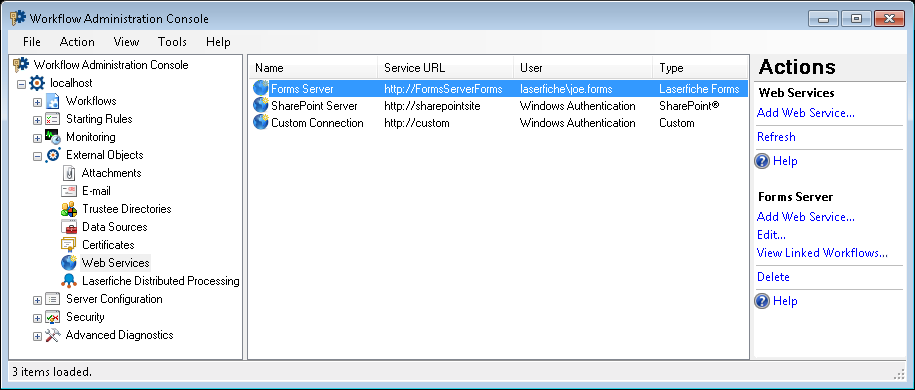
- In the Web Services node of the Workflow Administration Console, click Add Web Service.

- In the Server property box for the Create List Item activity, the Invoke Business Process activity, or the Retrieve Laserfiche Forms Content activity, select the Manage servers from the drop-down menu. Alternatively, select Manage Web services from the HTTP Web Request or HTTP Form Post activity's Web Services property box. In the
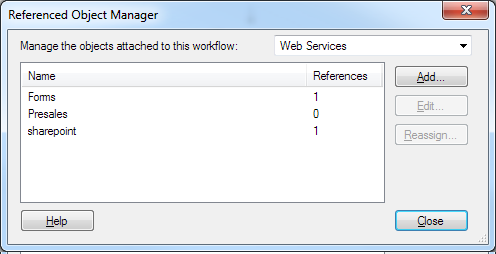
Referenced Object Manager, click Add.
- Select Web Service from the
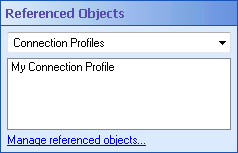
drop-down menu in the workflow's Referenced Objects property box. Click Manage referenced properties. In the Referenced Object Manager, click Add.
Note: The Web Services option only appears if you have already configured one or more Web services with a Create List Item, Retrieve Laserfiche Forms Content, HTTP Web Request, or HTTP Form Post activity. To show the Reference Objects property box, select a blank area in the Designer Pane and click the Advanced button
at the top of the Properties Pane.
Note: If you open a workflow file that refers to a Web service not configured on your Workflow Server, the text [Not found] will be added to the end of the Web service's name. In this situation, click the Add button. The Add Web Service dialog box will be populated with all the properties that were saved with the workflow file. Make any necessary changes, and click OK. Alternatively, if you configure a new Web service from the Workflow Designer with the same name as the Web service that wasn't found, the not-found service will be replaced and all references will be updated. If you configure a new Web service with the same name in the Workflow Administration Console, you will need to manually assign the new Web service to each activity.
- In the
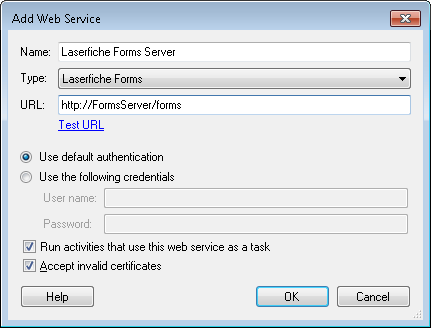
 Add Web Services dialog box, configure the following:
 - Name: Type a name for the Web service. The name you provide here will appear as an option for the Workflow activities that can interact with Web services, so ensure the name is clear and informative.
- Type: Select the type of Web service you want to connect to.
- Laserfiche Forms
- SharePoint
- Exchange
- Custom
- AI
- URL: Type the website for the Web service you want to connect to. Click Test URL to ensure that the URL is correct and that Workflow can connect to the Web service.
- Specify your login information for the Web service. Choose to Use default authentication to log into the Web service with the Windows name and password you are currently logged in with. Alternatively, choose to Use the following credentials and provide a user name and password that can access the Web service.
Note: To configure a Forms server, you must login as user who has the Creator role on the Forms server. More information.
- If connecting to a Microsoft 365 Exchange service, select Use OAuth and provide the credentials necessary for that service:
- Username: The username of the account associated with the mailbox.
- Application (client) ID: This is the application ID assigned to your app. The ID can be found in the Microsoft Azure portal.
- Tenant ID: The directory tenant that granted the app the permissions requested, in GUID format. The ID can be found in the Microsoft Azure portal.
- Client secret: The client secret generated for the app in the Microsoft Azure portal.
- Scopes: Define the specific Microsoft 365 Exchange permissions your application is requesting from Microsoft Entra ID during OAuth authentication.
- Microsoft Entra ID endpoint: The URL of your organization’s Microsoft Entra (Azure AD) authorization service.
Note: You must create an app registration within the Microsoft 365 or Azure management portal to obtain the information necessary. When registering for Exchange API access, the Exchange user created for this purpose must have "full_access_as_app" permissions with full access to all mailboxes.
Note: For Exchange Online, set the URL according to details found at Microsoft's App Registration and Token Service Root Endpoints resource.
Microsoft Graph global service:
URL: https://outlook.office365.com/ews/exchange.asmx
Scope: https://outlook.office365.com/.default
Microsoft 365 GCC High environment:
URL: https://outlook.office365.us/ews/exchange.asmx
Scope: https://outlook.office365.us/.default
Microsoft 365 DoD environment:
URL: https://outlook-dod.office365.us/ews/exchange.asmx
Scope: https://outlook-dod.office365.us/.default - If connecting to a Sharepoint service and OAuth is required for authentication, select Use OAuth 2.0 and provide the credentials necessary for that service.
- Authorization Endpoint: The Microsoft Entra ID URL used to authenticate users and obtain consent when connecting to the SharePoint service with OAuth.
- Token Endpoint: The Microsoft Entra ID URL used to exchange authorization codes for access tokens when connecting to the SharePoint service with OAuth.
- Application (Client) ID: This is the application ID assigned to your app. The ID can be found in the Microsoft Azure portal.
- Tenant ID: The directory tenant that granted the app the permissions requested, in GUID format. The ID can be found in the Microsoft Azure portal.
- Scopes: Define the level of access your application is requesting from the web service. Enter scope as offline_access https://{Default Site Collection URL}/AllSites.Write
- Default Site Collection URL: The default site URL of user's SharePoint server, formatted as https://companyname.sharepoint.com
- Authorize: After configuration is complete for OAuth, use the Authorize button to finalize setup before saving.
Note: See Prerequisites for Configuring SharePoint with OAuth using Azure Apps.
Note: Supported SharePoint versions include SharePoint 2013 and later for on-premises installations and SharePoint in Microsoft 365 for online applications.
- If connecting to a Custom web service and OAuth is required for authorization, select Use OAuth 2.0 authentication and provide the client credentials necessary for that service:
- Grant Type: Client Credentials
- Token Endpoint: The URL provided by the authentication server where your application requests an access token. This token is required to authenticate API requests and access protected resources.
- Client Authentication: Specifies how the client credentials are sent to the authentication server.
- Send client credentials in body: Include the client ID and secret in the body of the token request.
- Send as Basic Auth Header: Include the client ID and secret encoded in the Basic Authentication header. This option requires a Client Password.
- Send as Bearer Auth Header: Include the client access token in the Bearer Authorization header. This option requires a Client Password.
- Application (Client) ID: This is the application ID assigned to your app. The ID can be found in the portal where the app was registered.
- Client Secret: The client secret generated for the app in the app registration portal.
- Scopes: Define the level of access your application is requiresting from the web service. Note: User should create application in specific product and the application that supports client credentials or authorization code flow. So the settings in custom web service depends on the application created by the end user.
Note: You must create an application within the specific product you're connecting to. The application must support client credentials. The settings for a custom web service depend on the application created.
- If connecting to an AI web service:
- OpenAI requires an API key.
- Local LLMs will work with either default authentication or specified credentials, depending on the model and machine location.
- OpenAI-compatible is currently the only service type supported.
- The supported list of LLMs can be found here.
- Advanced: Clear the Run activities that use this Web service as a task to run these activities within Workflow. Selecting this option runs these activities as external processes, freeing Workflow resources. Clearing this option will use more Workflow resources but can make the activity run more quickly. We recommend leaving this option selected unless otherwise directed by your Workflow administrator.
- Advanced: Clear Accept invalid certificates to only accept valid certificates from the Web service. You may want to clear this option if a secure connection to this Web service is important; however, in many cases, this level of security is not necessary. Select this option to accept invalid, out-of-date, or self-signed certificates from the Web Service.
- Advanced: Select Specify client certificate and use the dropdown to select a certificate if the server requires 2-way TLS.
- Click OK to save the web service properties.
Note: The URL must start with http:// or https://.
Note: To connect to a Laserfiche Forms server, you must first specify your Workflow Server on the Forms Server Configuration page. If the Workflow Server is not specified in Forms, Workflow will receive an HTTP (401) Unauthorized error when connecting to the Forms server, and the Forms server will record a "WFAPIAccessDenied" event log message with additional details.
Important: If you are using an HTTP connection and provide a user name and password (as opposed to using default authentication), this information may be sent unencrypted and unsecured over your network.
To modify a Web service
- Select a Web service in the Web Services node of the Workflow Administration Console and click Edit. Alternatively, open the Referenced Object Manager from the Referenced Objects property box, select a Web service, and click Edit.
- Make any desired changes to the Web service's URL, type, authentication, or advanced task settings in the Edit Web Service dialog box.
- Click OK.
To delete a Web service
- In the Web Services node of the Workflow Administration Console, select a Web service.
- Click Delete under the Web service's name in the Actions Pane, or right-click the Web service and select Delete.
To assign a different Web service to multiple activities in a workflow
Example: The ABC Company has a new SharePoint server. Instead of individually updating each activity that accesses the old SharePoint server, you can update all the activities once with the Reassign option.


