Business Process Step
This activity defines and reports on an individual step in the business process. The Business Process Step activity lets you configure the following:
- The name of the particular step in your business process
- A due date that the step should be completed by
- Step participants
- Instructions and resolutions for the step
- A reporting identification number to be used for business process reporting
See the tokens this activity produces.
- Drag it from the Toolbox Pane and drop it in the Designer Pane.
To configure this activity
Select the activity in the Designer Pane to configure the following property boxes in the Properties Pane.
-
Activity Name
Once added to a workflow definition, the default name of an activity can be changed. Providing a custom name for an activity helps you remember the role it plays.
To name an activity
- Add an activity to your workflow by dragging it from the Toolbox Pane and dropping it in the Designer Pane.
- Select the activity in the Designer Pane.
- Under Activity Name in the Properties Pane, replace the default name.

Note: Activity names cannot be the same as any other activity name in the workflow, they cannot be the same as the workflow's name, they must be less than 100 characters, they must contain at least one alphanumeric character, they cannot be "Name," and they cannot be the same as the activity's runtime type (which is usually only an issue with custom activities).
-
Activity Description
Use the Activity Description to provide descriptive text to help you remember the role that the activity plays in the workflow. All activities contain a default description that you can modify while constructing your workflow.
To modify an activity description
- Add an activity to your workflow by dragging it from the Toolbox Pane and dropping it in the Designer Pane.
- Select the activity in the Designer Pane.
- Under
 Activity Description in the Properties Pane, replace the default description.
-
Step Name
The Step Name property box allows you to define whether the name of the step will be updated by the Business Process Step activity. By default, the activity name will be used as the step name. See the tokens this activity produces.
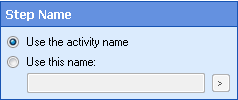
Example: John wants to rename a business process step to include information about the step's action. He selects Use this name and types in %(EntryName). This will create a dynamic step name that will change based on the entry being processed.
Configure the Step Name
- Use the activity name: This option lets you choose if the step name will be reported as the activity name as configure in the Properties Pane.
- Use this name: Type a name for the step. To use tokens, click the Token button (right arrow)
 .
.
-
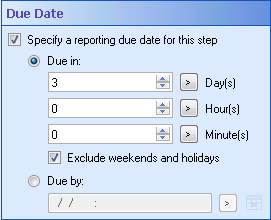
Due Date
The Due Date property box allows you to define a due date for this step in your business process. This information will be shown in the Business Process Details in the Laserfiche client applications and is used for reporting and notification purposes only. Setting a due date will not affect the progress of the business process. Learn how to configure a deadline.
Tip: In the Laserfiche Client and Web Access, you can search for entries associated with business processes. To search for entries whose business process has stopped at an overdue step, you can edit the business process's status to reflect that it is overdue. First, put an Escalation activity inside the Business Process Step activity and configure it so its escalation time uses the Business Process Step activity's Due Date token: %(BusinessProcessStep_Due Date). Then, drag the Update Business Process activity from the toolbox and drop it inside the escalation branch. Configure the Update Business Process activity so that it updates the status of the business process to include "Overdue."
How does it work? If the Business Process Step activity reaches its due date, the escalation branch will run and the Update Business Process activity will set the status of the business process to "Overdue." You can then search by status in the Laserfiche client application's search to locate overdue entries.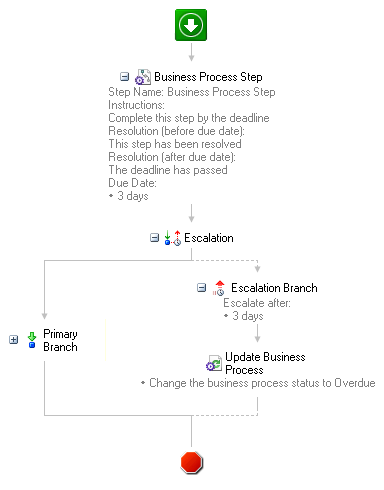
To configure the Due Date
- Add the Business Process Step or Update Step Due Date activity to your business process definition by dragging it from the Toolbox Pane and dropping it in the Designer Pane.
- Select the activity in the Designer Pane.
- In the Due Date properties box, in the Properties Pane, select Specify a reporting due date for this step. The following options will become available:
- Due in: Select the number of days, hours, and/or minutes before the step will be due. Click the token button (right arrow)
 to use tokens. To exclude weekends and holidays, select Exclude weekends and holidays.
 - Due by: Define a date and/or time that the step must be completed by. Type a due date in the field, or click the token button (right arrow)
 to use tokens.
Note: Configure custom weekends and holidays in the Holidays and Weekends node of the Workflow Administration Console.
Note: If you do not input a time, the due date will default to 12:00:00 AM of the specified day.
Tip: If you update a due date (in the Update Due Date activity) and only specify a new time, the original date will be retained.
-
Step Instructions
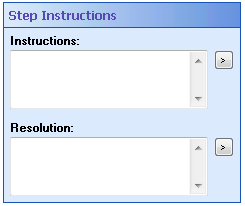
The Step Instructions property box allows you to define instructions, as well as describe the resolution, or conclusion, of the Business Process Step activity. These instructions and resolutions will appear in the Business Process Details in the Laserfiche Client or Web Access and in the Details tab of the business process's instance details and can be used to tell the participant what their responsibility is for that business process step. This panel provides reporting information for the business process. These properties are optional.
To configure Step Instructions
- Add the Business Process Step activity to your workflow definition by dragging it from the Toolbox Pane and dropping it in the Designer Pane.
- Select the activity in the Designer Pane.
- Configure the Step Instructions in the Properties Pane by completing one or all of the following fields:
- Instructions: Type instructions for this step in the business process. These will appear, when the step is in progress, in the Business Process Details of the Laserfiche client applications and can be sent in Workflow Notifications. Click the Token button (right arrow)
 to use tokens.
 - Resolution: Type a conclusion for the current Business Process Step activity. The Resolution will be displayed after the Business Process Step activity is completed.
If the Due Date property box is configured, two types of resolutions are possible: one that will be shown before the due date occurs and one that will be displayed if the business process step is completed after the due date occurs.
- Before due date: This conclusion will be displayed if the business process step is finished before the due date occurs. Click the Token button (right arrow)
 to use tokens.
 - After due date: This conclusion will be displayed if the business process step is finished after the due date. Click the Token button (right arrow)
 to use tokens.
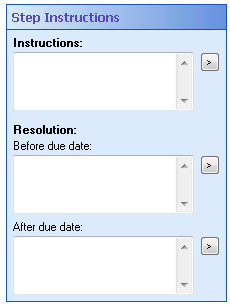
Note: The resolution occurs after the step has been completed and it will be displayed in the Business Process Details.
-
Participants
In a business process, the participant is the user or group who is responsible for a specific step in a business process. Each participant is allotted a business process role that is used for configuring Workflow notifications. You can also configure instructions that will be displayed business process details and can be sent as an email via the Workflow Notification System.
The Participants property box, in the Business Process Step activity, lets you define which trustee(s) will be involved in that specific step of the business process.

To configure Participants
- Add the Business Process Step activity to your workflow definition by dragging it from the Toolbox Pane and dropping it in the Designer Pane.
- Select the activity in the Designer Pane.
- Under Participants in the Properties Pane, click Add Participant. Or, you can manage business process roles by clicking the Manage Roles link.
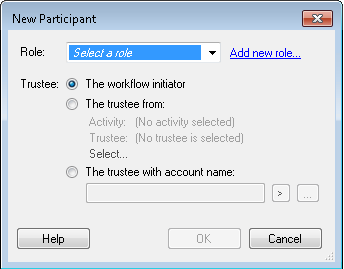
- From the New Participants dialog box, select a previously configured Role or configure a new role by clicking the Add new role link to open the Role Editor dialog box.
- Select the trustee who will act as the role's participant in the current business process step.
- The workflow initiator: The option will list the user who started the workflow as the Business Process Step participant.
- The trustee from: Option allows you to select a trustee that was involved in a previous step in the current workflow definition. More information.
- The trustee with account name: This option lets you select a user or group from the Laserfiche Administration Console. Type in the trustee's name, click the Token button
 to use tokens, or click the ellipsis button
  to browse for a trustee.
Note: Tokens must have the User Name token tag in order to show up in this token menu.
Note: Each role can only be assigned once per business process step, however, a single trustee can be assigned multiple roles with a step. You can also add as many participants as required in your Business Process Step activity.
-
Advanced Properties
Click the Advanced button
 at the top of the Properties Pane to view and configure these properties.
This property box allows you to assign a custom identification number to the business process step for advanced reporting. This property box is found in the Properties Pane associated with the Business Process Step activity. You can associate steps of like type by configure them with the same reporting ID. This way, they will be evaluated together during reporting.
Example: A business process runs a Parallel activity with three branches, one for each department in a company. Each branch contains a similar business process step and each step is assigned the same reporting ID. When viewing the business process details, the step duration will be calculated from the average time it took for the step in each branch of the parallel to complete.
To configure the reporting ID
- Make sure the Business Process Step activity is selected in the Designer Pane.
- Click the Advanced button
 at the top of the Properties Pane to see this property box.
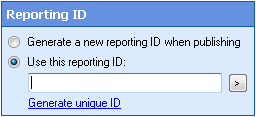
 - In the Reporting ID property box, select one of the following options:
- Generate a new reporting ID when published: This option is selected by default. Workflow will automatically generate and assign a new reporting ID for each step in a business process instance.
- Use this reporting ID: This option allows you to generate a static reporting ID. To use tokens, click the Token button (right arrow)
 .
.
Tip: Using a custom reporting ID allows you to specify the same reporting ID number for any Business Process Step activities that you want to be evaluated together during reporting.
The Business Process Step activity produces the following tokens.
| Name* | Description | Sample Syntax** |
|---|---|---|
| Role Display Name |
The display name of the Business Process Step participant. |
%(BusinessProcessStep_Role Display Name) |
| Role Account Name | Laserfiche account name of the Business Process Step participant. | %(BusinessProcessStep_Role Account Name) |
| Role E-mail | Email address of the Business Process Step participant. | %(BusinessProcessStep_Role E-mail) |
| Reporting ID | The identification number assigned to the step in the business process instance. This number is used for reporting purposes. | %(BusinessProcessStep_Reporting ID) |
| Instructions | The instructions for the step as configured in the Step Instructions property box or as updated by the Update Step Instructions activity. | %(BusinessProcessStep_Instructions) |
| Due Date |
The due date assigned to the specific Business Process Step activity in the Due Date property box or in the Update Step Due Date activity. |
%(BusinessProcessStep_DueDate) |
| Is Overdue | If a due date is configured, this token's value will be either "True" or "False." | %(BusinessProcessStep_Is Overdue) |
| Resolution | The resolution for the step as configured in the Step Instructions property box. | %(BusinessProcessStep_Resolution) |
*"Role" will change depending on the role configured in the Participants property box.
**"BusinessProcessStep" will change to match the name specified in the Activity Name property box.
Note: All non-alphanumeric characters, except underscores, are removed from the name. For example, if you rename the activity Assign-to-@Initiator, the syntax for the Role Display Name token will be: %(AssigntoInitiator_Role Display Name).

