Selecting Entries
The process for choosing an entry is different for activities and conditions.
Selecting Entries for Activities
Some activities interact with entries other than the starting entry. These include:
- Activities that return or create entries.
- Activities that interact with entries returned or created by another activity. .
- The condition dialog box in the Conditional Parallel, Conditional Sequence, Repeat, and Routing Decision activities lets you choose entries to specify conditions for. More information.
- The Wait Conditions tab of the Route to Folder, Route to Group, and Route to User activities lets you choose an entry to specify conditions for. More information.
Create Entry, Find Entry, Find Entries, Move Entry, Replicate Entries, Retrieve Shortcuts, Routing Activities (Action), and Search Repository.
Assign Field Values, Associate Entries, Assign Rights, Assign Tags, Attach Electronic Document, Change Starting Entry, Copy Metadata, Create Link, Delete Annotation, Delete Document Signatures, Delete Entry, Delete Shortcuts, Email (Attachments), Fill Out PDF Form, For Each Entry, Generate Web Access URL, Generate WebLink URL, Get Digital Signatures, Invoke Workflow, Migrate Entry, Move Entry, Move Pages, Retrieve PDF Form Contents, Rename Entry, Replicate Entries, Retrieve Field Values, Retrieve Text, Route Entry to Folder, Route Entry to Group, Route Entry to User, Script, SDK Script, Set Entry Owner, Sign Document, Verify PDF Signatures, and Wait for Entry Change.
To select which entry or entries an activity will act on
Note: Not all activities allow you to choose which entries they will act on. Some activities will only act on the starting entry.
- Add an activity to your workflow by dragging it from the Toolbox Pane and dropping it in the Designer Pane.
- Select the activity in the Designer Pane.
- In the Properties Pane, in the appropriate property box, choose which entry the activity will act on.
- Starting Entry: The entry the workflow began with.
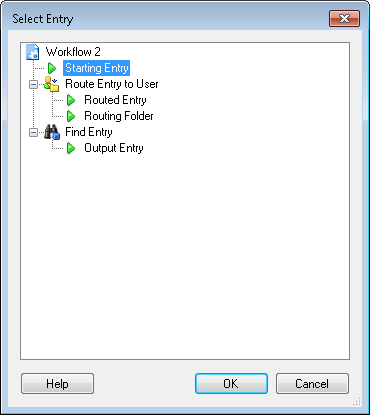
- Other Entry: To choose an entry that was returned or created in a previous step in the current workflow, click the Select link and choose an entry from the Select Entry dialog box.
Note: Some activities do not have the starting entry selected by default. If you are configuring one of these activities, click the Select link to choose an entry for the activity to act on.
Selecting Entries for Decision Conditions
Many flow control activities require you to specify decision conditions that define when the activity, or a branch of the activity, will run.
For some decision conditions, you must define the entry the condition refers to.
To select an entry for a decision condition
- In the condition editor, click a condition's first set of blue underlined text. If no such text appears, you do not need to specify an entry for that condition.
- The Select Entry dialog box will open. Click the green arrow next to the returned or generated entries you want to use.
- Click OK.
Selecting Entries for Wait Conditions
To select entries for wait conditions
- Add a Route Entry to User, Route Entry to Group, or Route Entry to Folder activity to your Workflow Definition by dragging it from the Toolbox Pane and dropping it in the Designer Pane.
- Select the activity in the Designer Pane.
- Under Routing Options in the Properties Pane, click any of the icons to open the Routing Activity Options dialog box.
- Select the Wait Conditions tab.
- Click No condition set. Click here to create one. More information.
- Define for which entry these conditions must be met for the workflow to continue. From the top drop-down menu, select one of the following.
- Input entry: The wait conditions must be satisfied for the entry specified in the Entry property box. More information.
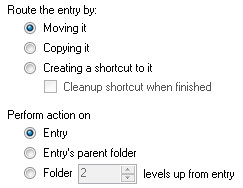
- Routed Entry: The wait conditions must be satisfied for the routed copy of, or shortcut to, the input entry as defined in the activity's Action tab. (If you chose to move the input entry, the routed entry is the same as the input entry.)
- Routing Folder: The wait conditions must be met for the folder the routed entry is inside.
Example: Bob wants to route shortcuts of all incoming resumes to the applicants' folders. When an applicant's folder also contains an entry named Recommendations, he wants the workflow to continue. In this situation, Bob selects to Route the entry by Creating a shortcut to it and to Perform action on Entry in the Action tab. In the Wait Condition tab, he selects Routing Folder and specifies that the folder must contain an entry named Recommendations for the workflow to continue.


